Introduction
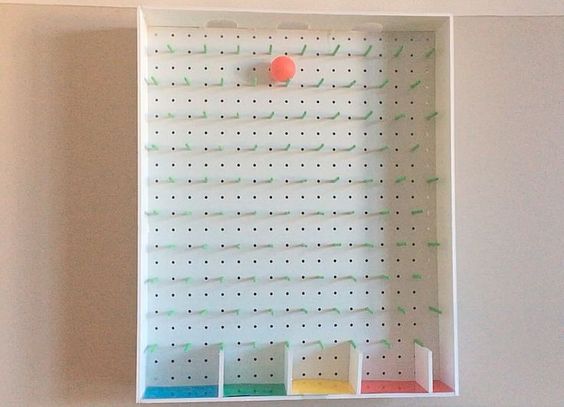
A classroom Plinko board is an exciting and interactive tool that can be used to engage students in learning, motivate them with rewards, and spice up classroom activities such as reviews and quizzes. Inspired by the popular game show “The Price is Right”, the Plinko board uses gravity, bouncing pegs, and a bit of luck to delight students. In this article, we’ll walk you through the process of creating your own classroom Plinko board and share some ideas on how to incorporate it into your teaching strategies.
Materials You’ll Need
- A large foam board or sturdy cardboard (approx. 3×4 feet)
- Dowel rods or wooden skewers
- Ping pong balls or small tokens
- Cups or containers for catching the falling tokens
- Hot glue gun with glue sticks or strong adhesive tape
- Markers or stickers for labeling the board
Step-by-Step Guide to Making a Classroom Plinko Board
- Determine the size of your Plinko board based on the available space in your classroom.
- Lay out your foam board or cardboard on a flat surface and use markers to plot out evenly-spaced rows for your dowel rods or skewers. The more rows you create, the more bounces the token will make as it falls.
- Poke holes in the foam board or cardboard along the grid points you’ve marked for the rows.
- Cut dowel rods or wooden skewers to equal length (approx. 3-4 inches).
- Insert one end of each dowel rod or skewer into a corresponding hole on your board, angling it so that it points slightly upwards toward the opposite edge of the board.
- Use hot glue or strong adhesive tape to secure each dowel rod into place.
- Attach cups or containers to the bottom of your board to catch the falling tokens. Label each container with a point value, reward, or review question.
- Customize your Plinko board by adding stickers, decorations, or markers to the board.
Incorporating the Plinko Board into Classroom Activities
1. Rewards: Assign point values to each of the containers at the bottom of your Plinko board and use it as a way to reward students for positive behavior, good grades, or participation in class.
2. Reviews: Prepare review questions for each container and have students answer questions based on where their token lands after dropping it onto the Plinko board.
3. Quizzes: For a fun spin on traditional quizzes, create a Plinko-based quiz by placing questions or topics in each container and having students answer them as they play.
4. Vocabulary practice: Use the Plinko board to help students review vocabulary words by having them create sentences using the words associated with each container they land on.
5. Icebreakers: To get students interacting with one another, use the Plinko board as an icebreaker activity with containers labeled with conversation-starting topics or questions.
With a bit of creativity and effort, you can make your classroom environment more interactive and enjoyable by incorporating a DIY Plinko board into your teaching repertoire. Happy crafting and teaching!


