EdTech News

Teach in the City? A Comprehensive Fire Safety Guide for Your Students

Introduction:

As a teacher in the city, it’s essential to prioritize fire safety education for your students. Teaching them these valuable life skills could be lifesaving, as city living often comes with increased fire risks due to dense populations and shared housing arrangements. Ensure your students are well-equipped to handle emergency situations by sending this comprehensive fire safety guide home with them today.

1. Fire Prevention at Home

Make sure your students understand that fire prevention starts at home by teaching them these crucial tips:

– Keep flammable objects away from heating appliances and open flames

– Never leave cooking unattended

– Test smoke alarms regularly and ensure batteries are replaced when needed

– Use surge protectors for electronic devices and avoid overloading outlets

2. Design an Escape Plan

It’s important that every student discusses creating an escape plan with their family. This should include:

– Identifying two exits from each room (if possible)

– Drawing a map of the home and marking escape routes

– Choosing a designated meeting spot outside the building

– Practicing the escape plan regularly

3. Educate Students on How to React During a Fire

Students should be able to identify actions they can take during a fire:

– Stay low and crawl beneath smoke

– Check doors for heat before opening them

– Use an escape ladder if necessary

– If trapped, seal off the room by closing doors and covering vents or cracks around doors

4. Know When to Stop, Drop, and Roll

Ensure your students understand what to do if their clothing catches on fire – stop, drop to the ground, cover their face, and roll back and forth until the flames are extinguished.

5. Properly Using Fire Extinguishers

Teaching your students about fire extinguishers is crucial for them to know how to handle small fires safely:

– Remember the acronym PASS (Pull, Aim, Squeeze, Sweep)

– Pull the pin on the extinguisher

– Aim at the base of the fire

– Squeeze the handle to release the extinguishing agent

– Sweep from side to side until the fire is extinguished

6. Call for Help

Students need to know when and how to call for help during a fire emergency:

– Dial 911 (or your local emergency number) immediately after ensuring personal safety

– Provide accurate location details and describe the situation calmly and clearly

Conclusion:

As a city teacher, it is your responsibility to equip your students with the knowledge and skills needed to face potential fire hazards. With this comprehensive guide in their hands, you are helping them and their families establish essential routines that could save lives in case of emergency. Send this fire safety guide home with your students today and encourage them to take action on what they’ve learned.

We Discovered the Easiest Way to Create a Yearbook

Introduction:

Yearbooks are an essential part of capturing memories and preserving the moments that define our lives. From student achievements and team accomplishments to friendships and candid captures, a yearbook is a time capsule for future generations to look back upon. However, creating a yearbook can be a challenging and time-consuming endeavor. But worry not! We have discovered the easiest way to create a yearbook, making this task simpler and more enjoyable for all.

Step 1: Assemble Your Yearbook Team

Start by assembling a dedicated and passionate team of individuals who are excited about the project. This team should consist of students, faculty members, and even parents who are willing to contribute their time and efforts to make the yearbook a success.

Step 2: Choose an Effective Online Yearbook Platform

Selecting an online yearbook platform drastically simplifies the yearbook-making process. These platforms offer user-friendly tools that allow you to design and customize your yearbook with ease. Some popular choices include TreeRing, Picaboo Yearbooks, Shutterfly, and Walsworth Yearbooks.

Step 3: Plan Your Yearbook Structure

Develop a comprehensive outline of the yearbook’s structure. This includes deciding on sections such as academics, sports, clubs, events, portraits, and any additional areas specific to your school. It’s also crucial to determine page designs, fonts, layout styles, colors schemes, and overall aesthetics.

Step 4: Gather Content for Each Section

Organize teams of student photographers and writers to cover events throughout the school year. Encourage them to capture candid moments in addition to scheduled events like sports games or performances. A Google Drive or Dropbox account can help streamline collaboration by allowing members to upload photos, write-ups, captions, quotes, and more.

Step 5: Create Drafts & Revise

Upload the content and start piecing together each section using your yearbook platform’s tools. Collaborate with your team to edit, revise, and proofread the text before finalizing layouts and designs.

Step 6: Additional Features

Consider incorporating additional features such as video clips, embedded slideshows, or interactive pages to create a more engaging digital yearbook experience.

Step 7: Review & Approve Final Draft

Have multiple individuals thoroughly review the final draft to check for errors or any missing information. Once everyone is satisfied with the result, move forward with finalizing the order on your chosen platform.

Step 8: Order & Distribution

Place your order with the chosen company and ensure that the proper number of yearbooks are ordered for distribution to students. Allow time for printing and shipping to give distributors a buffer for any unforeseen issues.

Conclusion:

Creating a yearbook no longer has to be daunting! By following these steps, you will have an organized system in place that simplifies the process while still producing an amazing finished product. Get ready to provide your school community with a cherished keepsake that captures memories for years to come.

Check Out These Amazing Free Resources for Engaging Kids in Climate Learning

Introduction:

Climate change is an urgent issue that affects everyone on the planet, and it’s essential to educate future generations about its causes and impacts. If you’re looking to engage kids and teens in climate learning, there are numerous free resources available to help make the process fun and informative. In this article, we’ve compiled a list of these amazing resources to enhance climate education for kids of all ages.

1. NASA Climate Kids (https://climatekids.nasa.gov/)

The National Aeronautics and Space Administration (NASA) offers a comprehensive website dedicated to teaching children about climate change, complete with interactive games, engaging articles, and even an animated series. Topics include weather patterns, renewable energy sources, and how kids can take action against climate change.

2. Climate Literacy & Energy Awareness Network (CLEAN) (https://cleanet.org/)

CLEAN is a collection of over 700 various learning tools specifically designed to engage students in climate-related subjects. Their resources include high-quality interactive simulations, informative videos, and lesson plans – all targeted at different grade levels.

3. Global Weirding with Dr. Katharine Hayhoe (https://www.globalweirdingseries.com/)

Dr. Katharine Hayhoe, a renowned climate scientist, hosts this YouTube series covering various aspects of climate change in an engaging way. The videos use storytelling techniques mixed with scientific facts to help viewers understand complex topics related to climate science.

4. The National Oceanic and Atmospheric Administration (NOAA) Climate Education Resources (https://www.noaa.gov/education/resource-collections/climate)

NOAA’s extensive collection of educational resources can help children better understand the science behind weather patterns and their relation to our earth’s overall health. NOAA offers materials such as data visualizations, toolkits for educators, multimedia presentations, and games aimed at simplifying the complex world of climate science.

5. Climate Kids – The Earth Institute, Columbia University (https://climatekids-education.explainingclimatechange.com/)

This resource provides diverse educational materials in alignment with the Next Generation Science Standards (NGSS). Find inquiry-based activities that focus on resilience, climate change’s impacts, and potential solutions—ideal for both educators and parents seeking to engage children in climate education.

6. Project Learning Tree (https://www.plt.org/)

Project Learning Tree is an environmental education organization offering climate-related learning opportunities for various age groups. Their lessons and classroom activities focus on core subjects like science, technology, engineering, and mathematics as they relate to the environment and climate change.

7. Tiki the Penguin’s Guide to Energy and Climate Change (http://tiki.oneworld.org/energy/tour.html)

This inviting website featuring Tiki the Penguin aims to teach children about energy use and its impacts on our planet. The resources include engaging illustrations, activities, and quizzes that foster an interest in climate education in young learners.

Wrapping Up:

Climate change is one of the most pressing issues facing humanity today. To ensure that future generations are well-equipped to deal with its challenges and work towards meaningful solutions, it is crucial to educate them from an early age. Utilize these free resources to engage kids in climate learning that is both enjoyable and informative.

Ask the Experts: Educators’ Questions About Vaping, Answered

Introduction

The growing concern surrounding the rise in youth vaping has educators and parents seeking answers to better address the issue. Vaping, also known as using electronic cigarettes or e-cigarettes, has been trending among young people and can have negative health consequences. In an effort to provide accurate information and guidance, we’ve gathered a panel of experts who will answer some of the most commonly asked questions related to vaping.

Question 1: What are the health risks associated with vaping?

Answer: The long-term effects of vaping are still being studied, but current research suggests that e-cigarettes are not safe and can pose significant health risks. Some potential risks include addiction, damage to the developing brain, lung disease, increased heart rate, and multiple other side effects. The harmful substances found in e-cigarette vapor may also cause respiratory issues and weaken the immune system.

Question 2: How can educators help students make healthier choices about vaping?

Answer: Educators play a crucial role in promoting a healthy and safe environment for their students. They can achieve this by providing accurate information about the dangers of vaping, promoting open discussions on the topic in class or during school assemblies, as well as encouraging positive peer pressure against substance use.

Question 3: How do you identify students who might be struggling with nicotine addiction?

Answer: There are several signs that might suggest a student is struggling with nicotine addiction such as frequent irritability, restlessness, inappropriate use of e-cigarettes during school hours or on school property, chronic bad breath or coughing, and a decline in academic performance. By closely monitoring student behavior and communicating concerns to parents or guardians, educators can be instrumental in identifying those at risk.

Question 4: What resources are available for schools to navigate this issue?

Answer: Schools can access various resources to help them address vaping among students. Organizations such as the American Lung Association, the CDC, and the FDA offer comprehensive guidelines and educational material. Schools can also seek local partnerships with healthcare professionals, addiction recovery centers, and other experts to provide valuable seminars and workshops tailored to their community’s needs.

Question 5: How can parents be involved in addressing vaping in schools?

Answer: Parents are an essential partner in combating youth vaping. They can be actively involved by staying informed about the issue, monitoring their child’s behavior for signs of vaping or nicotine addiction, and engaging in open communication with school staff to foster a collaborative approach. Parent-teacher associations (PTAs) and other parent groups can also act as liaisons between schools and communities to share resources and promote awareness campaigns.

Conclusion

Addressing the prevalence of vaping among students is a substantial challenge for educators, parents, and communities alike. By seeking answers from experts, fostering open communication, and utilizing available resources, schools can create supportive environments that encourage students to make healthier choices and combat the dangerous trend of vaping among young people.

Understanding Magnet Schools: A Detailed Overview

Introduction

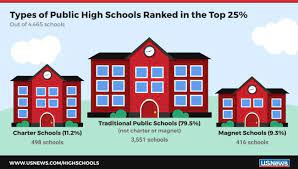
Magnet schools have become a popular option for many parents and students in search of a more specialized and dynamic educational experience. These innovative public schools offer unique opportunities that cater to diverse learning needs and interests. This article will provide an in-depth look at magnet schools, exploring their history, purpose, benefits, and key characteristics.

History of Magnet Schools

The concept of magnet schools originated in the United States during the 1970s as a response to racial segregation in public education. Magnet schools were designed to encourage voluntary desegregation by attracting students from various socio-economic backgrounds, ethnicities, and races. By creating specialized programs with unique offerings, these schools aimed to draw students from outside their immediate neighborhoods and promote diversity.

Purpose of Magnet Schools

The primary purpose of magnet schools is to offer specialized curriculums that focus on areas such as arts, technology, science, and language immersion. This allows students to pursue their interests and excel in subjects they are passionate about. In addition, magnet schools provide an inclusive environment that fosters critical thinking, collaboration, communication, and creativity – essential skills for success in today’s global society.

Benefits of Magnet Schools

1. Diverse Learning Environments: Magnet schools promote inclusivity and understanding by bringing together students from different cultural backgrounds and experiences.

2. Innovative Programs: These schools are known for their exceptional programs that cater to various learning styles and abilities.

3. Academically Challenging Curriculums: Students at magnet schools often benefit from rigorous coursework suited to their interests.

4. Smaller Class Sizes: Many magnet schools feature smaller class sizes, facilitating personalized attention from teachers and fostering strong relationships among students.

5. Greater Parental Involvement: Parents of magnet school students tend to be committed to the school community by actively participating in events and ensuring the growth of these institutions.

Key Characteristics of Magnet Schools

1. Admissions: Magnet schools often have a competitive admissions process, including applications, interviews, and entrance exams.

2. No Geographic Boundaries: Students can attend magnet schools irrespective of their residential zones.

3. School Culture: These schools typically emphasize a strong sense of community and shared values among their students, teachers, and parents.

4. Highly Qualified Faculty: Educators at magnet schools are experts in their respective fields and bring passion for teaching to the classroom.

5. Publicly Funded: Though they offer specialized curriculums, magnet schools are funded through public revenues.

Conclusion

Magnet schools stand out as an attractive choice for many families seeking unique educational experiences tailored to their children’s interests and needs. By combining innovation, inclusivity, and academic rigor, these institutions prepare students for success in an increasingly diverse and interconnected world. Parents considering magnet schools should research available options in their area to determine the best fit for their child’s development.

School Supply Showdown: Best Erasers for the Classroom

Introduction:

It’s that time of year again, when back-to-school shopping sets parents and students on a quest to find the best school supplies for the classroom. One essential tool that none can afford to overlook is the humble eraser. From eliminating mistakes in a math problem to perfecting sketches in art class, erasers are the unheralded heroes of the school supply world.

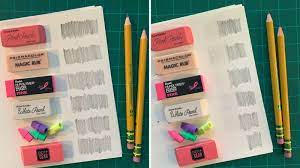
In this article, we’ll conduct a School Supply Showdown, putting the spotlight on some of the best erasers available for classroom use. We’ll consider factors such as efficiency in erasing, durability, ease of use, and affordability.

1. Staedtler Mars Plastic Erasers

Staedtler has been a trusted name in stationary for decades, and their Mars Plastic Erasers live up to their reputation. These erasers are highly efficient at removing pencil marks without smudging or damaging paper. Made from PVC-free plastic material, they’re long-lasting and have minimal crumbling.

2. Prismacolor Magic Rub

Prismacolor’s Magic Rub eraser is another excellent classroom option. It’s renowned for its effectiveness in removing colored pencil marks without leaving any residue – perfect for creative students who enjoy sketching and drawing. Magic Rub erasers are affordable and made from soft vinyl.

3. Paper Mate Pearl

Paper Mate’s Pearl eraser is designed with flexibility in mind. The soft, pliable rubber formula easily conforms to various surfaces without tearing paper. Efficient at removing both pencil and color marks, Pearl makes it easy for students to clean up any errors they encounter during their work.

4. Pentel Hi-Polymer Block

Pentel’s Hi-Polymer Block eraser is not only highly effective at removing pencil marks but also environmentally friendly as it contains no PVCs or latex. Additionally, this lightweight and compact design mean students can easily transport it wherever they go.

5. Faber-Castell Dust-Free Vinyl

Faber-Castell’s Dust-Free Vinyl eraser combines the best of both worlds – effectiveness and cleanliness. Capable of removing graphite marks with ease, this eraser also collects dust within its structure, ensuring minimal mess. With a comfortable grip and affordable price tag, you really can’t go wrong with this option.

Conclusion:

Selecting the right eraser for the classroom is no small task, as different students have varying needs and requirements. However, these top contenders are sure to please both teachers and students alike. No matter which option you choose from our School Supply Showdown list, rest assured you’ll be investing in a tool that promotes accuracy, creativity, and great work in the classroom. Happy erasing!

Hey, Where’d Those Scholastic Dollar Books Go?

Introduction:

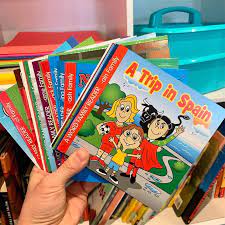
Do you remember those thrilling days when the Scholastic Book Fair arrived at your school, offering a treasure trove of new and exciting reads? Then you may have encountered the fantastic deals of Scholastic Dollar Books. But where did this popular section go?

The Rise of Scholastic Dollar Books:

Scholastic has been a key player in children’s education since 1920, providing a range of materials for schools and young readers. The Dollar Books concept was introduced to make reading more affordable and accessible to all children, regardless of their financial status. These books were priced at just one dollar, allowing parents and teachers to extend their budgets while still providing quality literature for young readers.

The Incredible Impact:

The concept of offering books at such a negligible price had long-lasting effects on children’s literacy. Research has shown that having access to books plays an essential role in cognitive development. Kids who read outperform their peers in school and are more likely to graduate from college. In addition to these benefits, the joy experienced by students when purchasing their very own book was unparalleled.

A Shift in Strategy:

So why did the once-popular Scholastic Dollar Books vanish? The reasons are multi-faceted; however, it primarily boils down to a change in strategy. As the publishing landscape evolved, so too did Scholastic’s approach to marketing its products. Instead of dollar books, they focused on bundled packages with multiple titles or expanding digital offerings through e-books and other online resources.

Furthermore, changes in the economy made it more challenging to provide quality literature for just a dollar. Fluctuations in production costs, as well as the growing competition from discount stores such as Dollar Tree or Walmart, made it difficult for the company to maintain its $1 price point while covering expenses.

Where Are They Now?

Although Scholastic Dollar Books have seemingly disappeared from book fairs, they have not vanished entirely. Scholastic still offers discounts on books and resources, sometimes offering them in sales or package deals. The company remains committed to making reading accessible and fun for children.

Additionally, there has been a rise in initiatives and programs that focus on providing low-cost or free books to kids. Organizations such as First Book and Dolly Parton’s Imagination Library provide free books to children in need, ensuring literacy remains a priority.

Conclusion:

The decline of Scholastic Dollar Books signifies a change in tactics, but the goal of promoting a love for reading among children remains the same. Today, they may not be as accessible through physical fairs, but opportunities for finding affordable and engaging reads still exist both online and through community programs.

Bang for Your Buck: Maximizing Value in Everyday Life

In today’s fast-paced and ever-changing world, it’s essential to find value wherever you can. The age-old adage of “bang for your buck” still holds true as consumers look to stretch their hard-earned dollars. This article aims to show you how to maximize the utility and satisfaction you receive from each dollar spent in various aspects of your life.

Budgeting: A Foundation for Success

The first step to getting the most out of your money is creating a solid budget. By allocating specific amounts for various expenses, you’ll have a clear picture of where your money is going. This enables you to identify areas where you may be overspending or underinvesting. Cutting back on unnecessary expenditures and reallocating those funds toward essential items or saving goals will ensure that each dollar works harder for you.

Comparison Shopping: Knowledge is Power

Don’t just settle for the first price you see on a product or service, do your due diligence by comparing prices across multiple sellers, platforms, or stores. This extra step can often result in significant savings, especially when it comes to big-ticket items like electronics or large purchases like home improvement projects.

Investing in Quality: Longevity Matters

While it may be tempting to gravitate towards low-cost items at the expense of quality, remember that sometimes cheap products may end up costing more in the long run. Investing in high-quality items can ensure that they withstand the test of time, ultimately saving money by not having to replace them as frequently. It’s essential to strike a balance between affordability and durability.

Utilize Coupons, Discounts, and Reward Programs

Taking advantage of coupons, discounts, and reward programs is an excellent way to capitalize on savings opportunities. Whether it’s signing up for email newsletters from favorite retailers, scouring social media for promotional codes, or joining rewards programs at local businesses, being proactive about seeking out deals can pay off in a big way.

Harness the Power of DIY

Rather than outsourcing expensive tasks or buying pre-made products, consider learning essential do-it-yourself (DIY) skills. Simple home repairs, meal prepping, or crafting can all save you money while providing satisfaction and pride for a job well done.

In conclusion, getting more bang for your buck is all about strategic thinking and refusing to settle for average value. By incorporating these tips into your financial habits, you’ll find yourself enjoying both an increased sense of financial security and the satisfaction that comes from knowing you’re getting the most out of each dollar.

7 Steps To Hosting a Fabulous St. Jude Trike-A-Thon

1. Plan your event

Begin by deciding on a date for your St. Jude Trike-A-Thon event to ensure ample time for preparation and promotion. Then, find a suitable location such as a local park, school playground, or community center with enough space to set up the racecourse and accommodate participants and spectators.

2. Register and gather resources

Register your event on the St. Jude Trike-A-Thon website to receive essential support and valuable resources, including an event planning kit, fundraising ideas, promotional materials, and more.

3. Set goals and organize teams

Set fundraising goals for both individual riders and the event as a whole. Create teams to encourage friendly competition among participants and motivate them to meet or exceed their personal goals. Encourage team captains to lead recruitment efforts and help team members stay engaged throughout the preparation process.

4. Promote the event

Spread the word about your upcoming St. Jude Trike-A-Thon by using social media platforms, local community boards, flyers, and newsletters. Reach out to local business owners and organizations for sponsorships, donations, and partnership opportunities. Don’t forget to emphasize the mission of St. Jude Children’s Research Hospital – finding cures for children fighting cancer.

5. Implement fundraising strategies

Help participants reach their fundraising goals with creative ideas like bake sales, raffles, or silent auctions leading up to the day of the event. Encourage team members to share their fundraising pages on social media and via email to engage friends, family members, coworkers, and neighbors in this worthwhile cause.

6. Prepare on-site logistics

As you near the day of your St. Jude Trike-A-Thon event, coordinate the setup of the racecourse (including obstacles or challenges), registration tables, refreshment stations, first aid kits, signage/banners displaying sponsors’ logos or team names, and entertainment for the event, such as music or guest speakers.

7. Celebrate success and express gratitude

After the successful completion of your Trike-A-Thon, take time to thank all participants, volunteers, sponsors, and donors for their invaluable contributions. Share milestones reached throughout the campaign and any inspiring stories that you may have encountered. Celebrate the impact made on saving children’s lives while reinforcing that their collective effort helped make a difference for St. Jude in their mission to treat and defeat childhood cancer.

In conclusion, organizing a St. Jude Trike-A-Thon event is not only a fun way to raise funds and awareness for childhood cancer research but also serves as an excellent opportunity for community engagement. By following these seven steps, you’ll be well on your way to hosting an unforgettable Trike-A-Thon that impacts many children’s lives at St. Jude Children’s Research Hospital!

5 Improv Games for Any Content Area

Introduction

Improvisation games can be a powerful and engaging way to promote creativity, communication, critical thinking, and collaboration in any content area. By getting students up on their feet and interacting, improv exercises can encourage them to think on their toes, adapt ideas quickly, and stay present in the moment. Here are five improv games that can be adapted for any subject area, making them an excellent addition to your teaching toolkit.

1. Freeze Tag

In this classic improv game, two students begin a scene using physical movement and dialogue based on a given prompt. At any point during the scene, another student calls out “freeze,” the actors stop in place, and the student taps one of the frozen actors on the shoulder before taking their place and starting an entirely new scene inspired by their current frozen position. This game encourages creativity and quick thinking as students must adapt to unexpected changes.

Possible adaptations: Give prompts related to a specific content area or have students incorporate vocabulary or concepts from a lesson into their scenes.

2. Expert Panel

Three or more students sit in a row as “experts” in a specific field (e.g., science, history), while another student acts as the host. The host asks questions relating to the content learned in class, and each expert must answer differently from the others — either with factual information, creative elaboration or humorous exaggeration. This game helps increase critical thinking skills by requiring students to showcase their knowledge while also thinking creatively.

Possible adaptations: Have experts represent different periods or perspectives within the content area (e.g., Ancient Egypt vs. Modern Egypt) or use this game as a review activity before an assessment.

3. Word at a Time

Two or more students stand facing each other and create a story — one word at a time, with each person adding one word per turn. Encourage students to build off one another’s words and keep the story moving forward. This game fosters listening, collaboration and fluid thinking as students must adapt to changes in the direction of the narrative.

Possible adaptations: Give students content-specific vocabulary words to incorporate into their stories or require them to create stories within a specific theme or subject area.

4. Silent Line-Up

Students are challenged to line up in a predetermined order without speaking — such as by height, birthday, or alphabetically by first name. To add a content-specific twist, provide prompts related to your lesson (e.g., arrangement based on historical events happening from earliest to latest). This physical game promotes non-verbal communication and teamwork.

Possible adaptations: Use key terms, formulas, or concepts from the lesson for the predetermined order.

5. One-Minute Speech

Students are given 60 seconds to speak about a specific topic from the lesson without pausing, backtracking or using filler words like “umm” or “like.” This game trains them in concise communication and critical thinking as they recall information and articulate it clearly under time pressure.

Possible adaptations: Use questions from quizzes or tests as the topics for one-minute speeches, or assign students different angles of debate on an issue studied in class for added complexity.

Conclusion

Improv games can serve as a versatile way to energize classroom learning while fostering essential skills like creativity, critical thinking, and collaboration. By adapting classic improv activities to fit your subject area, you can offer students new perspectives on curriculum material and build their understanding in an engaging and memorable way.