Thousands of students worldwide learn best through movement and physical activity – in other words, they have a bodily-kinesthetic learning style. If you have no idea what that means, you have come to the right place. Below, we will be discussing exactly what this learning style entails, a few of its characteristics, and how students who use this style study.
What Is The Bodily-Kinesthetic Learning Style?
As we have already mentioned, the bodily-kinesthetic learning style involved plenty of movement and physical activity. In fact, students will often pace up and down or fidget with some sort of object while studying to retain the information as best as possible.
Experts all over the world also refer to this style as physical learning or tactile-kinesthetic learning.
Characteristics
Students who use bodily-kinesthetic learning prefer bodily information over any other forms. In other words, they remember information best when it is presented through movement or while they are moving themselves. For example, the student may want to touch or manipulate objects while they are being taught a particular section of work.
Kinesthetic students will often enjoy activities such as drawing, modeling, sculpting, athletics, dancing, and physical sciences. These students love working with their hands and often excel in practical tasks.
It is common for kinesthetic students to do very well in sport and athletics. Since their brains work best while moving, physical activity usually is one of their favorite past-times.
How Do Students With This Learning Style Learn?
As the name suggests, students who have this learning style perform best when they are allowed to use their hands and tactile senses. They will prefer direct involvement with the work they are being taught instead of merely reading through sections in the textbook.
These types of students can also excel when they write notes. Since their hand is moving while studying, their brains tend to retain the information much better. They may also enjoy working on a computer or completing practice activities on a digital device.
It is very common for these students to enjoy taking things apart and putting them back together again. For this reason, they will often do very well in subjects that involve technology and other complex systems.
Concluding Thoughts
The bodily-kinesthetic learning style is one that revolves around plenty of movement and physical activity. Students with this learning style tend to retain information best when they are moving. For example, a student will learn better if they have a stress ball to keep their hands busy while they work. These types of students will often excel in practical subjects, such as science.
Applying to a private high school can be an extremely daunting process. There are so many things to think about, including parent statements, interviews, and your academic results. When it comes to these applications, there are a few common mistakes that children tend to make.
We have made a list of 4 of these mistakes that you should avoid when completing your application form.
Underestimating The Campus Visit
Contrary to popular belief, campus visits can be an essential part of the application process. Many students believe that these tours are simply for their benefit, but this is not true. While you view the school, the teachers, admin staff, and tour guide will be watching you closely, monitoring your demeanor, behavior, and attitude.
If you seem completely uninterested while on your tour, the staff are likely to make a note of this. When you send your application in, having that black mark next to your name will not do you any favors. For this reason, you will want to make as good an impression as possible on your campus visit.
Scripting Your Interview
The interviewer is likely to notice that you are speaking unnaturally if you script your interview. While this could make you feel more prepared, it is not recommended, as the school wants to get to know you and your passions. Instead of trying to memorize your answers, simply be yourself.
Only Applying To One Or Two Schools
Many students feel confident that they will get into one school and fail to apply to any others. This is never recommended, as you are not guaranteed a place in any private high school, no matter how good you may think your application looks. For this reason, you will want to apply to at least three different schools – this way, you will have a backup plan.
Failing To Include Anecdotes In The Parent Statement
Many parents go on and on about how perfect their child is in their parent statement. The school does not want to hear about this, though, as every parent thinks their child is amazing.
Instead, ask your mom or dad to write about a true story that makes you look good. This way, the school will be able to get an accurate idea of your character.
Concluding Thoughts
Children tend to make a few common mistakes when applying for a private high school. You mustn’t underestimate your campus visit. More so, do not script your interview or only apply to one school. Lastly, ensure that your parents include true anecdotes in their parent statement.
The theory of constructivism greatly influences the school life of children from a very young age. Most schools rely on this theory to provide each student with a personalized and unique learning experience.
Below, we will discuss everything that there is to know about constructivism and its use in the classroom. We will also mention a few ways in which you can integrate this theory into your lessons.
What Is Constructivism?
Through constructivism, a student is taught to learn and grow through their own experiences and personal knowledge. The teacher recognizes that each student is different and that they learn in their own unique ways. In this way, the children can generate their own rules and principles based on past experiences and trial and error.
With this learning concept, the child is not forced down one particular academic path. Instead, the teacher will guide the class as they make their own decisions and acquire their own knowledge based on these choices.
Teaching With Constructivism
Past studies have found that children work best when guided by an adult or someone older than them. However, this does not mean that the teacher should dictate the work to the students and do everything by the book.
With constructivism, the students should be able to determine which learning method suits them best. The teacher should always be there to assist the children when they do not understand the work. With that being said, they should never force the students into using one learning method or style.
Ways To Integrate Constructivism
There are various ways in which constructivism can be integrated into the classroom:
Take the time to talk – students hate listening to the teacher talk for entire lessons. Instead of boring your class, take the time to discuss the work with them and ensure that they understand what is going on. You should also encourage students to test different theories and learning styles to determine which methods work best for them.
Doing is learning – as a teacher, you need to understand that real-world experiences are more valuable than anything taught in the classroom. Instead of simply preaching work to the students, take them outside and allow them to experience the work for themselves.
Concluding Thoughts
Constructivism is an academic theory that teaches students to learn through their own acquired knowledge and personal experience. To teach with constructivism, educators should allow students to try their own theories and make mistakes – this way, the students will learn from their errors and understand the work more clearly.
Approaching studying is not a one-size fits all matter. Knowing your learning style will help you develop the study habits suited to your strengths. Your learning style determines how you retain information the best, increasing your chances of getting through school.
The most common learning styles are visual learning, auditory learning, and kinesthetic learning. You can have one or the other, or even a combination of both in terms of memorization. The difference between each though, is based on the senses used for retaining information. Using these study techniques suited for each style may help you breathe easy when you take your next test.
Visual learner
The visual learner relies on visual aids. Notes are the best visual aids since they give you the most information on hand. Unlike other types of learners, visual learners have a hard time recalling what was said, making note-taking very important. However, while the lecture is ongoing, organizing notes can be difficult. The best approach is to read your notes after class, and rewrite them and organize them in a way that would help you understand the topic better.
Outlining your material is a good way for visual learners to organize their notes. Outlines help create the flow of how the information is stored in their mind. The way it is arranged gives them a visual pattern of the information, which is easily remembered.
To further create a visual stimulus for better recall, visual learners can mark up their lecture notes or material. Marking up information and topics with different colors can enhance the visual pattern. Associating different sections or topics in lecture notes with different colors will help with not only organization but also for retrieval when you are trying to think of an answer to a specific question.
Auditory learner
Auditory learners, as the name suggests, rely on what they hear. If you are an auditory learner, you can better absorb information through the sense of hearing and listening to lectures is the best way for you to retain information. It would help to record lectures on your smartphones or recording devices if allowed. By recording your sessions, you can listen to the lecture again, just if you missed important details of the lecture.
The use of mnemonics is a great technique for auditory learners. Songs, rhyming patterns, or other word association techniques is a fun way to memorize terms. These word association techniques create patterns that the brain can easily store for retrieval because it makes the terms associated with them unique.
Another way to recall notes or lectures is to hear them out loud. Even while taking your test or quiz, you can better retrieve information by reading the test aloud. Hearing the terms can trigger recall because your mind will remember the information associated with the words or even the rhythmic patterns you created when you hear them out loud.
Kinesthetic learner
If you are a kinesthetic learner, you can retain information better when you are doing other activities while studying. Simple activities such as listening to music while studying or even typing out your lecture notes will help you retain information because your mind will associate the lecture content you were thinking about and what your body was doing at the time.
These are just a few of the many techniques you can use while matriculating school. Finding your learning style will help you find the best way to study. You can be one of these types of learners or a combination of both. Try them out and find the studying technique that is best for you.
What’s the point of learning it if it’s that tough?
Is it difficult to learn Mandarin?
It would not be wrong to say that learning to write in Chinese is hard, some Chinese think so too. However, speaking the language is nothing like that. Several features make Mandarin Chinese a lot easier to learn than any European language. Below are some of the features which ease the learning of Mandarin.
Subject/verb agreement not required
Plural forms not required
Conjugations not required
Tenses not required
Requires a simple numbering system applicable when expressing date and time.
Requires simple conditional sentences
Requires simple prepositions
Why should you learn Mandarin?
Now you know that Mandarin is not as difficult as it looks, you can proceed to find reasons to learn it. The primary reason should be that it is the world’s most widely-spoken language. Gaining proficiency in this language enables you to communicate with tons of people all over the world. Other reasons would be:
Business – People who are into business and can speak Mandarin have greater chances of getting into the Chinese market. Your ability to speak Mandarin will make it easier to build important relationships.
Travel – There are lots of fascinating travel opportunities in China and Taiwan. You would get along better if you speak Mandarin.
Culture – Stemming from centuries of history, the Chinese share an infinitely beautiful culture. Regardless of where your interest lies – architecture, cuisine, history or music, you would better appreciate the Chinese culture with the knowledge of Mandarin.
Chinese Characters
Mastering the Chinese Writing System can be rather challenging, but that’s a strong reason to try! In spite of how difficult it seems, taking up the challenge of learning to read and write in Chinese will help to develop your intellectual stimulation forever. Chinese is most beautiful in its written form. It comprises of thousands of characters which do not just occur randomly. They follow a systematic design, which, when understood, simplifies the puzzle of learning new characters.
Get over the fear and master Mandarin Chinese. It is a key that comes with great gains.
As a new principal at a school, the first year is usually very intimidating and demanding. Both staff and students are on the mission to discover your strengths while trying to create a good impression of themselves. Your job as a principal now involves striking a balance between building relationships, improving certain things and finding out what every other person is doing well. In order to achieve this, you must be ready to invest a large chunk of your time and pay attention to your environment. Irrespective of your expertise, every new school principal should not expect things to be exactly as they were in their old school.
The differences in schools is what makes the first years for any new principal the study year. So, below are some tips to help you make it through through your first year as a new school principal.
Know the Superintendent’s Expectations
The superintendent and the principal must always be on the same page at all times. Therefore, it is absolutely difficult to be a productive school principal if you are not on a common ground with the superintendent. Understanding their expectations at all times and having a good relationship with them is an important step to you becoming a successful principal. Your superintendent is the boss, you don’t have to totally agree with them but whatever they say, stands!
Be Organized
To be a productive principal, you must be organized. Organization is a skill that must be possessed by every leader as the lack of it can result to confusion within yourself and with your followers. In a school setting, chaos is one thing that should not be tolerated and this is the fruit of disorganization. An unorganized leader is only a disaster waiting to happen.
Build a Plan of Attack
Don’t just assume that you know how much work you have to do, it could get really overwhelming if you don’t have a strategy. Creating a plan or a to-do list is the only way to make sure you are prepared during the first year at your new school. Do not underestimate the place of prioritization, as this is very crucial. Create a checklist for all the plans you need to complete, alongside deadlines for their completion. Make good use of the time when there are no students because once they come into the picture, the possibility of sticking to your schedule is reduced.
Know your Teachers
This set of people can either contribute to your success or failure. This doesn’t mean that you should try to be everybody’s best friend, but it is very important that you earn the respect of your teachers. Get to know all of them individually, their expectations of you and also tell them your intentions early. Be ready to support your teachers at all times except when it is impossible to do so. The earlier you build a strong foundation for a good working relationship with the teachers, the higher your chances of surviving the first year.
Learn and Accept the Community and District Traditions
Just like every community and school is different, the traditions, principles and beliefs also differ. As a new principal, learn to accept these traditions and save yourself the trouble of answering questions from alumni for changing the long standing order of events for this year’s homecoming week celebration. If you must make any changes, ensure that you run it by a board of parents, teachers, community members and students. Let them know your reasons for making the change and allow them to give their opinions. This way, you don’t have to shoulder the decision making process by yourself.
Know your Support Staff
This includes all the staff who run the affairs of the school behind the scenes. They include the security officers, custodians, administrative assistant and maintenance personnel. These people often know the ins and outs of the school and as a new principal, you will need a lot of information from them to run the daily operations smoothly. So, get to know them individually because they can be very resourceful.
Introduce yourself to Community Members, parents and students
Your relationship with the stakeholders of the school is very crucial just like your relationship with the teachers. Building a strong relationship with the community members, parents and students begins with a first impression. You need to be respected not just by the teachers but by the whole community as well. People’s perception usually becomes their reality and an effective principal is one who is respected by all.
Studies have shown that memorizing facts does not always equate to “learning.” When you connect facts to real-life applications or practical applications, kids will appreciate them more and absorb what they learn.
Having to memorize the multiplication table can be tedious, even as an adult, so one can imagine how difficult it can be for children. Multiplication does not always have to boring! When you multiply, you will notice patterns and rules. These patterns are what will make learning and teaching multiplication fun for all. Here are some tips and tricks to help you teach your child multiplication.
To See is To Believe:
Multiplication is repeated addition. You can prove that by using objects to demonstrate how it works. Write down a simple multiplication problem like 4 x 3 on a board or a piece of paper. Using marbles, ask your child to make four groups that consist of three marbles each. Let your child count them to show that the problem 4 x 3 means that you add 4 three times.
Fingers for Five:
Skip counting by 5 is easy to remember. They might find it more interesting to know that when you skip count by five with your fingers, the number of fingers you put up each time you count by five is the number you multiplied five to.
Try skip counting to 25 and track how many times you skip count using your fingers. You will see that five fingers are up by the time you get to 25. The problem you just solved then would be 5 x 5.
Fingers for Nine:
There is a simple trick to help your child visualize the product when multiplying 9 to single digits using their fingers:
Let your child put their hands out in front of them, with their palms facing down.
The fingers of the left hand will represent numbers 1 to 5 (from left to right), and the fingers of the right hand will represent numbers 6 to 10 (from left to right).
When you multiply by nine, ask your child to put down the finger that represents the number they will multiply nine with. For example, with the problem 9 x 6, your child should put down the thumb on the right hand.
The number of fingers that are still up found on the left side of the finger down is the tens place of the product, while the number of fingers found on the right side is the one’s place of the product.
Following the example above, there would be five fingers on the left side and four fingers on the right. The product then of 9 x 6 is 54.
Eleven twins:
When multiplying single digits to 11, show your child that the product will always be a pair of the same number. For example, when you multiply 11 x 7, the result will be a pair of 7s! So, 11 x 7 = 77.
Zeroes in Tens:
Multiplying by 10, you will see that the product always looks like that multiplier but with a zero at the end. For this example, let’s multiply 10 x 5. Your product should be 50, which looks just like 5 but with a zero at the end. Try out other numbers and see for yourself!
Zeroes in Fives:
What makes multiplying by 5 difficult is there are so many patterns. Notice that when you multiply an even number by five, the product always has a zero at the end. If you look even closer to the numbers next to the zero, it is always half the multiplier. Take a look at this example:
5 x 6 = 30
Here you can see that 6 is an even number. The product will then have a zero at the end. Look at number 3 in 30! The number 3 is half of 6, which is the number you multiplied 5 with.
Patterns always help with memorization and when you can apply that when teaching multiplication to your child, it can make a big difference in learning.
The state you practice law in would be the state that you chose to take your bar exam. Think twice when choosing a state because the bar exams’ difficulty level varies from state to state. If you look at the numbers carefully, you will find that some states’ passing rates are considerably lower than others.
The California Bar exam shows the lowest passing rate in the country. In 2017, the State Bar of California designed the exam to include a performance test to determine and rate the test taker’s ability to handle a client’s legal challenges, five essay questions, and the standardized bar test from the National Conference of Bar Examiners.
Arkansas also has a difficult bar exam. Like California, the exam takes place for two days. The number of state laws and local laws covered in the bar exam seems to raise the notch higher than other states.
The Washington bar exam is difficult. Having three law schools within Washington, including the out-of-state takers from Seattle, produces many law students. If you plan on taking the Washington bar exam, you need to prepare yourself. You may try Oregon next door, but they also rank fifth in difficulty level.
Louisiana differentiates itself in terms of bar exams. To practice law there, you will need to brush up on common law and civil law according to the state’s legal system. The Louisiana bar exam is constructed based on the Law curriculum of the four Law schools, which makes their bar exam unlike any other state.
In the state of Nevada, Las Vegas attracts experienced and new lawyers. The bar exam takes two days and a half to complete, while the passing score on their exams is higher. The laws unique to Nevada in combination with the standardized bar test makes it longer than other states.
If you are not confident about passing the bar exam, you should consider looking into the central states. The easiest bar exam is in South Dakota. Other states included in the list of easy bar exams would be Wisconsin, Iowa, and Nebraska. In Wisconsin, for example, they have a policy called diploma privilege where you are admitted immediately after graduating law school to the state bar.
If you plan on moving to another state in the future, you might consider taking the Multistate Bar Exam. If the state you move into also makes use of a Multistate Bar Exam, it makes it easier to be admitted to that state’s bar.
Over the last five years, Google Classroom has emerged as a popular application which streamlines the distribution and grading of assignments. Every week Tech Edvocate readers send us emails looking for tips and tricks to unleash the app’s true potential. As such, we decided to compile all these questions and answers into one readily available article for our readers.
What is Google Classroom?
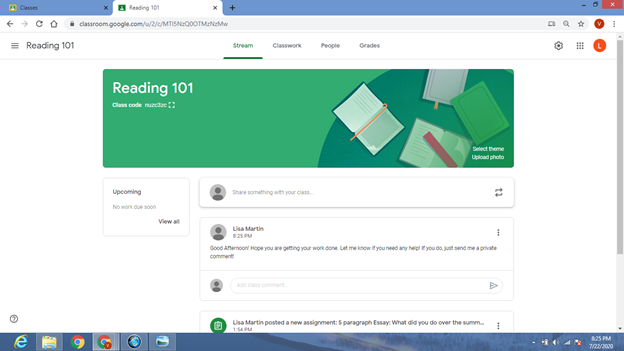
Google Classroom is a collaborative app, accessible on both the web or a mobile device, that provides an online platform to simplify and organize digital learning. It aims to improve interactions between educators and learners. It has four sections, each having unique features and functionalities:
Google Classroom has a “Class Stream” section that enables educators to post crucial announcements for their students. Educators can post links, videos, documents, or other text messages here.
The “Classwork” section allows educators to post assignments, quizzes, or share study material with students.
The “People” section shows the teacher’s name and lists the students enrolled in the class. You can use this section to check if a particular student has turned in their assignment or email a student or guardian.
Finally, the “Grades” section, which is only available for educators, offers an easy grading option for the submitted assignments.
Google Classroom creates a separate Drive folder providing a centralized location to store all digital materials of the Classroom. This feature helps organize various assignments, shared files, and other documents benefiting both educators and students. It certainly frees up a lot of your valuable time.
Google Classroom has numerous time-saving elements that improve classroom interactions. These are:
One-click copy: You can easily make a copy of Google Doc for every student in your class. This feature eliminates the need to recreate new documents for every student.
Assignment and grade management: This app provides an efficient way to customize the requirements of an assignment. You have the option to assign due dates or even chose to have no due date. The app also lets you effectively grade a submitted project and provide feedback to the students.
Progress monitoring: The app lets you monitor the progress of every student in your class. You can comfortably check how many students have or have not turned in a particular assignment by clicking the assignment link. Alternatively, you could also go to the “People” section.
Instant feedback: This feature lets you interact with individual students by commenting directly on their shared files. You can also provide feedback on their assignments by praising them or giving tips for improvement.
What is G Suite for Education?
G suite for education is a free Google service that brings together several of its products, enabling efficient interaction and collaboration between educators and learners. These apps provide students with the opportunity for creative thinking, all while helping them master learning objectives. You can use the application for free in your web browser.
Educators can use this service to prepare engaging digital content for a better learning experience while students can work together and complete assignments and group projects. Incorporating this service into the teaching and learning process makes remote learning seamless and practical. The core services include:
Google Classroom: It is a digital classroom that allows educators to post and organize assignments, study materials, videos, and documents. It offers an online platform that facilitates interactive learning. Educators can grade the projects and provide feedback for improvement.
Google Docs: It is a free web-based word processor. You can create and edit well-formatted documents with tables, images, and drawings. One can easily share Google Docs with anyone in your Classroom. It is an excellent tool for students as it lets them create documents at ease and facilitates sharing ideas with others. Teachers can use Google Docs to create worksheets and other engaging content.
Google Sheets: It is a free web-based spreadsheet application for analyzing and organizing data. It is a useful tool for making charts, progress monitoring sheets, sign-up sheets, communication logs, and much more.
Google Slides: It is an online presentation tool that lets you deliver your content in a well-formatted manner. Students can create presentations for seminars or group projects. Educators can also use this app to create slides, which provides a fantastic visual learning experience.
Google Forms: It is a web-based survey and quiz tool. Teachers can use this tool to create surveys in formats like multiple choice or and True/False. They can also use this tool to quiz their students. You can access the submitted results through a spreadsheet.
Google Drawings: It is a web-based graphic editor or diagramming tool. This tool allows you to edit and format images, flow charts, diagrams, etc. Students can use this tool to share their perspectives, which encourages them to think on their own. Educators can also create content that can help deliver instruction. The scribble tool also allows students to jot down lecture notes or questions.
How Do I Sign In to Google Classroom?
When logging into Google Classroom for the first time, follow these steps. The steps are the same for both educators and learners.
Step 1: Search for classroom.google.com on your web browser.
Sign in to the Classroom application by entering the email address that is associated with one of the following user account types:
School account: It is also known as a G Suite for Education account set up by a recognized school. The email generally looks like [email protected]. If you are facing any issues with this email, you may contact your school’s IT administrator.
Personal Google Account: This a personal email account set up by a student or guardian. Typically a home school would use a personal Gmail address. The email address should typically look like [email protected].
G Suite account: It is a professional account set up by a company administrator. It looks like [email protected].
Step 2: After entering your email address, the website will prompt you to enter your password. Click ‘Next‘ after you have entered your password.
Step 3: A welcome message will greet you. It will also list your name and email address. Click Continue.
Step 4: A G Suite for Education account would require you to identify yourself as either a student or teacher. Personal Google accounts, however, will not have this option.
Step 5: If you are a student, click on the + sign in the right-hand corner of your screen and select Join class. Or, if you are an educator, click on Create Class. Your account setup is successful. You are now ready to use Google Classroom!
How Can Teachers Use Google Classroom?
Google classroom is an exceptionally flexible application. It has tons of useful features that can benefit educators. Google Classroom enables educators to:
Organize their classes better. With the help of other integrated Google services and tools such as Slides, Docs, and Drive, educators can effortlessly conduct and manage courses. For instance, they can assign due dates, which are then automatically added to the class calendar. Similarly, an educator can use Drive to store all relevant documents, files, and assignments centrally. They could also use Slides or Spreadsheets to create engaging educational content for a better learning experience.
Distribute and collect assignments, projects, and course materials. Educators can edit assignment topics and distribute them to several classes at once. They can also reuse these topics every year. Students with access to technology can significantly benefit from these features. With Google Classroom, educators do not need to waste time creating multiple physical copies of the same document. This feature also keeps students engaged in their studies.
Communicate with students about their classwork. Teachers can assign due dates or post reminders about assignment submissions. They can also check the progress of individual students and help them with their queries. This teaching method requires frequent and effective communication to build a stronger relationship between the educator and learner. The application also provides a quick option to provide feedback to the students.
Give timely feedback on assignments or assessments. With Google Forms tool’s help, educators can quiz their students on any course topic and grade them accordingly. Students can get instant feedback on their work to keep them motivated. Teachers can also use the private comment feature to correct mistakes or praise them.
How Does Google Manage Privacy and Student Data?
An educator should always be concerned with the learners’ data and privacy while choosing a digital application for their Classroom. An application might collect private data from learners, and an educator needs to ask questions about this. The company that created the product must be transparent about its data protection policies.
Google claims to prioritize data security and privacy for all G Suite for Education products. The company asserts that they collect data every time a student clicks a link, downloads a file, watches a video, or searches the web. The reason this data is collected is to make their services work better for the user. Google makes an effort to be as transparent as possible about their data and privacy policies. They make assurances that they only use the collected data for product and service development and is otherwise kept private.
However, stakeholders have expressed sincere doubts about Google’s capability to deliver their promises about user privacy and data protection. Google branding in various schools has also raised questions on trade-offs that have possibly enabled Google to build its brand.
Educators must realize that students or guardians may choose not to use Google products in school. The school administration must have an alternative plan for those who choose to opt-out. Schools must also obtain permission from parents or guardians before implementing any form of online learning. No administration can force a private digital learning platform on any student. Some parents may also be against the entire idea of digital learning and prefer the more traditional approach. Hence, educators should discuss all relevant information about online and remote learning with both students and their parents.
Irrespective of using Google Classroom, it is essential to understand its data privacy and security policy. Educators should teach data privacy laws and internet safety. One should teach students the dos and don’ts on the internet and warn them not to share private and sensitive information on the web. Students should also be aware of networking etiquette and follow the general norms while on the internet. Eductors may also encourage families to make sure their children learn the implications behind internet safety.
How Can Google Classroom be Used to Differentiate Instruction?
A formative assessment aids in each learner’s educational growth by keeping them motivated and providing additional support if needed. Numerous formative assessment applications have now added Google Classroom integration. Using tools like Google Forms, you can differentiate a student’s instruction and assist them accordingly. For instance, you can give a student a quick formative assessment to determine if they comprehend what has been taught. If not, you can reteach the material using alternative strategies. Consequently, you can provide them with private feedback or show support.
Google Classroom enables educators to edit and redesign assignments for a particular student or a group. One can personalize an assignment to help their students master the skill being taught. This feature helps students with specific needs or problems to understand and function alongside their classmates. The educator can choose to provide additional materials, notes, videos, or instructions with the assignments. They could also customize the due dates for various students depending on their ability to perform. Students with learning difficulties or language barriers benefit significantly from custom assignments. Educators can also routinely check on any student and help them with queries or questions.
Google Classroom lets educators pay attention to every student and help them individually. The option to comment and provide feedback privately makes differentiation efforts less conspicuous. Students feel equally special, and the thought of being left out doesn’t cross their minds.
Being on the internet or not, assisting every individual student will always require a creative approach. It ultimately depends on the educator and how he or she wants to express themselves to the class. One should be willing to support each student’s needs while ensuring that others don’t feel left out. Luckily enough, the web offers tons of excellent tips and tricks to provide a better learning experience.
How Can Google Classroom Make Learning Fun and Interactive?
Educators can use the Classroom application to make digital learning a fun and engaging task. They can always use apps like Slides and Drawing to create impressive visual learning materials. Also, in addition to using integrated tools, teachers can try to randomize the course materials. One can try to teach a topic using videos, images, or step-by-step voice instructions. This method reduces the monotonous text-based study materials that take away the charm from learning. With so many customizable features, educators can make sure students receive their education in a way that fits their learning style.
If an interactive hub is what you want for your students, you should use the ‘Stream’ section in the Classroom application. The ‘Stream’ section is the first page your students see when they log into their account. It is essentially a feed where you can post important announcements, assignments, and other course-related materials. This section creates an open space for both students and educators to interact share ideas. I would personally recommend educators to use Screencastify, which allows you to present files and documents with an audio clip of your voice explaining the same. This feature lets students get personally attached to their education.
Learners now have the platform to participate in group discussions and have their voices read by the entire class.
Can I Add an Assignment to Google Classroom Without Adding it to the Stream?
The ‘Stream’ is a community hub, which lets you post announcements to keep learners informed. However, many educators seem to dislike the randomness of Google Classroom’s ‘Stream’ section. Apart from important messages and posts, duplicate notifications of updated classwork appear in abundance. This issue makes the ‘Stream’ incoherent and confusing. If you only want conversations to appear in ‘Stream,’ you can disable automatic notifications of posts on the ‘Classwork’ page. Learners can always check their assignments by clicking the ‘Classwork’ tab. This technique will make your community hub take up less space.
You can manually adjust your settings to disable default notifications from the ‘Classwork’ page or hide them entirely. You can also have a collapsed or expanded view of notifications on your ‘Stream’ page. Educators can customize what they want on their main community page to avoid incoherence. Follow these steps to change the settings:
Go to classroom.google.com, and you will find a menu with your classes.
Select the class that requires a change.
Click on the Settings button (top right corner, third icon from the left) on the Stream Page and scroll down to General settings. There is a drop-down option under “Classwork on the stream.” You can manage your notifications there.
You can select “Show attachments and details” if you want a detailed post about the assignment you created, including all instructions and attachments.
You can select “Show condensed notifications” if you want a short condensed version of the assignment post on your Stream. This option will show only the title of the assignment. It is also the default option.
You can select “Hide notifications” if you want to remove all automatic posts about your assignments from the Stream. It entirely depends on the educator and how they want their Google Classroom to appear.
5. After making your selection, save your changes by clicking “Save” in the right-hand corner.
Can I Place A Worksheet in Google Classroom?
You can also rephrase this question as, “How do I put a PDF inside Google Classroom so my learners can write on top of it.” Educators should always keep in mind that digitalizing a paper worksheet is often challenging and tedious. Plus, it usually isn’t worth the hard work either.
Be sure to ask yourself these questions before you attempt to digitalize your worksheet:
Will this worksheet help students learn?
Is this worksheet better than hands-on learning?
Is this worksheet better than a group discussion?
Is this worksheet a better job of engaging learners in new ways? —This is the most reasonable utilization of technology! Its purpose is not to save paper but modernize old ideas. Technology provides us with an opportunity to create learning environments that weren’t possible before.
Instead, can I create a Google Doc with similar information to support the same learning objective? It is way easier to insert an equivalent Google Doc.
However, If you still want to upload a worksheet, follow these steps:
Scan the document using a scanner. Compile the photos into a PDF and save it on your computer.
To add the pdf to your Drive, go to drive.google.com. Click on the “New” button (+ sign in the top left corner).
Click “File Upload.”
A new window which includes your computer files will appear. Navigate to the PDF file that you want to upload and click “Open.” The PDF will start uploading.
Now sign in to your Google Classroom account. You can add your newly uploaded PDF document as a stream post or while generating a new assignment. Click “Add,” then choose “Google Drive,” and select your document.
How Do I Give Parents Access to Google Classroom?
Educators can send parents emails, keeping them updated about their children’s digital learning. However, you can only add parents to the Classroom using a G Suite for Education account. Personal Google accounts cannot benefit from this feature. Educators should have no trouble whatsoever since most schools these days use G Suite versions anyway. It is always great to have parents involved in their children’s education.
Educators need to invite parents to Google Classroom by adding their email under their child’s name. You can send invites from the ‘People’ tab, which should be accepted by the receiver. The invited parents receive summaries of their child’s progress in the Form of an automated email. Parents can choose how often they want to receive the summaries (daily or weekly) and can also unsubscribe at any time.
The email summaries contain information about the following:
Unsubmitted work or assignments.
Due dates of assigned work. Daily emails contain due dates that are either today or tomorrow. Weekly emails contain due dates in the upcoming week.
Class activities like essential announcements, assignments, and questions that educators recently posted.
Google Classroom has email summaries turned off by default. Educators should note that parents don’t have access to any of the sections of the Classroom. They also cannot view posts on your class stream. As such, guardians cannot see their child’s grades. Therefore, educators have to communicate with parents using other reliable methods like personal email. They should also discuss this issue with parents before inviting them to the Classroom.
You can turn on “Guardian summaries” by navigating to the Settings page. Then scroll down to General settings.
Click the grey button to the right of where it says, “Guardian summaries.” The button will turn green, indicating that the feature is on.
You can also click “See example” underneath “Guardian summaries” for more information on this topic.
How Do I Use Slides Without Using Google Classroom?
Yes, all educators with a G Suite account or Gmail account can use all Google applications for free. Google Slides is one of the free apps that you can access from Google Classroom as well. To launch the app, open your Chrome browser and click the Google Apps icon. The icon has a grid of nine grey dots (also known as the waffle icon). Once you click the icon, the Google apps menu will appear. You can select Google Slides or any other app that you want to use. For Slides, a new slideshow document would be available. You can use it to create a well-formatted presentation for your Classroom.
It will look like this:
If you want to share your presentation or give someone access to Slides, follow these steps. First, open a new Slides document, and then share it from the ‘File’ tab.
Alternatively, you can click the yellow “Share” icon in the top right corner. Click on “Copy link” in the “Get link” section. A link to the slideshow will automatically be copied.
You can share this link via email or even post it on your Stream page. When someone clicks the link, they need to request permission to open it. Consequently, you will receive a request email, which you may choose to accept or deny. Also, always be sure to check who requested the permission. The shared Slides file won’t require a Gmail account for someone to edit it.
The students who want to share their presentation files can either email a copy of the file or share the link to their work. They can follow the same steps to copy the link to their document. They will also have an option to enter your email address directly. You can find the shared document on your Drive in the “Shared with me” section.
What Can I Do With Google Classroom?
So this probably is the most critical question to ask. Why should you choose Google Classroom? And what’s in it for you? To answer your questions, you first need to analyze the pros and cons of a physical classroom. Although a traditional classroom seems to have a more lively student-teacher interaction, it may not be entirely accurate. However, in such a situation, it is often challenging to manage and organize assignments, grades, or attendance logs.
On the other hand, Google Classroom is a digital learning platform that allows you to handle and streamline how you deal with each student’s classwork. You can also set up a Classroom account for free in only a few minutes. The reasons which make Google Classroom a big deal are:
Add announcements and course content: The Classroom app provides you with a community hub, called a Stream, to post information or share course-related messages. You can also add study materials, like documents, slides, etc., or even create discussion boards for interactive learning. Learners will be able to see these announcements whenever they log in to the Google Classroom app. Plus, all the uploaded files, documents, images, videos, etc., are neatly organized in a separate Google Drive associated with the Classroom. Yes, it is that simple.
Teachers can quickly add assignments or other coursework for students. The assignments will have due dates, and you can promptly grade them. Educators can also choose to customize the projects or alter due dates for students with learning disabilties. The deadlines automatically get updated on the Calander app to provide timely notifications to the students. To create an assignment, you need to go to the “Classwork” section.
Grade an assignment: You can effectively grade the assignments that your students turned in. There is also an added feature of private feedback, which you can use to praise a student or help them correct their mistakes. Once you finish grading, you can send the assignments back to your students. Throughout the semester, the grades will be neatly organized in a grade book in the “Grades” tab. This feature enables you to conduct paper-free grading!
Manage learners: You can always choose whether you want your learners to post, comment, and share files. This option lets you maintain order on your stream page. Interactive learning is essential, but the unmonitored flow of opinions may result in chaos. You can choose the option “Students can post or comment” to let learners freely voice their opinions. The “Students can only comment” option allows learners only to comment on the posts that you make. Lastly, you may select the “Teachers can post or comment” option to restrict students from abusing their privilege. This feature lets you create a safe and orderly environment for digital learning.
What Can’t I Do With Google Classroom?
Although the Google Classroom application has emerged as one of the best online learning platforms where teachers can quickly post assignments, messages, grades, or share online resources. Certain features in the app are not so great. Here is the list of things the Classroom app does not have:
A chatbox: The app only has a standard Stream section to post your messages or assignments. However, this feature doesn’t address the need for communication between educators and learners. There is no chat function to enable you to communicate with your students in real time. You either have to make use of the public Stream section or send private emails to your students. As a solution, you can use Google Meet or Hangouts for live video or audio communication.
A test or quiz app: Although there are numerous ways to create quizzes for your students in Google Classroom app, it does not have a stand-alone quiz tool. You can always make use of integrated apps like Google Forms to add test questions for which you may choose to receive a short answer from your students or provide them with multiple choices. I would recommend using external applications to create quizzes and then share the link with your students.
A discussion forum: Google classroom allows you to make announcement posts on your Stream and let learners comment on them. However, this does not allow you to interact with your students at an optimal level. When multiple students all comment on the same post, the thread becomes exceptionally long. This often will create difficulties for you as an educator as you will struggle to sort out and organize the comments to facilitate a useful discussion. Also, students cannot format the messages they send, meaning all messages will have the same color, font, and size. While there is the option for a discussion board, it is not as optimized as those in other learning websites.
What is the Most Efficient Way to Set Up Google Classroom?
Google Classroom is a beautiful digital learning application that streamlines web-based learning while also making it fun and engaging. It offers a straightforward account set up process for educators. You can follow these steps to set up your educator account:
1. Sign up
Go to classroom.google.com and then sign in using your G Suite for Education account. You can also use your Gmail address, but you might have difficulties inviting a large number of students. A personal Google account would require you to invite each learner individually.
2. Create your first class
Click on the “+” button on the top right corner of the screen to create your first class. Choose the “Create a class” option when prompted. Now fill in all the relevant information and type in a name for your class. Once you are happy with everything, click “Create.”
3. Invite learners to your class
Once you have created your digital Classroom, you can invite your students to the class. Go to the “People” section, and copy the unique code under the “Students” tab. You can share this code with your students, who will need to enter it while logging into the Classroom application. Alternatively, you can invite your learners by entering their email addresses. As an educator, you should keep in mind that the invited students must have a personal Google account or a G Suite for Education account to log into the class.
Learners who want to log into Google Classroom using the unique code need to visit classroom.google.com. They can click on “Join Class” and type in the unique code to enter their class successfully. This method also benefits the educators without a G Suite for Education account, as they don’t have to type in every student’s email manually.
Your Digital Classroom is now live! You may follow these steps to make the most out of your Classroom:
To create an assignment or post your first announcement to the Stream, go to the “Classwork” section. Then click on the “+ Create” button and enter the required information to create your post. When making assignments, be sure to assign numbers to them so that learners can know which came first. Numbering is necessary because you cannot reorder your posts once they are on Stream. However, you have the option to separate your assignments from other posts and move them to the top. You can also re-edit your assigned tasks to optimize them for a better learning experience. After you have posted a project, you can click on the title to check student submissions.
You can add course-related resources such as videos, presentations, worksheets, links, etc. either to your Stream or Classwork section. You can directly upload your content from your computer or add them from your Google Drive folder. Adding creative resources instead of regular articles or essays can help you make learning a fun and engaging experience.
Educators can use Google Classroom’s shared drive folder to organize all course-related documents. This Drive folder is created automatically when you first make your Classroom. You can access this folder through the “Classwork” section, where you will find the “Class Drive folder.” All submitted assignments and projects are routinely added to this folder. This feature lets an educator manage tons of documents and files in a neat and organized manner.
Does Google Classroom Harvest or Collect My Child’s Data?
Google’s strict data privacy policies forbid them from tracking user data through the Google Classroom application. However, it should be noted that most apps associated with G Suite for Education do collect learner data. For instance, if a school opts for additional google services, the integrated apps collect user data.
Parents should know that if their child uses their personal Gmail account to log in to Google Classroom, data like the sites they visit, videos they watch, or their location are regularly collected. However, it is also necessary to know that Google offers complete transparency over its data collection policies and states that it is only utilized for app improvement.
Guardians should also be aware of another risk involving data privacy, which is third party involvement. Although Google never sells user data to partners or other websites, third parties often target individuals through ad-on applications to collect their data.
Educators should make sure that parents know about these data privacy issues and obtain permission before implementing an online learning platform like Google Classroom. Educators and parents should also teach learners to be responsible digital citizens and understand online etiquette and internet safety. Learners should always refrain from sharing personal or sensitive information on the web.
What Safety Settings Can I Enable on My Child’s Google Account?
Privacy settings can be changed on the Google Account page if your child uses a personal Gmail account for Google Classroom. If he or she uses a school account, you can contact the school administration regarding the settings you can change. However, keep in mind that Google Classroom requires certain information to stay public, such as your child’s name. The following settings might help you get rid of your internet safety concerns:
The Personal Information page lets you choose what information you want to be public. You can customize this setting to allow only relevant information to be visible.
The Data & Personalization page lets you take a Privacy Checkup and then provides you with a step-by-step guide on what privacy settings are the best for you. You can also visit ‘Activity controls’ to see the data Google collects from you. You can ‘pause’ an activity to stop Google from tracking it.
The People & Sharing page lets you update and display your contact information or see what information you share with Google.
You may download the Google Family LinkforParents app from Google Play Store. This free application offers parental control options to monitor your child’s internet activity. Applications like this ease parent’s concerns while also letting kids have fun with technology. Here are some of the fantastic features the app provides:
Manage apps your child can access
Supervise screen time
Set daily time limits
Get activity reports
Approve or deny the installation of apps
Find your child’s location
Create a family group of up to 6 people
How Can I Prevent Students from Using Google Classroom to Cheat or Cyberbully?
You should know that there is no option in the Google Classroom application to prevent learners from accessing other web content, such as Wikipedia or YouTube. Students can also view messages or comments that their classmates make on the Stream and reply to them. However, the submitted assignments are generally sent straight to the educator and can be kept private from other students. There is also a Quiz Lock feature that prevents students from visiting other websites during an ongoing test.
Cyberbullying, unfortunately, is indeed possible for learners to practice. Kids often cyberbully their classmates by commenting on their posts or using Google Meet or Google Hangouts. Chatting sessions between students during course-related discussions can often be a distraction. Victims have also reported cyberbully on group projects or shared Google Docs. This happens because a lot of students believe that no one would notice them there.
Your child can choose to turn off Hangouts or remove people from a shared file if he or she gets distracted by the constant chatting. To accomplish this, click “Share” and go to the ‘Advanced options.’ Then click the ‘X’ button next to the names of the people you want to remove. Teachers can turn off posts and comments of the students if they think they are abusing their privilege to cyberbully others.
There is no feature to prevent learners from engaging in inappropriate activities like cyberbullying. The best way would be for teachers and parents to talk to the learners about internet safety and the dos and don’ts on the web. They should teach them to be responsible digital citizens and tell them about the implications of negative behaviors. It would be best to remind them that their access to technology can always be revoked if caught abusing their privilege. Google Classroom is an application that tries to make the learning experience fun and beneficial. One should not misuse the features that this application provides.
What are the Most Popular Features and Functionalities of Google Classroom?
Assignments: Teachers can create and assign classwork to individual students or groups by adding online resources such as YouTube videos, Google Images, blog posts, or uploading PDFs directly from their computer. The assignments may have deadlines, which get automatically updated on the class calendar. Educators also have the option to re-edit classwork to optimize it further.
Customizable Grading System: Educators can quickly grade submitted classwork around a grading system or create a grade category. They can choose one of the following methods to provide students with their grades:
Total Points Grading: Total points earned by learners is divided by the maximum points.
Weighted by Category Grading: Grade categories are first assigned a weight. Then the average score of each category is calculated and multiplied with the grade weight. This action will give the overall grade out of 100%.
No Overall Grade: Educators can choose not to grade an assignment.
Virtual Discussions: Educators can create discussion boards on the Stream to let learners voice their opinions freely. Learners can also choose to hold discussions on Google Docs, and teachers can provide feedback. Group discussions ensure that everyone is on the same page and keeps learning fun and engaging. Educators also have the option to mute specific individuals from commenting or making new posts on the Stream.
Announcements: Educators can quickly post quick announcements to update the students about classwork, projects, deadlines, etc. These announcements are mere messages that help learners stay on the same page with the rest of the class. Learners can also comment on announcements, but this is dependent on whether or not the educator has that option available.
Live Classes: Google has recently offered a service that allows educators to facilitate real-time video classes using Google Meet. Teachers can add up to 250 participants to the call and live-stream the session to another 1,000,000 viewers. The service has an added feature of recording the session for the learners who could not attend the class. Live classes provide an opportunity for students to learn a course-topic and clear up doubts through an open discussion among their classmates. These classes make the learning process enjoyable and straightforward.
How Does Google Classroom Help Teachers Personalize, Individualize, and Differentiate Instruction?
Google Classroom has many unique features that allow educators to cater to the specific needs of learners. You can do this in three ways:
Based on who the learners are
The application lets teachers create learning activities while keeping in mind a student’s proficiency in that subject. They can optimize coursework if a student struggles to keep up with the rest of the class. Teachers can also provide more challenging assignments for advanced students. Such variation in the classwork enables all students to be on the same page.
Educators can differentiate instruction for students with learning difficulties and offer them additional support. They can provide the learners with resources like presentations, worksheets, videos, graphical contents, or receive shortened assignments or extended due dates to keep them engaged in their work.
For students capable of completing more rigorous tasks, educators can optimize their assignments with increased requirements and criteria. They can also choose not to provide task resources, which will motivate them to do their own research. As you can see, the possibilities are endless. Despite requiring different education standards for different students, educators can develop the perfect assignment to meet those standards.
Based on how learners learn
The best teaching method for your students may vary from person to person. While some may enjoy learning from reading a textbook, others might want a more creative approach like presentations. With Google Classroom, you can easily upload documents, slides, videos, or other similar resources to cater to every learners’ needs.
Educators should understand that each student has a unique personality and set of abilities. Educators must teach using creative methods to bring the most out of their students. There may be learners who despise the traditional pen-paper teaching style and want to learn through visual presentations. Google Classroom has several useful integrated tools that help you achieve this goal. You can upload concept maps, images, diagrams, animations, or even include songs and podcasts for auditory learners. Similarly, kinesthetic learners can be offered virtual field trips, interactive games, etc.
Some students may enjoy working with audio files and can submit assignments by recording songs, podcasts, etc., while others may want to work on a video of them explaining the content. Similarly, some students may also prefer the standard text-based method matched with interactive images to make their point. Surveys have shown that many learners these days tend to make presentations for their classwork using free tools like Google Slides. Lastly, Google Sheets is another free tool that may be useful to kids who are good with numbers.
There are tools and options for every student to express their thoughts. You just need to be a bit creative to find what suits you.
Can Administrators Use Google Classroom Learning Analytics?
Administrators can access the ‘Highlights’ report, which lists App Usage Activity for Google Classroom, Google+, Google Drive, Gmail, and Google Calendar. Admins can view this list using an administrator account only. The report lets you analyze the in-depth usage of Google services and how they have benefited your educators and students. The available metrics are:
Weekly active users
The number of active classes in the last 14 days
The number of courses created
The number of posts created by educators and learners
For individual users, the number of classes and posts created, and the last active time
What Are the Most Efficient Ways to Use the ‘Ask a Question’ feature in Google Classroom?
Exit Tickets: Before the class ends, educators can ask the students a quick question about the lesson. The question will appear on the Stream page of Google Classroom as soon as the learners log in. Your question can be multiple choices or short responses. Exit tickets often help sort the learner’s doubts.
Wait Time:Google Classroom has a feature that displays the students who have answered the questions you posted. A list like this can help educators to proceed at a comfortable pace for all students. They also get the opportunity to understand the strengths of their students better. Instead of asking each learner if they have responded to the question, teachers can quickly view the real-time updated list.
Share a Resource: The learners can share relevant resources like documents, images, or citations to back their responses. They can upload files or share links by clicking on the “Add” button. This option also encourages the students to research the topics that they are learning.
Multiple Choice Questions and Polls:Google Classroom offers educators the ability to create multiple choice questions and polls for their class. This feature is beneficial for educators who want to receive feedback on course work, as it is quick to set up the poll, and you can get your answers instantaneously. For instance, if you want to know what topics your class would be interested in studying, you can create a poll. Likewise, students can choose one of the many choices available to them. You can also choose to keep the anonymity of the poll result by unchecking the “Students can see class summary” (underneath the “Topic”) option.
Ask Learners to Ask Questions: Educators can ask learners to answer their questions or develop their own questions. It encourages students to think out of the box and improves their higher-order thinking skills.
How Does Google Classroom Improve the Teaching and Learning Process?
Google Classroom is a big time-saver: Google Classroom provides a centralized Drive for all your files, allowing you to place all your attention on more important things. Also, all the stored files are neatly organized to avoid confusion. You can grade assignments quicker on the digital application, as it doesn’t contain the hassles of pen-paper assessments. The digital grade book also saves you valuable time and effort.
Increased educator-learner engagement levels:Google Classroom offers tons of audio-visual tools, educational apps, and technical support to help educators create engaging lessons for their students. The platform allows you to develop assignments, post entertaining YouTube videos, upload an eye-catching presentation, or even include an interactive online game. Technology-driven students of this era benefit significantly from Google Classroom.
Makes teaching more focused and organized: Since all submitted assignments are recorded and stored, educators can quickly check whether students have submitted their classwork. You can access this information from both a desktop or mobile device by clicking on the corresponding tabs. This info also allows you to grade your students effectively, based on the work and time they put in. Educators may find viewing submitted work to be an easy process, as all the files are stored in the shared Google Drive folder, which is just a click away.
Learner-educator communication and collaboration is made easy: The application makes learner and educator interaction easier. Teachers can schedule their posts or post them directly to the Google Classroom Stream. These messages can be viewed by learners whenever they log in to their Classroom account. Integrated services like Google Meet and Hangouts also allow educators and learners to stay in touch through virtual communication. Video conferencing, Q&A sessions, and live classes are a few features that improve student-teacher interaction.
How Do I Attach Files or Add Links to Assignments in Google Classroom?
Educators can link documents, PDFs, YouTube videos, drive files, or websites using the Google Classroom app. They can also share and distribute learning activities, projects, and course-related content.
Here’s how you can do it:
Select the Classroom you want to work in
Click on the (+) button on the bottom-right corner of your screen
Choose the ‘Create assignment’ option
On the assignment creation pop-up, enter the title, instructions, topic, and deadline
Choose the type of attachment you would want to include
Click ‘Assign’
The attachment option is excellent for adding online resources or the files on your desktop. Attaching files created from integrated tools like Google Docs, Google Sheets, etc., is a pretty straightforward process. This feature saves a lot of time and effort.
Educators can choose how students interact with the files you upload on Google Drive. The following options will in available next to every uploaded file in the Form of a pull-down menu:
(a) students can view the file – learners will be allowed to read the file but cannot edit it.
(b) students can edit the file – learners will be allowed to read and edit the file freely.
(c) make a copy for each student – each learner will get an editable copy of the file. Each file will automatically have the learner’s name on the title. The edited copies will then appear in your Google Drive underneath the ‘Classroom’ folder.
You can also use the attachment feature to share answer templates that students should follow while completing their assignments.
Can I Share Assignments with Multiple Classes in Google Docs?
Suppose you have several classes accessing the same material. In that case, you can post the same resources or assignments to numerous classrooms at once through Google Classroom. All the learners will receive the same assignments at the same time, thereby effectively saving time.
To do this, click the pull-down menu on the top-left corner of the screen in the assignment creation pop-up message. It displays the current class you are accessing by default. Select the class (or multiple classes) you want to post the assignment to by clicking on the downward-pointing arrow next to the current class name. When you post the assignment, it will appear in all the Classrooms you have previously selected at the same time.
Can I Differentiate Assignments to Individual Students?
In the pull-down menu of the assignment creation pop-up, you will find your students’ names from a specific class listed. By default, ‘All Students’ will be selected. Click on the downward-pointing button next to it and select the name(s) of the student(s). Once you post the assignment, only those specific students will receive it.
Using the steps above, you can assign a more challenging assignment to higher-level students, a modified one for struggling students, or even make up an assignment for one specific student. The tasks can be differentiated with ease.
Similarly, you can post questions or assignments to a specific group of learners without the hassle of having to confuse the other learners with posts that are not intended for them.
How Can I Use Google Calendar Integration with Google Classroom?
When you create or join a class, a calendar pertaining to that class is added to your Google Calendar. Any appointments, video conferences, deadlines for assignments, or dates for exams can be updated through this Calendar. All changes will, by default, get updated on your learners’ calendars. This way, Google Calendar’s integration with Classroom makes it easy for you and your learners to stay organized.
How Do I Open Google Calendar in Google Classroom?
Select a Classroom > Click on the ‘About’ tab > Click on ‘Google Calendar’
Place your cursor over the Calendar you want to share from under ‘My Calendars’ in your Google Calendar. Then click the three dots beside the calendar name.
Click ‘Settings and sharing.’
Now scroll down to the “Access Permissions” section, and check the box “Make available to public.”
Click on ‘Get shareable link’ right below.
You can then copy the link to share it with the parents through their social networking profiles or emails.
How Do I Archive a Room in Google Classroom?
If you complete a class and want to remove it from your home screen but don’t want to lose access to the shared assignments learner progress, you have an alternative. Google Classroom allows you to ‘archive the Class’ so that you can reuse those posts again.
Click the three-dots button located in the upper right corner of the class you want to archive and choose ‘Archive’ from the next menu.
Click ‘Archive’ again once the confirmation pop-up message appears
If you want to make an archived class active again, follow the steps below:
b. To unarchive a class
Open the Google Classroom homepage and click the menu button in the top left corner of your screen.
Scroll down and click ‘Archived classes.’
Click on the ellipsis (three-dots) button located in the upper-right corner of the tile of the class you want to restore, and select ‘Restore’ from the drop-down menu.
Click ‘Restore’ again once the confirmation message pops up.
How Do I Reuse Old Posts and Assignments in Google Classroom?
If you want to share an old post with a new group of students or want your students to repeat exercises or review the content for a second time, Google Classroom allows you to do so.
First, select a Classroom and go to the “Classwork” tab.
Click the (+) Create button on your screen and scroll down to select ‘Reuse post.’
The pop-up will list your classes, including the archived ones. Select the class you want to reuse the post from.
The posts you previously assigned to the class will appear. You can choose the one that you want to repost.
If the post has attachments, check the box at the bottom-left corner that says ‘Create new copies of all attachments’ and then click ‘Reuse.’
The assignment creation pop-up appears; make changes if needed, and then press ‘Assign.’
How Do I Schedule Posts and Assignments in Google Classroom?
In case you have several assignments ready to be allotted but do not want to post them all at the same time, you can schedule your posts so they can be posted on the day and time of your choosing. Once you set it, Google Classroom will automatically post it for you.
Here is how you do it:
Create your post or assignment, and then in the top right-hand corner where it says ‘Assign,’ click the downward arrow and select ‘Schedule.’
Select the date and time in the pop-up window.
Click ‘Schedule,’ and the assignment will be posted on the date and time of your choosing.
Remember that a post can not be scheduled for multiple classes. It must be done individually for each class.
How Do I Create Self-grading Quizzes in Google Forms?
You can create self-grading tests through Google Forms. It saves time, the students can see their test results right after they submit the quiz, and you can pre-record feedback for right or wrong answers.
You can double-check the Form by clicking on the ‘Preview’ (eye button) on the top right-hand corner of your screen. You may answer all the questions and check if everything is working as you wish.
Click on the ‘Responses’ tab next to the ‘Questions’ tab, then toggle ‘Accepting responses’ and click on the ‘+’ button to create a spreadsheet to collect the responses.
Now back in your Google Classroom, create a new post, and click the Google Drive button to insert the specific Google Form.
Learners will have access to view the Form as an attachment to the original post.
How Do You Invite Co-teachers to Google Classroom?
If you have a co-teacher working with the students in the Classroom, you can add them to your Google Classroom account. While you invite your co-educator, you can always control what they can and cannot do within your Google Classroom based on the default permission settings.
The guardian email summaries feature is turned off by default. Here’s how you can turn it on:
Select a Class.
Click on the Settings (gear) icon, and scroll down to the ‘General’ options.
Toggle ‘Guardian summaries’ to turn it on.
Next, you have to invite the parents to your Google Classroom so the summaries can reach them. Go back to the ‘People’ tab. Here, you will find, next to your students’ names, the option to ‘Invite Parents.’ Click on it, enter the parents’ or guardians’ email addresses, and click ‘Invite.’
If you cannot invite guardians, you may need to resolve this issue with your school administrator.
How Do You Communicate With Students Using Comments in Google Classroom?
You can communicate with your students inside your Google Classroom in two main ways. These are- class comments and private comments.
Class comments: This is similar to comments made with your social media handle, where your comments will be visible to the entire class. Class comments appear in the ‘Stream’ tab, where both the educator and the learners can reply to comments.
So if a student has a question about the assignment, they can comment under the post, and the educator can reply with an explanation. Since all can view these Class comments, even other students can benefit from them.
You can even set who can comment on the posts. Google Classroom provides you with these three choices: Students can post and comment, Students can only comment, and Only teachers can post and comment. Change the settings as desired in the ‘General’ settings section by clicking on the Settings (gear) icon on the ‘Stream’ page. A drop-down menu below the ‘class code’ contains all three options. It is essential to instruct the students to post comments responsibly so as to create an environment open for discussions and conversations about the course. You can then let them retain their privileges to comment!
Private comments: These are helpful for one-to-one conversations between a student and a teacher. You can provide constructive criticism or praise to a student about an assignment without it being visible to other learners or appearing on the ‘Stream’ tab.
Students can add their private comments when they submit their assignments in the assignment turn-in pop-up. You can view these comments and reply to them from the ‘Grading’ section. These options encourage healthy and frequent communication between the teacher and student that is crucial for the teaching and learning process.
How Do I Send Students Emails in Google Classroom?
You can also communicate privately with a student via email through Google Classroom instead of a private comment. This feature allows you to explain your thoughts more exhaustively.
Here is how you do it:
Select a Class.
Click on the ‘People’ tab at the top of the page.
Check the name of the learner(s) you would like to send an email to.
Click on the ellipsis (three dots) button on the right corner of the name and select ‘Email student.’
On the Gmail pop-up that appears, type your message and hit ‘Send.’
To benefit from this feature, you must be logged in to your Gmail account, and your students must have access to their email. So make sure these boxes are checked first.
How Does My Child Access Google Classroom?
The teacher does most of the work in setting up a Google Classroom. Once they set up the Classroom, they will provide a class code for your child to enter. The teacher can also send an invite via email. When your child has been granted access to the Classroom, they can join any time by merely going to classroom.google.com.
For students taking multiple subjects under different teachers, multiple Classrooms will appear on their dashboard. They have to select the Classroom that they want to enter from the dashboard. Once the student enters the class, they will find the following tabs at the screen’s top.
Once a student logs in to the Classroom, they will see the Stream tab, showing the announcement page where the teachers post course-related content and other messages. They will also find an overview of the work they have been assigned to do or any other posts the teachers may include.
Next to the Stream tab is the Classwork tab. It shows a full list of the assignments added by the teacher. A click on any assignment shows all details like due dates, resources required, and completion status. The student can also submit their finished assignments here, adding files, slideshows, or images as necessary.
The last tab is the People tab, which shows all the students and teachers participating in the Classroom. Here, students can directly communicate with one another or with their educator via email.
Click on the + sign in the upper right-hand corner of your Google Classroom account. Select ‘Create class.’
A ‘Create class’ pop-up will show up. Fill in the relevant information in concise and clear words. The Class name is mandatory, while the Section, Subject, and Room are optional. Once done, click ‘Create.’
In the ‘People’ tab, click on the sign next to ‘Students’ to add your learners to the Classroom. You can add learners by entering their email addresses and adjust what permissions you want the learners to have regarding commenting and posting. If the class is large, this process is going to take quite some time. Alternatively, you can ask your students to join the class by entering the code you have provided them with. You will find the code at the bottom of the page.
Open your ‘Stream’ tab to make any announcements to the class. You will be able to attach a file, a document from Google Drive, a YouTube video, or any other link to a resource.
In the ‘Classwork’ tab, create an assignment for the learners enrolled in the class. Add in the title, the description, and instructions and give it a deadline for completion. Attach any resources you want the learners to refer to, and then click on ‘Assign.’
Your class is now ready to go. The learners can now gain access to the class and work on their first assignment.
How Do I Monitor Student Assignments in Google Classroom?
In your Google Classroom account, click on the ‘Stream’ tab. You will find ‘Upcoming Assignments,’ which lists all the assignments you have posted, on the page’s left corner. Click on one of those.
This will take you to the learner work page. It shows you the learners’ status of assignment completion. An assignment is marked complete when a student submits their work in their Google Classroom account. This option automatically allows you to view the names of the students who have turned in their work. You can then reach out to those who haven’t submitted their work to ensure they do not fall behind academically.
Check the box next to the learner’s name. It allows you to email the learner(s) by clicking on the ‘envelope’ icon at the top of the screen. It’s better to send an email if you have more than a few questions or explanations to share.
You can review the students’ work and assign them grades and points now. What was previously a tedious job done by hand now can be done by a simple click. Once a student has submitted their work, you can grade it and return it to them. The student will automatically see their grade once they log in to their Google Classroom account.
Clicking on a student’s name will allow you to send them a private comment (including some constructive criticism), a request for altering something in the assignment or resubmission, or even some praise for their effort.
Clicking on the folder at the top of the learner work page allows you to view all students’ work simultaneously. You will now have access to all the submitted assignments, and they will include the student’s names in the title, so you know who the work belongs to.
Why Should We Use Google Classroom?
One main reason to amalgamate Google Classroom into your actual Classroom is because of the highly engaging nature of the app. Children love working with technology. Combine it with a fast and paperless way to cover and exchange resources like Google Slide presentations with bright and colorful images, and the app is bound to increase students’ interest in learning. Besides, it much more fun for the educator to create interactive resources than filling out a boring worksheet!
Google Classroom is relatively easy to get the hang of once you use it a couple of times. Students are already very good with technology on their own. Just a few tutorials will have them ready to log in and get started on their assignments. They might even come up with new and creative ways to use the app to surprise the educator.
Another beneficial feature of Google Classroom is its organizational features. All work assigned or submitted is saved in Drive. No worries about lost homework or a massive stack of assignments to hand out. All work is online and safe.
This feature also saves teachers a lot of time. All they have to do is share resources with their students through Google Classroom, and it is then available to the students to peruse at their own time. They can access any educational material they require to grasp a concept in their course fully.
We all know, no teacher likes grading assignments. The self-grading feature on Google Forms makes everything that much easier. It even gives you a spreadsheet of the students’ scores. With Google Classroom, you can create quizzes with multiple choice questions and input the correct answers. Once the student submits the test, their score is automatically shared with them and you. So, not only is it an incredible time-saver for the educator, but it also provides students with instant feedback.
This app allows an educator to better cater to a student based on their abilities. Learners can freely work at their own pace while having differentiated assignments to suit their needs. The teacher can assign assignments to specific students or modify assignments with additional resources to be submitted at a different due date.
Why is Google Classroom So Popular?
If you have been using paper for your resources and assignments, Google Classroom provides a user-friendly digital alternative. The app is intuitive and easy-to-use, and if you have been using paperless methods for learners before this, the Classroom will effortlessly integrate apps to make for an efficient workflow.
The app’s self-organizing feature is incredible as it puts all assignments in one safe place to be accessed whenever you want. No more losing assignments that turn up months after their due date! Students can log in to their Google Classroom account, and their projects will be waiting for them, especially with the handy auto-save feature of all Google apps. For an educator, this app is immensely flexible and time-saving. It streamlines the whole process of developing an assignment, copying, assigning, supervising, collecting, grading, recording grades, and returning the assignment with feedback into a few small tasks that can be accomplished by a few simple clicks. Every piece of work is saved and organized in a Google Drive folder with easy access.
Google Classroom is a management app rather than a production app. It is user-friendly like all other Google apps, and if the students use other Google apps such as Docs or Spreadsheets, they will feel comfortable using Classroom. It merely requires you and your students to post information and locate them when necessary.
Google Classroom is designed to provide a healthy learning environment where ideas can flow freely, and discussions can be held easily. An educator can post a question on the ‘Stream’ page, and everyone in the Classroom can reply with their answers or link resources and share ideas with each other.
Due to its time-saving features, paperless platform, and ability to create engaging, interactive assignments, it is quickly becoming a popular learning management app used in many schools and educational institutions.
How Does Google Classroom Compare to Other Learning Management Systems?
The market for Learning Management Systems or LMS’s is already cutthroat. Many other LMSs have been here for a while, providing unique features and user-friendly tools. Google Classroom has many innovative features. But what makes it have the edge over other LMSs is its easy integration with Google’s other free services. This helps teachers to incorporate Google Docs, Sheets, Forms, or Slides into their assignments while also making sharing assignments with students more manageable.
Another massive advantage of using Google Classroom is that it is created for easy collaboration or sharing. Learners can share their work and resources with their classmates and interact with them by sharing questions and tips. Educators can collaborate with each other and can assign tasks for group projects to specific groups of students. One-click is all that is required for a collaborative discussion.
However, if you have grown used to other LMSs, you might not find certain perks that they have included over several years of modification. Some LMSs allow educators to create assignments right in the app or enable a seamless integration of non-Google apps for communication and sharing of relevant data.
What Types of Posts and Assignments Can You Make in Google Classroom?
Although you can post just about anything in Google Classroom, there are five main types of posts it allows you to create:
Assignment: You can make a post that provides students with assignments and allows them to submit them. You can build assignments on any subject and have the students complete them in many different formats, such as a Google Slides presentation, or fill in data on a Google sheets form. Based on the content you want to cover, you have endless ways of creating assignments that meet each student’s needs and abilities.
Quiz Assignment: You can post a Google Form questionnaire or quiz in the Classroom. You can make it multiple choice or short answer, input the correct answers to have it automatically graded. Students can immediately see their grades once they submit the quiz. It provides immediate feedback and saves time.
Question: You can post a question for your students to reply to. It can be a question that the students can respond to with short answers. It can also be a question inquiring about the best time to hold a video conference, or you can ask for student feedback about coursework.
Material: You can post resources for coursework or assignments, which can be in the form of an article (through Drive), a link to a piece of information, pictures or slides, even a YouTube video. Any kind of educational content, posters, or study guides can be posted.
Post to the Stream: An announcement or link posted on the Stream homepage will be the first thing your students will see when they login into their Google Classroom account. These posts are great if you want to share important messages. You can even choose which students get to see your posts if you only want to reach specific students.
When you create a post, you can always link documents from your Google Drive, images, or videos. Many apps can integrate well with Google Classroom, so you can always share content with ease.
In Google Classroom, What Are the Essential Parts of an Assignment Post?
Title: You type in the title of the assignment here. The title of a project always has to be concise and easy to understand. Never repeat a title, or it might confuse your students.
Instructions: Instructions are not mandatory. You can add pieces of information or notes you want your students to remember while attempting the assignment. You can add tips and tricks, or reminders, or a warning statement.
Add: This is the space where you link resources that your students will need to understand and complete the assignment correctly. You can share a document from Drive, a file, or a video. You can make the learning process a lot more enriching and interactive in this way.
Develop: This is where you can create a new Doc, Slide, Sheet, Drawing, or Form. Create the perfect assignment, and then it can be easily uploaded as a new assignment.
For: A assignment is usually automatically posted in the Google Classroom you are working on. But by using this drop-down menu, you can choose a single assignment to be posted to multiple Classrooms. You can also select a particular project to only be accessible by a specific group of students or even a single student.
Points: By default, the app assigns 100 points to an assignment, but you can alter it or leave it ungraded.
Due Date: You can choose a due date for the assignment to be submitted by the learner. A deadline helps students to stay focused and motivated. If you want your students to have sufficient time to finish the assigned work without the added pressure of a deadline, you can select the ‘no due date’ option.
Topics: If you want to separate your assignments by subject, you can assign them under a particular topic. It helps to keep your projects even more organized. However, it is an optional setting, so you can always choose ‘no topic.’
Rubric: You can create a rubric for your assignments within Google Classroom or upload your own. Students can self-assess their work through the provided rubric.
You can post your final assignment by clicking on ‘Assign’ on the upper right-hand corner of the page. If you have several projects ready to go but do not want to post them all at once, you can schedule your posts. This can be done by clicking on the downward pointing arrow next to ‘Assign’ and then selecting ‘Schedule.’ You will be asked to set in a date and time for your assignments to be posted, and you don’t have to worry about posting it on time after that.
How Do I Delete a Google Classroom I Am No Longer Using or Made by Mistake?
You can archive a Class when you are done with it and reuse the posts at a later date if you want. However, if you do want to delete a class, here are the steps you need to follow:
To delete a class, the first step is to archive it. In the Classes homepage, hover the cursor over the class you want to delete and click on the ellipsis (three dots) button and select ‘Archive’ from the drop-down menu.
A confirmation pop-up will appear. Click ‘Archive.’
Then, on the menu on the left corner of the homepage, select ‘Archived classes.’
You will find the class you just archived. Click on the ellipses (three dots) on the upper right-hand corner of the class and select ‘Delete.’
A confirmation pop-up will appear, asking you if you are sure to delete the class. Click ‘Delete’ to delete your class permanently.
Where Do I Find the Class Drive Folder?
The shared Drive Folder located in your Google Drive can be accessed in two ways. First, through your Google Classroom account, and second, using your Google Drive account. This folder includes every assignment you have created for the class, all the resources you have shared, any materials you may have uploaded, and all the work turned in by your students.
To access this folder using the first method, go to the ‘Classwork’ tab in your Google Classroom account. You will find it in the upper right corner next to the folder icon titled ‘Class Drive Folder.’
To access the folder from your Google Drive, login to your Drive by going to drive.google.com. Once the page opens, click on ‘My Drive’ on the left-hand side.
You will find a section named ‘Folders’ where you will see a folder titled ‘Classroom.’ Clicking on this will take you to all the drive folders for each of your Google Classrooms. The title of each drive folder will be the same as that of the corresponding Classroom. Here is an example:
How Do I Personalize My Google Classroom Homepage?
By default, Google Classroom will put a random image as the background of your Classroom. But you can always change it based on the subject, theme, or your personality. The app allows you to pick a theme from a menu of choices provided by Google, which include the categories: General, English & History, Math & Science, Arts, Sports, or Other. Each category offers many colorful and inventive pictures to pick from.
To choose a theme for your Classroom, go to the homepage, and you will see a colorful rectangular box that mentions the class title and class code. Click on ‘Select theme’ on the bottom right corner to pull up your options.
Choose the theme you like best and click ‘Select class theme’ on the bottom left corner. The new theme will now be updated on the homepage.
In case you do not like any of the theme choices, you can drag and drop an image or upload it from your computer. You can choose to upload a personal photo or one downloaded from the internet. To select this option, go to the Classroom homepage and click on ‘Upload photo’ in the bottom right corner of the colorful rectangle showing the class code.
Click on it, and the screen below will appear:
You can drag and release a photo it, or click on ‘Select a photo from your computer.’ A menu showing your files will appear.
Select the image file that you want to upload and click ‘Open.’
It will upload the image you selected:
Once it is uploaded, you can crop it as you desire. Once you are happy with the way it looks, click ‘Select class theme’ on the bottom left corner. The image will be uploaded to the main page.
How Do I Save an Assignment as a Draft and Finish it Later?
One of the handiest features of Google apps is their auto-save feature. You no longer lose work if you forget to save it or your computer crashes mid-work. Google Classroom also has the same auto-save feature.
You can save an unfinished assignment as a draft by merely clicking the drop-down arrow next to the ‘Assign’ tab and selecting ‘Save as draft.’ However, it is unnecessary to log off in the middle of creating an assignment, as it will automatically be saved as a draft. You can come back and finish it later at any time.
The following is an example of an assignment that has not been posted:
The ‘X’ next to ‘Assignment’ allows you to exit out of the assignment you are working on and come back to the ‘Classwork’ tab. You can see it being saved as a draft here.
Your unfinished assignment will still be in the drafts section even after you have logged out. You can come back at your leisure and click ‘Edit assignment’ to finish creating the assignment.
If you want to delete the draft, click on the ellipsis (three dots) button next to ‘Draft’ and select ‘Delete.’ Your draft assignment will be deleted.
How Do I Create a Spreadsheet of the Assignments and Grades From My Google Classroom?
Under the ‘Grades’ tab of your Google Classroom, you will find an easy to read and well-kept digital grade book with all the assignment titles along with their due dates and the grades assigned to each student. The ‘class average’ feature takes all the grades for a particular assignment and churns out the class average for that assignment. If you want to view the grades in the form of a spreadsheet, Google Classroom allows you to convert the digital grade book into a Google Sheets file. Here are the steps:
Click on the ‘Grades’ tab to view the digital grade book.
Click on an assignment title, and then go to the Settings (gear) icon in the right-hand corner of the page. Select ‘Copy all grades to Google Sheets.’
A Google Sheet will automatically be generated for you, using your Google Classroom grade book’s data. You can view it on your screen as it opens up automatically.
Why would I want to create a spreadsheet?
A spreadsheet allows you to have a printable record of the grades you handed out.
You can share the spreadsheet with the school administration to assess and discuss student progress in the class.
You can make a copy with only one student’s grade information to share it with their parents during a conference.
You can add additional student info to the spreadsheet for a more comprehensive file.
The spreadsheet allows you to calculate the class grade average automatically.
Concluding Thoughts
We hope this guide answers all the frequently asked questions regarding Google Classroom.
How do you think we did? Did we miss any questions? We hope the guide helps you understand Google Classrooms’ inner workings and endless features.
Daily motivational coaching and engaging online lessons build resilience and confidence.
(Minneapolis) January 5, 2021 — EmpowerU today announced that the company has secured $1 million in seed funding to launch its highly personalized, tech-powered, social-emotional learning solution nationwide. The funding will fuel EmpowerU’s efforts to bring much-needed mental health support to students beyond Minnesota, where more than 1,000 students have already benefited with improved wellbeing, confidence, and hope.
This round of financing was led by Capita3, a Twin Cities venture firm with a focus on women-led organizations. Additional investment partners include ECMC and GreatNorth Labs.
A recent EdWeek survey indicated that 66% of high school principals are actively searching for effective solutions to battle the escalating levels of student anxiety, avoidance and depression. With EmpowerU, student growth happens one day at a time, one small step at a time through engaging, online skill-building lessons supported by daily 1:1 motivational coaching. This daily blend of support results in significant improvements in emotional wellbeing, school attendance, and grades, while decreasing the need for more costly interventions.
EmpowerU coaches are highly trained, empathetic therapists who help students face their obstacles and make the important connection between core concepts in online lessons and the unique challenges in their lives, fueling change.
“EmpowerU delivers transformational student support at a fraction of the cost of therapy,” said Katie Dorn, the company’s co-founder. “As a licensed school counselor and therapist, I know how desperate educators are for cost-effective tools that actually help students overcome struggle. Although most students are unable to control their barriers, EmpowerU helps them navigate obstacles and come out the other side stronger. Students build hope that despite their difficult circumstances, they can feel better and thrive, today and in the future.”
Independent evaluation of EmpowerU showed that:
More than 93% of students who complete EmpowerU make a dramatic shift from discouragement and anxiety to improved wellbeing, motivation, and hope.
More than 88% of students complete the program, compared to 5-30% completion rates with other programs.
More than 98.5% of students would recommend EmpowerU to a friend or classmate.
Students can access the EmpowerU portal on any computer or mobile device. The semester-long course can be completed online in only 20 to 30 minutes per weekday. EmpowerU’s approach is aligned with CASEL and National Health and Wellness standards, so students who complete all six units of the course can receive a semester wellness credit.
EmpowerU was launched in Minneapolis-St. Paul by three clinicians from different but complementary adolescent mental health specialties who saw the deep need to re-engineer the delivery of mental health support to schools. The highly supported course uses evidence-based strategies, habit-change tools, wellness focus, and mental health coaching methodology to empower students to decrease anxiety and build persistence, resilience, and confidence.
# # #
About EmpowerU
EmpowerU’s revolutionary approach helps students replace anxiety and depression with resilience and confidence. As active participants in their wellness journey, students receive engaging online lessons and daily motivational coaching that fuels improved emotional wellbeing, school attendance, and grades. EmpowerU offers site-based licenses to schools and colleges, as well as access to the credit-bearing course through third-party online schools or direct from the company. To learn more, visit EmpowerU.education.
About Capita3
Capita3 is a venture capital group investing in early stage companies innovating in health that are led by women. Capita3 is led by successful entrepreneurs and investors who’ve founded and built companies to exit, and experienced dozens of startup company exits. Capita3 believes in investing in the growth of the CEO alongside our investment in the growth of the company, and is instrumental in helping companies launch, grow and exit.
About ECMC
ECMC Group’s Education Impact Fund (‘EIF’) is ECMC Group’s $125M+ strategic impact investment arm. EIF invests market-rate capital in impact-driven, financially scalable companies that are improving access and outcomes for learners. EIF is committed to building a diverse portfolio of seed- to later-stage companies, as well as investments in other mission-aligned funds across the post-secondary and future-of-work sectors.
About GreatNorth Labs
Great North Labs is an early-stage venture fund based in St. Cloud/Minneapolis and focused primarily on the Upper Midwest. It is led by successful tech founders/investors in Minnesota and Silicon Valley. As founders backing founders, the fund cultivates access to investment intelligence and opportunities via strategic relationships to directly help entrepreneurs and startups develop, grow, and find exits.