Helicopters have always been an object of fascination for both children and adults. The way they hover and maneuver through the sky intrigues many. If you have ever wanted to make a simple flying toy at home, a DIY helicopter craft might be the perfect project for you! In this article, we will guide you through the steps to create a fun and engaging helicopter craft that you can enjoy with your kids or even by yourself.
Materials Required:
– Cardboard
– Scissors
– Ruler
– Pencil
– Colored construction paper
– Glue or adhesive tape
– A wooden dowel (or a pencil)
– A small plastic bottle cap
Step 1: Prepare Cardboard Pieces
Start by cutting out two rectangular pieces from the cardboard. One piece should measure 8 inches by 1 inch, and the other should measure 5 inches by 1 inch. These will form the main rotor blades of your helicopter.
Step 2: Attach Blades to Dowel
Take your wooden dowel (or pencil), and lay it down on the table horizontally. Place the longer cardboard piece on top of the dowel, aligning its center with that of the dowel. Similarly, place the shorter cardboard piece directly below the dowel, again aligning their centers. Now secure both pieces of cardboard onto the dowel using glue or adhesive tape.
Step 3: Fold Blades
Gently fold both cardboard blades upwards so that they sit at a slight angle (around 45 degrees). This will help them catch the air when your helicopter spins, creating lift.
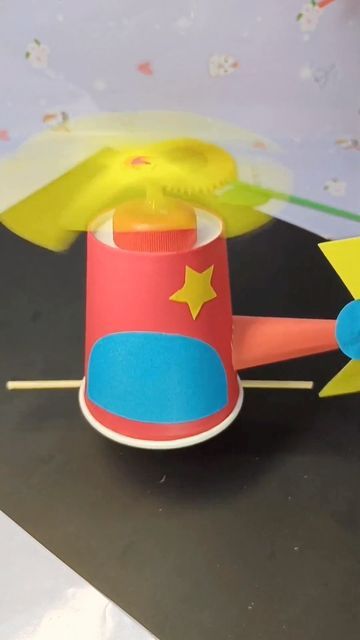
Step 4: Create Helicopter Body
Cut out a rectangle from colored construction paper measuring about 6 inches by 4 inches. Roll it into a cylindrical shape, sealing its overlapping edges with glue or adhesive tape. This will form the body of your helicopter.
Step 5: Attach Rotor Assembly to Body
Slide the wooden dowel (with the attached blades) through the top opening of your construction paper cylinder. Once the dowel has passed through, secure it by using glue or adhesive tape to affix a small plastic bottle cap at the end of the dowel.
Step 6: Tail Fin and Stabilizer
Cut two triangular shapes from colored construction paper. One should be larger than the other; this will become your tail fin, while the smaller one becomes your horizontal stabilizer. Attach both triangles to opposite ends of the cylindrical body, with the tail fin near the rotor assembly, and the stabilizer at the other end of the cylinder.
Step 7: Decorate Your Helicopter
Now comes the fun part – decorating your DIY helicopter craft! Get creative with paints, markers, stickers, or glitter – anything that will personalize your new flying toy.
Step 8: Enjoy Your Flying Toy
Hold your helicopter at a height and let it go! Observe how its rotor blades spin as it falls towards the ground, simulating a real helicopter in flight. Experiment with different throwing techniques to see how they impact flight performance.
In Conclusion:
The DIY helicopter craft is not only an easy and fun project but also an excellent way to teach kids about aerodynamics and engineering principles. Creating this flying toy will undoubtedly provide hours of entertainment for all involved. So grab some cardboard, a dowel (or pencil), and let’s get crafting!