Introduction:
A broken laptop screen can be extremely frustrating, but it doesn’t necessarily mean you have to shell out for a brand new laptop. Many broken screen issues can be easily fixed by connecting the laptop to an external monitor. In this article, we will discuss the steps you need to follow to attach a laptop with a broken screen to a monitor.
1. Gather Your Equipment
Before getting started, gather the necessary equipment:
– An external monitor
– A video cable (HDMI, VGA, or DVI) that is compatible with both your laptop and monitor
– A power cable for the monitor
– Mouse and keyboard (optional)
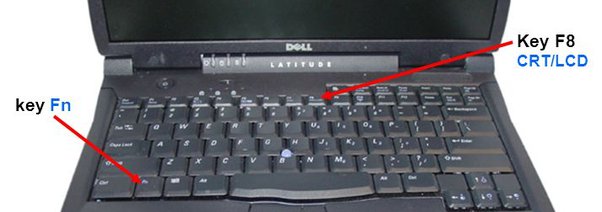
2. Identify Video Output Port On Your Laptop
First, identify the video output port on your laptop. This can vary depending on the make and model of your device, but most laptops have either an HDMI, VGA, or DVI port. If you are unsure about which port your laptop has, refer to your user manual or look for it online.
3. Turn Off Your Laptop
Before connecting the video cable to your laptop and monitor, turn off your laptop. This will help ensure there are no accidental electrical surges during setup that could damage your devices.
4. Connect The Video Cable To Your Laptop And Monitor
Plug one end of the video cable into the corresponding port on your laptop and the other end into your monitor’s input socket. Make sure the connections are tight and secure so as not to disrupt transmission during use.
5. Connect The Monitor Power Cable To A Power Source
Connect the power cable from your monitor to an electrical outlet or surge protector.
6. Turn On Both Devices
Turn on your monitor first followed by powering on your laptop.
7.Set Your Monitor As The Primary Display (Optional: If You Can See Enough Of Laptop Screen)
If you can see enough of your broken laptop screen to navigate, right-click on the desktop background, and go to “Display settings” or “Screen resolution.” Look for the section that shows multiple monitor display settings, and set your external monitor as your primary display.
8. Adjust Display Settings If Necessary
If your laptop doesn’t automatically detect the external monitor or adjust resolution, press the “Windows” key together with the “P” key (hold both keys down simultaneously) on your keyboard to open the project menu. Choose “Extend” for a dual display setup or “Second screen only” if you want to use only the external monitor.
Conclusion:
Connecting a laptop with a broken screen to an external monitor is an efficient way to troubleshoot and continue using your device without incurring additional expenses. Following these steps will allow you to quickly and easily extend or replace your laptop’s broken screen with an external monitor, giving new life to an otherwise unusable device.