Tech Advice

Top 7 Ways to Fix Google Chrome Not Loading Pages on Android and iPhone

Introduction:

Google Chrome is a popular web browser used by millions of people on their smartphones. However, at times it could stop loading pages, leaving users stranded. If you’re facing similar issues on your Android or iPhone, worry not! Here’s a list of the top 7 ways to fix Google Chrome not loading pages on mobile devices.

1. Check Your Internet Connection:

Ensure that your device is connected to the internet via Wi-Fi or cellular data. Sometimes, weak signal strength or network issues could make it seem like Google Chrome is malfunctioning. Open another app requiring internet access and check if it’s functional. If not, consider restarting your phone or switching to a different network.

2. Restart Google Chrome:

Closing and reopening Google Chrome can help solve temporary glitches. Remove it from the app switcher (recent apps) and then reopen the browser. This restarts the app and can potentially resolve any issues that may have arisen.

3. Clear Cache and Data:

Go to Settings > Apps & notifications > Chrome > Storage on Android or Settings > General > iPhone Storage > Chrome on iPhone. Tap ‘Clear Cache’ (Android) or ‘Offload App’ (iPhone) to clean up unnecessary data that might be causing the issue.

4.Refresh The Web Page:

Refreshing the page multiple times might help load it properly sometimes. Tap the refresh button (↻) next to the address bar to force a reload of the page.

5. Update Google Chrome:

Make sure you’re using the latest version of Google Chrome by visiting the App Store (iPhone) or Play Store (Android). Old versions may contain bugs that prevent pages from loading effortlessly.

6. Disable All Extensions:

Extensions could cause conflicts within the browser and lead to page loading issues. In Google Chrome, go to Menu > More Tools > Extensions, and turn off all extensions. Restart the browser and check if the pages load correctly.

7. Reset Chrome Settings:

If still facing issues, consider resetting Google Chrome settings to default. Go to Menu > Settings > Advanced > Reset and clean up (Android) or Settings > Privacy > Clear Browsing Data on iPhone. This step will remove all personalized settings like bookmarks, stored passwords, and other browsing data.

Conclusion:

Although Google Chrome is a powerful and reliable web browser, it occasionally suffers from page loading issues on Android and iPhone devices. Implementing the solutions mentioned above can help resolve these issues quickly. If nothing works, try uninstalling and reinstalling Google Chrome on your device as a last resort solution.

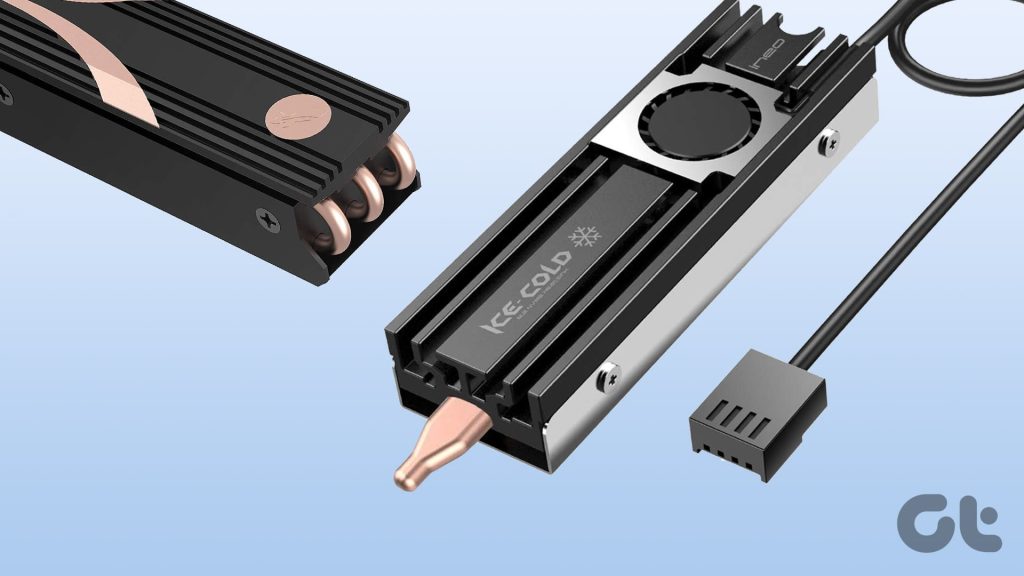
The Importance of Heatsinks for M.2 NVMe SSDs

With the rapid advancement of technology in recent years, Solid State Drives (SSDs) have become an integral component in most modern devices. Among the different types of SSDs available in the market, the M.2 NVMe SSDs have become increasingly popular due to their high-speed performance and compact form factor. However, these SSDs are also known to generate a considerable amount of heat, which raises the question – do M.2 NVMe SSDs need a heatsink?

What is an M.2 NVMe SSD?

M.2 stands for Next Generation Form Factor and is a specification for mounting storage devices onto motherboards via a small, versatile form factor. NVMe (Non-Volatile Memory Express) is a protocol designed specifically for high-performance SSDs that use NAND flash memory. When combined, M.2 NVMe SSD drives offer significant speed and storage advantages over traditional SATA III or HDD counterparts.

Why Heatsinks May Be Necessary

One of the primary concerns when it comes to M.2 NVMe SSDs is overheating. Due to their dense circuitry and small size, these drives can generate significant thermal loads during heavy use or when multiple drives are installed in confined spaces.
To maintain optimal performance and ensure longevity, it’s essential to ensure that temperatures remain within reasonable limits. This is where heatsinks come into play – they help dissipate heat from the drive quickly and efficiently.

Factors to Consider

1. Drive Workload: If your SSD operates under constant heavy workloads, such as video editing or rendering 3D models, utilizing a heatsink might be necessary to provide efficient cooling.

2. System Cooling: Effective airflow within your device can contribute significantly towards keeping your components cool. If your device uses efficient cooling solutions like fans or liquid-cooling, you might not require an additional heatsink for your M.2 NVMe SSD.

3. Thermal Throttling: Modern M.2 NVMe SSDs often come equipped with thermal throttling, which regulates the temperature of the drive by reducing its performance when reaching critical temperature levels. This built-in feature can reduce the need for an external heatsink in some situations.

4. Manufacturer Recommendations: Always consult your SSD’s manufacturer guidelines for their specific recommendations regarding heatsinks and thermal management.

Conclusion

The necessity of a heatsink for your M.2 NVMe SSD depends on several factors that can contribute to overheating such as drive workload, system cooling, and manufacturer recommendations. Evaluate these conditions and monitor your SSD temperature to determine if a heatsink is required for optimal drive performance and longevity. Ultimately, using a compatible heatsink can help to enhance your dashboard’s effectiveness and extend its lifespan significantly.

Last Chance to Get a Free Dada Zarude and Shiny Celebi in Pokémon Sword and Shield

If you’re an avid Pokémon Sword and Shield player, you might already be well aware of the limited-time distribution event for Dada Zarude and Shiny Celebi. For those who haven’t claimed these Pokémon yet, this may be your last chance! In this article, we’ll provide details on how to get your hands on these special Pokémon.

As part of a collaboration between Pokémon Sword and Shield and the movie “Pokémon the Movie: Secrets of the Jungle,” players have been given a chance to acquire two exclusive in-game Pokémon — Dada Zarude and Shiny Celebi. The promotion began on November 18th, 2021, and is set to end on December 27th, 2023.

So if you haven’t claimed these rare Pokémon yet, follow the steps below to get them right now:

1. Sign up for the Pokémon Trainer Club newsletter – If you’re not already a member of the Pokémon Trainer Club (PTC), sign up by heading to the official PTC website (www.pokemon.com).

2. Opt in for marketing emails – While registering for the PTC newsletter or if you are already a member, make sure you’ve checked the box that allows you to receive marketing emails from The Pokémon Company International.

3. Wait for the email – An email with codes for both Dada Zarude and Shiny Celebi will be sent to eligible users starting from December 15th, 2021. Check your inbox regularly (and your spam folder) for this important email.

4. Redeem your codes in-game – After receiving your unique codes, boot up your copy of Pokémon Sword or Shield and follow these steps:

– Select ‘Mystery Gift’ from the game menu.

– Choose ‘Get a Mystery Gift.’

– Click on ‘Get with Code/Password.’

– Enter the provided code and confirm.

– Once the Pokémon are obtained, find them in your collection and enjoy!
Remember, the last day to claim your free Dada Zarude and Shiny Celebi is December 27th, 2021. Don’t miss out on this fantastic opportunity to add these unique Pokémon to your Sword and Shield collection. Good luck, trainers!

Top Ways to Fix Facebook Messenger Not Sending Pictures

Introduction

Facebook Messenger is a widely-used messaging platform that allows users to send text messages, photos, and videos to their friends and family. However, problems can arise when photos don’t send or load correctly in the app. This article will discuss the top ways to fix Facebook Messenger not sending pictures, helping you continue sharing precious moments with your loved ones.

1. Restart your device

The first and easiest solution is simply restarting your device. Sometimes, software glitches can cause issues with various apps, including Facebook Messenger. Turn off your phone or tablet and then turn it back on; this might resolve the issue.

2. Check internet connection

A poor internet connection can cause pictures not to send through Messenger properly. To fix this issue, check if you are connected to Wi-Fi or have a stable cellular data connection. Switch between Wi-Fi and cellular data if one isn’t working well or consider moving closer to the router for a stronger Wi-Fi signal.

3. Update the Facebook Messenger app

It’s essential to always keep your apps updated, as developers often release updates fixing bugs and improving overall performance. Check if there is an update available for Facebook Messenger in your device’s app store and download it if available.

4. Clear cache and data

Cached data might be causing the problem with sending photos in Messenger. Clearing the app’s cache can sometimes resolve such issues. Open your device settings, find ‘Apps’ or ‘App Manager,’ select Facebook Messenger, and tap ‘Clear cache’ (Android) or ‘Offload App’ (iOS).

If clearing cache doesn’t work, repeat these steps but select ‘Clear data’ (Android) or ‘Delete App’ (iOS) instead of clearing cache – be aware that this will delete all conversations on the app.

5. Check set permissions

Ensure that Facebook Messenger has proper permissions to access storage on your device since this can affect its ability to send and receive photos. Go to your device settings, tap ‘Apps’ or ‘App Manager,’ find Messenger, and then review the permissions.

6. Troubleshoot photo size and format

Large files or unsupported image formats can prevent Messenger from sending pictures. Try compressing the picture file size or converting the image to a supported format like JPEG or PNG before sending.

7. Reinstall Facebook Messenger

If none of the previous steps work, try uninstalling Messenger entirely and reinstalling it from your device’s app store. This might eliminate any underlying issues with the app.

Conclusion

Though it can be frustrating when pictures don’t send on Facebook Messenger, these troubleshooting tips can help resolve most issues you may encounter. Remember to keep your apps updated and your device free of clutter for smooth app performance.

5 Innovative Ways to Look at Text Messages Without Your Phone

Introduction:

Have you ever found yourself in a situation where you need to access your text messages, but your phone is not available? Perhaps it’s charging, in another room, or maybe you’ve misplaced it. Fortunately, there are multiple solutions to this problem. This article will explore 5 innovative ways to view your text messages without using your phone.

1. Use a web-based SMS service:

A web-based SMS service allows you to send and receive text messages through an internet browser on any device. Some popular options include MightyText and MySMS. With these services, you can access your messages by logging into their websites and syncing them with your mobile number. You can then view and respond to your texts from the comfort of your laptop or tablet.

2. Connect to a messaging app:

Messaging apps like WhatsApp, Telegram, Apple Messages and Google Hangouts offer the advantage of being accessible on multiple platforms. To use any of these services, install the app on both your phone and computer (either as a desktop application or through the browser) and connect using the same account. This way, you’ll be able to access your text messages easily without needing your phone.

3. Utilize email-forwarding apps:

Some apps can forward text messages to a designated email address in real-time. These apps, such as PhoneLeash and SMS Forwarder, are simple to set up and can be quite useful in situations when you’re away from your phone but still need access to important messages.

4. Sync with a smartwatch:

If you own a smartwatch that is compatible with your smartphone manufacturer or supports pairing with it via Bluetooth or Wi-Fi, then checking texts without your phone couldn’t be more convenient. With features like voice command replies and notifications for incoming messages, smartwatches ensure that you won’t miss important texts even when your phone isn’t handy.

5. Consider using VoIP (Voice over Internet Protocol):

VoIP services like Google Voice and Skype can help you access your messages from any device that has internet access. After creating a VoIP account, link your mobile phone number and set up forwarding services so that text messages are directed to your chosen email or app instead of being sent to your device. This enables you to view your texts without requiring your phone nearby.

Conclusion:

In today’s technology-driven world, staying connected is more important than ever before. Thankfully, there are numerous ways to ensure that you never miss an important message, regardless of whether or not you have physical access to your phone. By utilizing these innovative solutions, you can maintain seamless communication even when your phone is out of reach or unavailable.

Soft White vs. Warm White: Which Should You Use in Your Smart Home?

Introduction:

When it comes to designing a smart home, one crucial aspect is choosing the right lighting color temperature. With various options available, it can be challenging to decide between soft white and warm white lighting. Understanding the difference between these color temperatures will help homeowners make an informed decision that enhances their home’s ambience and functionality.

Soft White Lighting:

Soft white lighting typically ranges from 2700K to 3000K on the Kelvin scale. This color temperature emits a yellowish hue, providing a warm, comfortable atmosphere in living spaces. Soft white light bulbs are ideal for areas where individuals tend to relax, such as living rooms, bedrooms, and dining rooms.

Advantages:

1. Encourages relaxation and feelings of warmth.

2. Mimics natural sunlight during sunrise and sunset.

3. Enhances cozy environments.

4. Ideal for spaces where people gather and spend time together.

Disadvantages:

1. Poorer visibility due to the yellowish hue.

2. Not suitable for task-oriented areas or rooms that require precision.

Warm White Lighting:

Warm white lighting slightly differs from soft white lighting in that it falls between 3000K and 3500K on the Kelvin scale. It produces a brighter and neutral tone compared to soft white lighting but still maintains a hint of warmth in its glow. Warm white lighting is best suited for task-oriented spaces like kitchens, offices, bathrooms, and other areas requiring clear visibility.

Advantages:

1. Better visibility compared to soft white lighting.

2. Maintains some warmth while providing sufficient illumination for tasks.

3. Promotes focus and productivity.

4. Suitable for areas where detailed tasks are performed.

Disadvantages:

1. Less cozy ambiance compared to soft white lighting.

2. Might seem too bright or sterile in relaxation spaces.

Conclusion:

Choosing between soft white and warm white lighting for your smart home ultimately depends on the desired atmosphere and functionality of each space. Soft white lighting is best for relaxing environments, while warm white lighting is ideal for task-oriented spaces. By carefully considering each room’s purpose and personal preferences, homeowners can create a balance between cozy and efficient illumination in their smart home.

How to Tell If a Number Is a Cell Phone or a Landline

In today’s fast-paced world, it has become more important than ever to distinguish between cell phone and landline numbers. Knowing the difference can help businesses increase the efficiency of their communication, save money on marketing expenses, and protect user privacy. This article will guide you on how to tell if a number is a cell phone or a landline.

1. Use a Reverse Lookup Service

One of the most straightforward methods to determine the type of a phone number is by using a reverse lookup service. There are many online platforms accessible that offer this feature, such as Whitepages and Intelius. All you need to do is enter the phone number into their search bars, and the service will provide information on whether it’s registered as a cell phone or landline.

2. Investigate Area Codes

While not foolproof, examining the area code can give you hints about the type of number you’re dealing with. Landline area codes tend to be specific to geographic locations, while cell phone area codes may cover larger regions where mobile networks are more widespread.

3. Utilize Commercial Databases

For businesses that require more accurate identification for large volumes of phone numbers, commercial databases are an excellent solution. These databases contain real-time information from network providers and offer high accuracy in identifying the type of telephone numbers.

4. Examine Your Caller ID

Some home phones and smartphones display the type of incoming calls through their caller ID systems. In most cases, they will either label landlines as “Residential” or “Business” numbers, while cell phones will often appear as “Wireless” or “Cellular.”

5. Test Text Messaging

If you’re trying to identify whether a contact’s number is a cell phone or landline, simply send them a text message. Landlines cannot receive text messages like mobile phones; therefore, if your message fails to deliver, it’s likely that you’re dealing with a landline.

Please note that this method might not be foolproof, as landline texting services do exist. However, they are not as common as traditional landlines and cell phones, so the chances of encountering one are relatively low.

6. Observe Call Costs

Another way to identify the type of number is by analyzing your phone bill. Cell phone calls cost more compared to a landline call. If you find a significant price difference between two numbers when calling them, there is a high probability that one is a mobile number and the other a landline.

In Conclusion

Knowing how to differentiate between cell phones and landlines can significantly impact your professional and personal life. The methods mentioned above will help you determine if a number is mobile or static with ease. Just remember, always proceed with caution and respect user privacy when attempting to identify the nature of any phone number.

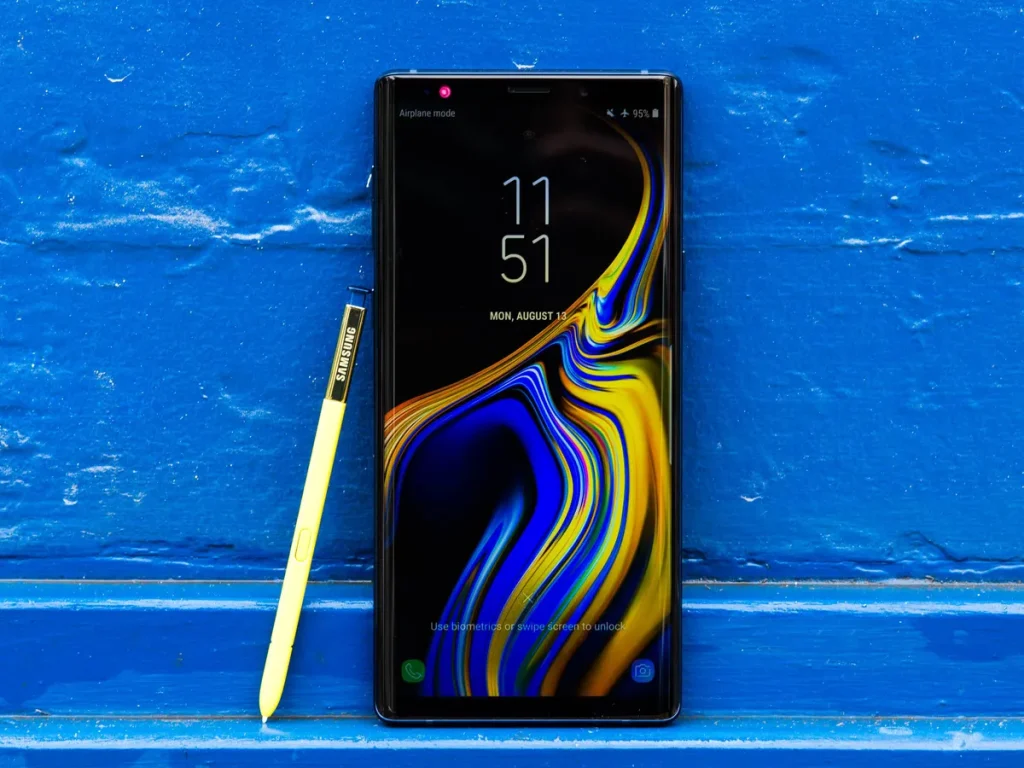
Samsung Galaxy Note 9 Review: Note 9 Could Still Reel You In After The Note 10 Launch

The Samsung Galaxy Note series has been a best-selling flagship phone lineup that never fails to impress smartphone enthusiasts. With the launch of Note 10 and Note 10+, one might wonder if the Samsung Galaxy Note 9 could still be an attractive choice for consumers. Here’s a review of the Note 9, highlighting its features and performance.

Design and Display:

The Samsung Galaxy Note 9 sports a sleek design with an aluminum frame and Gorilla Glass on both front and back, providing a premium feel. The device boasts a massive 6.4-inch QHD+ Super AMOLED display, offering sharp and vibrant colors with excellent contrast levels. Moreover, it comes with HDR10 support for enhanced video watching experiences.

Performance:

Powered by the Exynos 9810 or Snapdragon 845 chipset (depending on region) and up to 8GB RAM, the Samsung Galaxy Note 9 delivers top-notch performance effortlessly handling multitasking and heavy gaming sessions. The device runs on Android 8.1 Oreo out of the box but is upgradable to Android Pie and Android 10 later on.

S Pen:

The S Pen has always been the unique selling point of the Galaxy Note series, and the Note 9 is no exception. The upgraded S Pen now comes with Bluetooth Low Energy (BLE), enabling remote control functionality for various tasks like taking selfies, controlling presentations, or even managing media playback.

Camera:

Equipped with a dual-camera setup, including a 12MP primary lens with variable aperture (f/1.5 – f/2.4) and a secondary telephoto lens with a 12MP sensor, the Samsung Galaxy Note 9 captures stunning photographs in various lighting conditions. The camera features such as AI Scene Optimizer, flaw detection, and Live Focus further enhance the photography experience.

Battery and Storage:

The Samsung Galaxy Note 9 comes with a massive 4,000mAh battery, ensuring all-day power even with heavy usage. Furthermore, it supports fast charging and wireless charging for added convenience. The device is available in two storage variants – 128GB and 512GB – which can be further expanded up to 1TB via a microSD card.

Final Thoughts:

While the Samsung Galaxy Note 10 series introduces new features and improvements, the Note 9 remains a potential contender in the market due to its impeccable performance, stunning display, exceptional camera quality, improved S Pen functionality, and long-lasting battery life. Moreover, with the launch of newer models, the Galaxy Note 9’s price has become more competitive, making it an attractive option for consumers looking for a high-quality smartphone without breaking the bank.

How to Change Scribble to Keyboard on Apple Watch

Introduction:

The Apple Watch has become an essential part of many users’ daily lives, providing various functions from tracking fitness activities to managing notifications and responding to messages. One of the useful features of the Apple Watch is the ability to scribble or type out responses directly on the watch face. However, some users may prefer to alternate between the scribble and keyboard input methods. In this article, we will guide you step-by-step on how to change from Scribble to keyboard on your Apple Watch.

Steps to Change from Scribble to Keyboard:

1. Make sure your Apple Watch is running watchOS 8 or later, as the full-fledged keyboard is only available in watchOS 8 and later versions.

2. Press the Digital Crown on your Apple Watch to navigate to the home screen with all the apps.

3. Tap on the Messages app icon on your Apple Watch.

4. Select an existing conversation or start a new message by tapping the New Message button in the top right corner.

5. Once you are in a conversation, tap on the text field at the bottom where you would usually Scribble your message.

6. To switch from Scribble to a QWERTY keyboard layout, you will notice a small icon (three horizontal lines with dots) at the bottom-right corner of your text field. Tap this icon.

7. Your Apple Watch will now display a mini QWERTY keyboard that you can use for typing your messages.

8. If you wish to switch back to Scribble input, tap on that same icon again in the bottom-right corner while in typing mode, and it will revert back to Scribble.

Using QuickPath for Faster Typing:

With watchOS 8 and later versions, you can also use QuickPath – a swipe-to-type feature, which allows you to input text by swiping across keys to quickly type without lifting your finger.

Conclusion:

Switching between Scribble and the keyboard on your Apple Watch is a straightforward process. Whether you prefer to type or scribble your messages, watchOS 8 and later versions give you the flexibility to choose your preferred input method. Just follow the steps above, and you’ll easily be able to alternate between the two options for efficient communication using your Apple Watch.

Top 6 Ways to Fix Google Nest Hub Not Connecting to Wi-Fi

Introduction:

The Google Nest Hub is an increasingly popular smart home device, known for its compatibility with other smart devices and ease of use. But, like any technology, it isn’t without its issues. One common problem users face is the inability of their Nest Hub to connect to Wi-Fi. This article will explore the top six ways to fix this connectivity issue and help you get your Google Nest Hub back online.

1. Check Your Wi-Fi Connection:

Before diving into troubleshooting your Nest Hub, first ensure that your home Wi-Fi network is functioning correctly. Test the connection on other devices or perform a speed test. If there are any issues with the network itself, resolve them before attempting further steps.

2. Reboot Your Google Nest Hub:

Sometimes, a simple reboot can solve connectivity issues. To reboot your Google Nest Hub, unplug it from the power source, wait for about 30 seconds, and then plug it back in. Give it a minute or two to power up and check whether it connects to the Wi-Fi.

3. Restart Your Router:

If your Wi-Fi network works fine but the problem persists with the Nest Hub, try restarting your router. Unplug it from the power source, wait at least 30 seconds, then plug it back in and allow it to fully restart. Once this is done, see if the Nest Hub connects to your network.

4. Check and Update Your Google Home App:

Your Google Home app on your smartphone should be up-to-date and compatible with your device for seamless connectivity. Check for any updates available in either the Google Play Store (for Android phones) or App Store (for iPhones), and install them if necessary.

5. Factory Reset Your Google Nest Hub:

If none of these steps resolve the issue, consider performing a factory reset on your device. Press and hold both volume buttons on the back of the Google Nest Hub for about 10 seconds until the device prompts you to let go. After the factory reset, your device will reboot, and you can try connecting it to the Wi-Fi network again.

6. Contact Google Support or Your Internet Service Provider:

If all else fails, and your Google Nest Hub still won’t connect to your Wi-Fi network, contact Google Support or your Internet Service Provider (ISP) for customer support and assistance. They may be able to provide additional guidance in resolving any connectivity issues specific to your device or network.

Conclusion:

It can undeniably be frustrating when your Google Nest Hub isn’t connecting to Wi-Fi as expected, but with these top six tips for fixing the issue, you should be back online in no time. Remember that smart home devices aren’t perfect, and intermittent connectivity issues are not uncommon. However, familiarizing yourself with these troubleshooting steps will make it easier to resolve future problems.