As the holiday season approaches, crafting can be a joyful and educational activity that easily integrates into classroom time. Paper plate Christmas crafts are an especially great choice for teachers: they’re inexpensive, versatile, and suitable for kids of all ages. Let’s dive into some creative ideas for transforming simple paper plates into festive Christmas decorations.
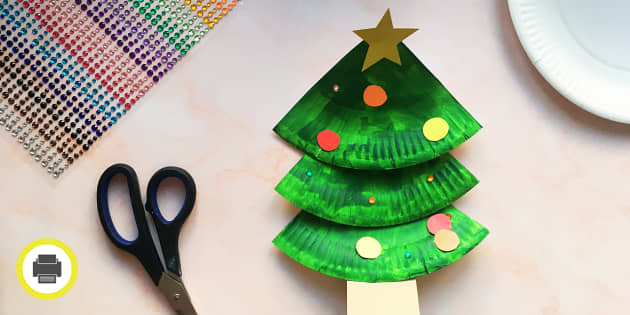
Paper Plate Christmas Trees
To make a Paper Plate Christmas Tree, you will need the following materials:
– Green paint
– Paper plates
– Glue
– Scissors
– Glitter, stickers, pom-poms, or sequins for decoration
Step-by-Step Instructions:
1. Paint your paper plate green and let it dry completely.
2. Once the paint is dry, cut the paper plate into three equal wedges. These will become the layers of your tree.
3. Starting with the largest wedge, glue each piece on top of each other from biggest to smallest to create a tiered tree effect.
4. Decorate your tree with glitter, stickers, pom-poms, or sequins to mimic ornaments and tinsel.
5. Lastly, cut out a star from yellow paper or cardstock and glue it at the top of your tree.
Paper Plate Reindeer
Materials Needed:
– Brown paint
– Paper plates
– Red pom-poms
– Googly eyes
– Brown construction paper or cardstock
– Glue
Instructions:
1. Begin by painting your paper plate brown and allow it to dry completely.
2. While waiting for the paint to dry, cut out reindeer antlers from brown construction paper or cardstock.
3. Once the plate is dry, glue two googly eyes in the middle of the plate.
4. Below the googly eyes, glue a red pom-pom to serve as the reindeer’s nose.
5. Attach the antlers to the top back of the paper plate so they stick out like a real reindeer’s.
6. Add a string to the back if you’d like to hang your craft on a wall or bulletin board.
More Paper Plate Christmas Craft Ideas
In addition to trees and reindeer, here are more paper plate Christmas craft ideas:
– Snowman: Use white plates and add construction paper features to create an authentic snowman face.
– Angels: Cut the plates into angel shapes and decorate with lace, glitter, and drawn-on faces.
– Santa Claus: Use red paint around the edge of a plate for his hat and add cotton balls for his beard and hat trim.
Tips:
– For younger children in particular, pre-cut materials can speed up the crafting process.
– Create an example craft for students to see as a reference.
– Use these crafts as part of a lesson about different holiday traditions around the world.
Homemade decorations not only brighten up any classroom but also give children a sense of accomplishment. By following these instructions or modifying them as needed based on supplies or age level, you can facilitate an engaging and festive crafting session in your classroom!