Tech Advice

Thin-film Solar Panels: The Lightweight Alternative Solar Option

Introduction:

As the demand for renewable energy sources increases, solar technology continues to evolve, offering innovative solutions for harnessing the sun’s power. One such solution is the development of thin-film solar panels – a lightweight and cost-effective alternative to traditional solar options. In this article, we will explore what thin-film solar panels are, their advantages and disadvantages, and how they fit into the broader solar energy landscape.

What are Thin-film Solar Panels?

Thin-film solar panels are a type of photovoltaic (PV) panel made by depositing one or more thin layers of PV material onto a surface. These layers can be composed of a variety of materials such as amorphous silicon (a-Si), cadmium telluride (CdTe), or copper indium gallium selenide (CIGS). Thin-film panels are generally lighter and more flexible than conventional crystalline silicon (c-Si) solar panels, making them a popular choice for applications where weight and flexibility are important factors.
Advantages of Thin-film Solar Panels:

1. Lightweight and Flexible: One of the key advantages of thin-film solar panels is their lightweight nature. This makes them ideal for use on structures with limited load-bearing capacity such as residential rooftoops and portable power systems. Thanks to their flexibility, they can also be applied to curved surfaces, smoothly integrating into various architectural designs.

2. Cost-efficiency: Thin-film solar panels typically have lower manufacturing costs compared to traditional c-Si panels due to a streamlined production process and the use of less raw material. This cost advantage can translate into lower prices for consumers in certain situations.

3. Improved Performance in Low Light Conditions: Thin-film panels are known for performing better than their c-Si counterparts in low light conditions or when partially shaded.

This can lead to higher overall energy generation in less-than-ideal lighting situations.

4. Aesthetic Appeal: Due to their slim profile and ability to be produced in various colors, thin-film panels are often considered more visually appealing than traditional solar panels. This can help improve the aesthetics of buildings and structures fitted with solar panels.

Disadvantages of Thin-film Solar Panels:

1. Lower Efficiency: While thin-film panels have improved considerably over the years, they still typically have lower efficiency rates compared to c-Si panels. This means that a larger surface area is required to produce the same amount of power, which could be an issue in space-constrained installations.

2. Limited Lifespan: Thin-film solar panels generally have a shorter lifespan compared to c-Si panels. This may result in higher long-term costs because of the need for panel replacement more frequently.

3. Environmental Concerns: Some thin-film solar panels have been manufactured using toxic materials such as cadmium telluride (CdTe). The use of these materials raises concerns about the potential environmental impact if not managed properly throughout the production and disposal processes.

Conclusion:

Thin-film solar panels offer an attractive alternative to traditional solar options for lightweight and flexible applications. While they may have some drawbacks in terms of efficiency and lifespan, their advantages make them a viable option for a wide range of uses. As solar technology continues to advance, we can expect improvements in both efficiency and sustainability of thin-film solar panels, further expanding their potential applications in renewable energy solutions.


Beats Collaborates with Kim Kardashian on New Fit Pro Earbuds Colors: First Look

Intro: Renowned audio brand Beats is joining forces with pop culture icon Kim Kardashian to release new colors for their Fit Pro Earbuds. This collaboration has generated excitement among fans of both Beats and Kim Kardashian, eager to see what the duo has in store.

Beats’ Fit Pro Earbuds: Unrivaled Audio Experience

The Beats Fit Pro Earbuds are known for delivering a high-quality audio experience. With an adjustable fit that ensures comfort during extended periods of use, these earbuds bring unparalleled convenience to your listening game. Equipped with Active Noise Cancellation (ANC) technology and impressive battery life, the Fit Pro Earbuds are perfect for fitness enthusiasts, travelers, and busy individuals alike.

The Kardashian Collaboration: Bold New Color Options

Teaming up with fashion mogul Kim Kardashian adds an extra touch of flair to the new range of Fit Pro Earbuds colors. Known for her eclectic taste in fashion and style, Kardashian’s influence on the collaboration will undoubtedly make a statement. Anticipate vibrant and unique hues that stand out from the conventional color palette currently available.

First Look: Stylish Meets Functional

The collaboration between Beats and Kim Kardashian brings a harmonious blend of style and functionality to your audio gear. These new color options will catch your eye while still maintaining the signature quality sound Beats is known for. Whether you’re hitting the gym or participating in a conference call, you’ll look good and stay connected with these chic earbuds.

In Conclusion

Beats’ collaboration with Kim Kardashian delivers on its promise of fresh, fashionable colors while maintaining exceptional audio quality. As more details emerge about this exciting partnership, keep an eye out for reviews, availability updates, and where you can get your hands on these stylish earbuds. Prepare yourself for a vibrant upgrade to your audio experience.

How to View Pictures as a Slideshow in Windows 11

Introduction:

Windows 11, the latest version of Microsoft’s operating system, comes with several new features designed to enhance productivity and improve user experience. One of these features is the ability to view pictures as a slideshow. In this article, we will guide you through the process of setting up and viewing a picture slideshow on your Windows 11 device.

Step 1: Locate Your Image Folder

Before setting up the slideshow, you need to locate the folder containing your images. This can be done by opening File Explorer and navigating to the folder where your images are stored. If you’re unsure about the location, try checking common image folders such as Pictures or Downloads.

Step 2: Select Your Images

Once you’ve found your image folder, select all of the pictures you want to include in your slideshow. To do this, click on the first image while holding down the ‘Ctrl’ key on your keyboard. Continue holding ‘Ctrl’ and clicking on each subsequent image until all desired pictures are selected.

Step 3: Access Options in Windows 11 Photos App

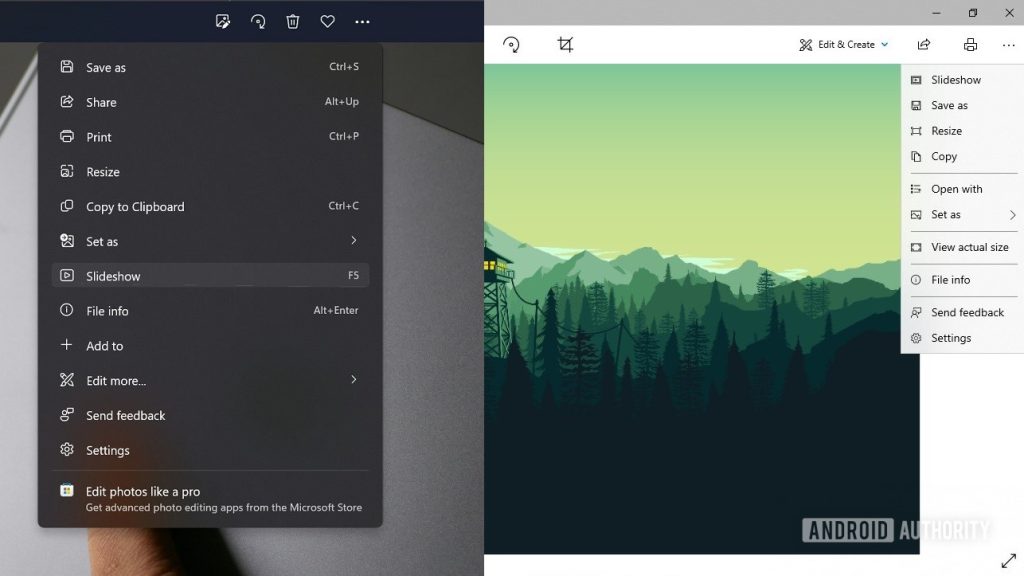
With your images selected, right-click any of the selected files. From the context menu that appears, hover over “Open with” and then click on “Photos.” This will open all the selected images in Windows 11’s Photos app.

Step 4: Start Your Slideshow

In the Photos app, locate an icon with four small squares at the upper right corner of the window; this icon represents multiple photos being displayed together. Clicking on this icon will display a menu with various options for controlling how you view your images. Select “Slideshow” from
this menu to begin playing your picture slideshow.

Customizing Your Slideshow Settings:

If you wish to customize settings for your slideshow, such as changing transition effects or setting a specific display time for each photo, follow these steps:

1. Open the Settings app on your Windows 11 device.

2. Click on “Personalization,”

3. Locate and click on “Background” under the Personalization settings.

4. Under the “Choose your picture” option, click on the drop-down menu and select “Slideshow.”

5. Click on “Browse” to select the folder containing the images you want to use in your slideshow.

6. Customize other options such as the time interval between images and whether or not to shuffle the slideshow.

Conclusion:

Viewing pictures as a slideshow in Windows 11 is a simple and straightforward process. With just a few clicks, you can transform a folder of images into an engaging visual presentation. Whether you’re sharing photos with friends, family, or using them for professional purposes, this feature makes it easy to showcase your visual content in an organized and appealing manner.

How to Fix it When Roku TV is Not Finding Antenna Channels

Introduction:

Roku TV has become a popular choice for cord-cutters seeking an affordable, user-friendly streaming experience. However, there may be instances when Roku TV fails to detect antenna channels, leaving users frustrated. In this article, we will discuss the reasons behind this issue and provide solutions on how to fix it.

1. Check Your Antenna Connection:

Before diving into more complex solutions, make sure your antenna is correctly connected. Ensure the antenna cable is securely plugged into the “Antenna” or “Cable In” port on your Roku TV. If the connections are loose or damaged, tighten and secure them or consider replacing the cable.

2. Rescan for Channels:

It’s possible that your Roku TV did not automatically detect all available channels during the initial setup process. To manually rescan for channels, go to your Roku TV settings and follow these steps:

a. Navigate to “Settings” then “TV Inputs.”

b. Select “Antenna” followed by “Scan for Channels.”

c. Wait for the scan to complete and see if any new channels have been detected.

3. Adjust Your Antenna Placement:

The location of your antenna can greatly impact signal reception. Move the antenna closer to a window or a higher point in your living space and rescan for channels. Try various positions and angles until you find the optimal location with the highest number of detected channels.

4. Upgrade Your Antenna:

If you’re using an indoor antenna and still experiencing issues, upgrading to an outdoor or amplified antenna might resolve the problem. Outdoor antennas generally offer better reception due to their higher elevation and distance from potential signal interference.

5. Check for Signal Interference:

Electronic devices such as Wi-Fi routers, microwaves, and fluorescent lights can cause signal interference, affecting channel detection on Roku TV devices. Power down these devices temporarily and rescan for channels to see if this resolves the issue.

6. Update Your Roku TV Software:

Outdated software may also cause issues with antenna channel detection. To update your Roku TV’s software, follow these steps:

a. Go to “Settings” then “System.”

b. Select “System Update” and click on “Check Now.”

c. If an update is available, follow the on-screen instructions to install it.

7. Factory Reset:

If none of the above methods work, you can try performing a factory reset of your Roku TV.
This will erase all settings and data, including channel lineups, so only use this option as a last resort.

a. Navigate to “Settings” followed by “System.”

b. Select “Advanced System Settings” and click on “Factory Reset.”

c. Follow the on-screen instructions to complete the reset process.

Conclusion:

In most cases, ensuring proper antenna connection and scanning for channels should resolve any issues with your Roku TV not detecting antenna channels. However, should the problem persist, consider upgrading your antenna or performing a factory reset as a last resort. With these solutions in hand, you should be able to enjoy seamless access to your antenna channels on your Roku TV device.

Catch Unwanted Pests: 3 DIY Bug Traps for Mosquitos, Flies, and More

As the warm weather approaches, the presence of pesky insects, like mosquitos and flies, tends to increase. They can be quite a nuisance during outdoor activities or even inside our homes. Not to mention, these pests can carry and transmit diseases. Fear not—here are three simple DIY bug traps that will help you catch these unwanted pests and retake control over your living environment.

1. Mosquito Trap

Materials:

– Plastic bottle

– Scissors or knife

– Black paper or black paint

– Tape

– Sugar

– Yeast

– Warm water

Instructions:

1. Cut the top part of the plastic bottle (about one-third from the top) using scissors or a knife.

2. Paint the bottom two-thirds of the bottle black or wrap it in black paper—mosquitoes are attracted to dark colors.

3. Add ¼ cup of sugar into the bottom part of the bottle.

4. Add 1 cup of warm water and mix until the sugar dissolves completely.

5. Sprinkle 1 teaspoon of yeast on top of the sugar-water solution—do not mix it in.

6. Place the cut top part of the bottle upside down into the bottom part like a funnel and secure it with tape.

7. Put the trap in an area where mosquitos tend to gather, such as near plants or stagnant water.

2. Fruit Fly Trap

Materials:

– A small jar or glass

– Plastic wrap

– Toothpick or fork

– Rubber band or tape

– Apple cider vinegar or fruit juice

Instructions:

1. Pour about an inch of apple cider vinegar or fruit juice into the jar—fruit flies are attracted to fermented substances.

2. Cover the jar tightly with plastic wrap.

3. Use a toothpick or fork to poke small holes in the plastic wrap—make sure the holes are big enough for fruit flies to enter but not big enough to escape.

4. Secure the plastic wrap around the jar with a rubber band or tape.

5. Place the trap in areas where you have seen fruit flies, such as near fruits and vegetables or trash cans.

3. Housefly Trap

Materials:

– Plastic bottle

– Scissors or knife

– Raw meat or fish

– Water

– Dish soap

Instructions:

1. Cut the top part of the plastic bottle (about one-third from the top) using scissors or a knife.

2. Place a small piece of raw meat or fish into the bottom part of the bottle.

3. Add water until it covers the meat/fish—the water should be almost halfway up the bottle.

4. Pour dish soap into the water—just a few drops will do.

5. Place the cut top part of the bottle upside down into the bottom part like a funnel and secure it with tape.

6. Position the trap in spots where houseflies commonly linger, such as near windows, doors, or trash cans.

These three DIY bug traps are an affordable and chemical-free solution to help control mosquito, fruit fly, and housefly populations around your home. Put them to good use and enjoy a more pest-free environment this season!

Wi-Fi Extender vs Mesh Router: Which Gives You the Best Network Coverage?

In today’s technology-driven world, having a reliable and robust internet connection is essential. As the need for seamless coverage increases, homeowners and individuals are often faced with the dilemma of choosing between Wi-Fi extenders and mesh routers. But which option provides the best network coverage? In this article, we’ll explore the key differences between these two devices, their advantages and disadvantages, and help you decide which one is right for your needs.

1. Wi-Fi Extender

A Wi-Fi extender, also known as a wireless repeater or range extender, is a device that boosts the signal strength of an existing Wi-Fi network. It works by amplifying the Wi-Fi signal from your router and retransmitting it to areas with weak or no coverage.

Advantages:

– Affordable: Wi-Fi extenders typically cost less than mesh routers.

– Easy to install: Installing a Wi-Fi extender is usually a simple plug-and-play process.

– Compatibility: Most extenders work with any standard router or access point.

Disadvantages:

– Reduced bandwidth: Due to their signal duplication process, Wi-Fi extenders can halve your available bandwidth.

– Limited range: Although they can improve coverage, they may not provide sufficient range for larger homes or areas with multiple floors.

– Inconsistent performance: The quality of extended networks can vary depending on factors like interference and physical obstructions.

2. Mesh Router

A mesh router system comprises multiple nodes or access points that work together to create a single, seamless Wi-Fi network. Unlike traditional routers, which rely on a single device to broadcast the signal throughout your space, mesh routers use several devices placed strategically around your home or office.

Advantages:

– Expanded coverage: Mesh routers deliver robust coverage over more extensive areas or multi-level homes.

– Seamless connectivity: Users can move within the covered area without any interruption in their Wi-Fi connection.

– Improved performance: Mesh routers typically offer better performance and stability compared to Wi-Fi extenders.

– Centralized control: Mesh systems often come with easy-to-use mobile apps for network management.

Disadvantages:

– Higher cost: Mesh routers are generally more expensive than Wi-Fi extenders.

– Compatibility issues: Some mesh systems may not be compatible with your existing router or ISP-provided equipment.

Conclusion

The choice between a Wi-Fi extender and a mesh router depends on your specific needs, budget, and the layout of your space. If you’re looking for an affordable, simple solution to boost your Wi-Fi signal in a small area or single room, a Wi-Fi extender may be the better option. However, if you have a larger home or require more seamless coverage across multiple floors, investing in a mesh router system might be the best choice.

Graduation Wishes, Quotes, and Messages for Sons

Introduction:

Graduation day is a momentous occasion for both parents and their children. It symbolizes the successful completion of an academic journey and the beginning of a new chapter in life. As a parent, you want to convey heartfelt wishes, inspiring quotes, and meaningful messages to your son on this special day. This article shares some of the best graduation wishes, quotes, and messages you can send to your son.

Graduation Wishes for Son:

1. Congratulations on your graduation, son! We are so proud of your accomplishments and the young man you have become. May this new chapter in your life be full of success and happiness.

2.To our dearest son, congratulations on your graduation! Today is the beginning of an exciting journey ahead. We love you so much and are always here to support you in everything you do.

3. Our dear son, congratulations on graduating! Your hard work has finally paid off. May your future be filled with countless opportunities and endless possibilities.

Inspirational Quotes for Sons:

1. “Believe in yourself and all that you are. Know that there is something inside you that is greater than any obstacle.” – Christian D. Larson

2. “Success is not final; failure is not fatal: It is the courage to continue that counts.” – Winston S. Churchill

3. “The only way to achieve the impossible is to believe it is possible.” – Charles Kingsleigh

Graduation Messages for Sons:

1. Dear son, as you graduate today, remember to always chase your dreams and never settle for less than what you truly desire in life. We believe in your potential and can’t wait to see what the world has in store for you.

2. Our dearest son, on your graduation day, we want to remind you of the love we have for you and our pride in your achievements. Keep striving for greatness and never give up on your goals.

3. Son, your graduation day is a testament to your determination, resilience, and hard work. As you move forward in life, continue to embrace these traits and inspire others with your success story.

Conclusion:

Graduation days are milestones that deserve heartfelt celebration and recognition. Sharing wishes, quotes, and messages with your son on this special day will remind him of the love, support, and encouragement he has received throughout his academic journey. It will also provide inspiration, motivation, and guidance as he embarks on a new path in life. Choose from the messages above or tailor them to fit your personal relationship with your son, and help make his graduation day even more memorable.

Celebrating Sweet 16: Heartfelt Wishes and Messages for a Memorable Birthday

Introduction

Happy 16th birthday! A sweet sixteen is a special moment in every teenager’s life, marking the transition from childhood to young adulthood. Friends and family come together to celebrate this significant milestone, but nothing quite expresses your love and best wishes like the perfect Sweet 16 birthday message. Discover heartfelt, funny, and memorable messages for that perfect greetings card, text message, or social media post.

Heartfelt Wishes

1. Happy 16th birthday! Today marks the beginning of your journey towards adulthood. Embrace each moment and cherish every memory. Here’s to an unforgettable celebration!

2.To the sweetest teenager on this special day, happy birthday! May your 16th year be filled with happiness, love, and laughter.

3. Turning sixteen is more than just a birthday; it’s the start of exciting new adventures and memories that will last a lifetime. Wishing you all the joy your heart can hold on your Sweet 16!

4. From childhood giggles to teenage dreams, we have watched you grow into a lovely young adult. Happy Sweet 16, my dear! Enjoy every moment of your celebration.

Funny Messages

5. Happy 16th birthday! Remember, growing old is optional – but growing up is mandatory. Enjoy your journey towards adulthood!

6. It took you sixteen years to become this fabulous – don’t stop now! Have an amazing Sweet 16 celebration!

7. You’re not a teenager forever! Enjoy the next few years of legal irresponsibility while you still can. Happy 16th birthday!

8. Welcome to the world of young adulthood, where things get even messier but also much more fun! Have a wonderful Sweet 16 birthday celebration.

Memorable Messages

9. Sixteen candles on your cake represent sixteen wishes waiting to come true. Make a wish, blow out the candles, and live your dreams on your 16th birthday!

10. I hope your Sweet 16 birthday is as special as you are. You’ve brought joy to our lives since the day you were born, and we can’t wait to see what the future holds.

11. This precious 16th birthday is a time for new dreams, new beginnings, and new chances to make lifelong memories. Wishing you a day filled with love, laughter, and everything that makes your heart soar.

12. On your Sweet 16, remember always to celebrate the person you are, appreciate every moment life brings your way, and cherish the love of family and friends who support you through it all.

Conclusion

Celebrating a sweet sixteen birthday is an unforgettable experience for both the birthday girl or boy and their loved ones. With these heartfelt, funny, and memorable messages in tow, you’re sure to convey your best wishes for the newly-turned sixteen-year-old in a meaningful way. Let each word remind them of how much they are cherished as they embark on this latest adventure in life!

Trader Joe’s Must-Haves: A Comprehensive List of All the Best Stuff to Buy

Are you considering diving into the world of Trader Joe’s shopping? This unique grocery store offers a wide variety of products at affordable prices, making it a favorite for many. To help you navigate the aisles and discover some hidden gems, we’ve compiled a comprehensive list of must-have items you won’t want to miss on your next shopping trip.

1. Everything But The Bagel Seasoning Blend: This blend of sesame seeds, sea salt flakes, dried garlic, dried onion, and poppy seeds is perfect for adding a flavorful twist to avocado toast, eggs, or any other dish that needs a little something extra.

2. Cauliflower Gnocchi: These gluten-free gnocchi made from cauliflower are an excellent swap for traditional gnocchi. Enjoy them with your favorite sauce or sautéed with olive oil and veggies for a delicious, low-carb meal.

3. Dark Chocolate Peanut Butter Cups: Satisfy your sweet tooth with these decadent dark chocolate peanut butter cups. At just the right size, they make for the perfect indulgent treat.

4. Unexpected Cheddar Cheese: With the crumbly texture of aged parmesan and the creamy taste of sharp cheddar, this unique cheese has become a fan favorite worth trying.

5. Jo-Jo’s Chocolate Covered Sandwich Cookies: A delightful twist on classic sandwich cookies, these jo-jo’s are enrobed in rich chocolate and come in various flavors like peppermint during the holidays.

6. Speculoos Cookie Butter: This sweet spread is made from crushed speculoos cookies and tastes great on toast, waffles, or as a dip for fruit or pretzels.

7. Mandarin Orange Chicken: Whip up an easy and tasty dinner with this frozen chicken dish that comes with a tangy mandarin orange sauce. Simply heat and serve over rice or vegetables for a satisfying meal.

8. Spinach and Artichoke Dip: Great for entertaining or an indulgent snack, this creamy dip pairs well with bread, chips, or veggies.

9. 21 Seasoning Salute: An all-purpose blend of 21 different herbs and spices, this seasoning makes it easy to add flavor to meats, veggies, and grains.

10. Cold Brew Coffee Concentrate: Make your morning java with ease using this cold brew concentrate. Just mix with water or milk in your preferred ratio for a smooth and delicious cup of coffee.

This list only scratches the surface of Trader Joe’s offerings, but it’s an excellent starting point for those new to the store or looking to expand their usual shopping lists. Be sure to give these items a try on your next visit and keep exploring the exceptional products Trader Joe’s has to offer!

How to Use a PS5 Controller on Xbox Series X or S

Introduction:

The gaming community is gearing up for the next generation of console gaming with the release of the PlayStation 5 (PS5) and Xbox Series X or S consoles. As these devices hit the market and fascinate gamers all around the world, one question arises for passionate gamers – can you use a PS5 controller on Xbox Series X or S? While this might seem an unusual combination, this comprehensive guide explores how to make it work.

Step 1: Update your Console and DualSense Controller Firmware

Ensure that your Xbox Series X|S and PS5 DualSense controller have their firmware updated to their latest versions. Keeping your devices up-to-date will help avoid compatibility issues.

Step 2: Acquire a Cronus Zen or Titan Two Adapter

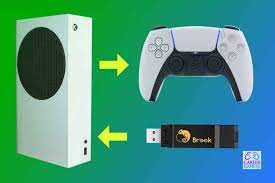
To connect your PS5 DualSense controller to your Xbox, you’ll need an adapter like Cronus Zen or Titan Two. These adapters act as a bridge between several controllers and consoles, making it possible to use them interchangeably.

Step 3: Connect the Adapter to Your PC

To set up the adapter, connect it to your PC using a micro-USB cable. Ensure that both your computer and controller are turned off before connecting them.

Step 4: Run Software for Adapter Configuration

Once you have the adapter connected to your PC, download and install its corresponding software from the adapter’s official website. This software allows you to configure your controller’s settings for use on various gaming platforms, including Xbox.

Step 5: Configure Your DualSense Controller

Using the adapter’s software, assign your DualSense controller to be used with your Xbox Series X|S console. Follow the instructions provided by the software regarding device recognition and configuration settings.

Step 6: Connect Adapter and Controller to Your Xbox Series X|S

Disconnect the adapter from your PC once you’ve successfully configured your controller. Now, connect the PS5 DualSense controller to the adapter using a USB-C cable and the adapter to your Xbox Series X|S via the micro-USB port.

Step 7: Test Controller Compatibility

Once everything is connected, boot up your Xbox Series X|S console and verify whether the DualSense controller is working correctly. Try navigating through menus and launching games to ensure the mappings are appropriately configured.

Conclusion:

Using a PS5 DualSense controller on an Xbox Series X or S might not be a conventional combination, but it is possible with the help of an adapter like the Cronus Zen or Titan Two. By following these simple steps, you’ll be able to enjoy your favorite Xbox games using a PS5 controller in no time!