Introduction:
Visual learning has gained significant attention over the past few years, especially in the education sector. One such visual learning tool is a “graphic organizer.” This article will explore what graphic organizers are, why they are an essential learning tool, and how to use them effectively.
What are Graphic Organizers?
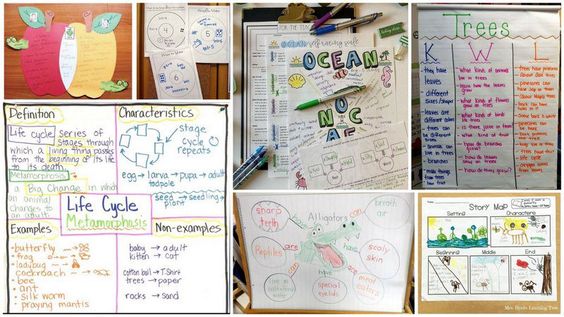
Simply put, graphic organizers are visual aids that help learners organize and present information visibly. They make use of diagrams, charts, mind maps, or other graphical elements to represent concepts and ideas in a structured manner. By doing so, graphic organizers enable learners to gain a deeper understanding of the subject matter by uncovering connections and relationships between various pieces of information.
Why Use Graphic Organizers?
1. Enhance Understanding: The human brain can process visual content more efficiently than textual data. Graphic organizers capitalize on this by visually representing complex ideas or concepts that might be difficult to understand through text alone.
2. Foster Critical Thinking: By breaking down complex ideas into smaller components, graphic organizers encourage learners to analyze each aspect individually and identify connections between them.
3. Improve Memory Retention: Studies show that information presented visually is retained better than verbal-only material. Thus, using graphic organizers can significantly improve memory retention and recall.
4. Aid in Organization and Planning: Graphic organizers offer an excellent way for students to structure their thoughts and ideas as they plan out essays, projects, or presentations.
5. Facilitate Differentiated Instruction: Since students learn at different paces and with varied styles, graphic organizers serve as a versatile learning tool that can be adapted to suit individual needs.
How To Use Graphic Organizers:
1. Choose the Right Organizer: Begin by selecting a graphic organizer suitable for your specific learning objectives. Some common types include Venn diagrams for comparing/contrasting ideas, timelines for chronological events, or flowcharts for processes.
2. Gather Your Material: Collect the necessary information related to your topic. This might include relevant facts, figures, quotes, or other critical pieces of data.
3. Break Down the Information: Analyze the gathered material and divide it into smaller components or subtopics. These will correspond to individual sections or elements of your graphic organizer.
4. Organize and Represent: Start building your graphic organizer by placing key ideas within their designated sections or boxes. Next, create connections and relationships using arrows, lines, or other visual aids.
5. Simplify and Refine: Finally, review your graphic organizer and simplify or refine the content wherever possible. Ensure that your final result is visually appealing and easy to read.
Conclusion:
Graphic organizers are a powerful tool that can enhance both teaching and learning. By incorporating these aids into classrooms, students can efficiently process information, improve critical thinking skills, memory retention, organizational skills, and cater to different learning styles. Start harnessing the power of these versatile tools today, and witness the positive impact they can have on your educational journey.