Art Education

10 Activity Ideas Inspired By The Day You Begin

Introduction:

The Day You Begin is an inspiring children’s book by Jacqueline Woodson that encourages readers to find the beauty in their diverse stories and experiences. Embracing our unique backgrounds and life situations can lead to increased self-esteem and a greater sense of belonging. To help you make the most of this powerful message, we’ve compiled a list of 10 activity ideas that are inspired by the themes found within The Day You Begin.

1.Identity Collages:

Gather art supplies like magazines, newspapers, photos, or drawings to create a visual representation of each individual’s personal story. Encourage participants to share their collages with others and discuss the importance of diversity within a community.

2.Cultural Food Swap:

Organize a cultural potluck where each person brings a dish from their heritage or family tradition. This activity encourages people to learn about different cultures and appreciate the diverse flavors present in society.

3.Language Bingo:

Create custom bingo cards with words from various languages spoken by members of your community or class. As you call out the words, participants mark off the corresponding spaces on their card until someone has bingo!

4.Personal Narratives:

Have students write a short narrative that highlights a unique experience or moment in their lives where they found strength through their differences.

5.Read-Alouds Featuring Diversity:

Choose books that celebrate diverse experiences and cultures, and conduct group read-aloud sessions accompanied by discussions around each story.

6.Multicultural Art Exploration:

Explore art from different cultures as a group, either through museum trips or online resources. Discuss the history behind the art pieces and how they reflect aspects of various cultures.

7.Singing Songs from Around the Globe:

Introduce songs from different countries and teach them to your group members. Singing together can create connections between people and foster an appreciation for the music of other cultures.

8.Interviewing Elders:

Encourage participants to interview an older family member or community member about their background and experiences, fostering intergenerational connections and understanding of diverse histories.

9.Inclusive Games and Sports:

Organize games and sports activities that emphasize teamwork, inclusivity, and fun rather than competition. This can help cultivate a sense of belonging among group members with diverse backgrounds.

10.Community Service Projects:

Participate in community service projects as a group, which fosters collaboration and bonding among individuals while also giving back to the larger community.

Conclusion:

By engaging with these 10 activity ideas inspired by The Day You Begin, you can encourage self-expression, empathy, and appreciation for diversity in your group or community. Remember that when we embrace our differences and come together, we create a stronger, more vibrant world.


Sparking Imagination: 18 Exciting Imagery Activities for Kids

Imagination plays a crucial role in children’s cognitive and social development. Engaging in imaginative play and activities helps kids build their creativity, problem-solving skills, and emotional intelligence. Here are 18 exciting imagery activities for kids to spark their imagination and enhance their learning experience.

1.Storytelling Sessions:

Encourage children to create their stories using different scenarios, characters, and settings. They can take inspiration from books, fairy tales, or their everyday experiences.

2.Puppet Shows:

Using homemade or store-bought puppets, kids can enact scenes from stories or create new ones to entertain family members and friends.

3.Picture-Based Stories:

Give the children a few random images and ask them to create a story that links them all together.

4.Role-Playing:

Choose various themes or situations — like post office workers, doctors, astronauts — allowing children to role-play these scenarios as realistically as possible.

5.Collage Creations:

Collect old magazines and newspapers, then ask the children to cut out images and create collages that represent different themes or stories.

6.Dream Journals:

Encourage kids to write down their dreams or creative stories in a journal as a regular activity.

7.Shadow Art:

Using a lamp or flashlights, help the kids create shadow shapes of animals or objects on the wall. Combine these shadows creatively and narrate stories around them.

8.Imaginary Friend:

Invite your child to invent an imaginary friend with unique characteristics and habits; this will help them understand others’ perspectives and emotions better.

9.Sensory Boxes:

Fill boxes with varying textures (e.g., pebbles, sand) so that children can use these as inspiration for creating imaginative tales linked to different environments.

10.Costume Dress-Up & Fashion Show:

Provide dress-up clothes and accessories for kids to mix-match and create their unique outfits, then organize a fun fashion show.

11.LEGO Storytelling:

Using LEGO bricks or other building blocks, ask children to create scenes from their stories or build imaginary worlds.

12.Nature Art:

Take kids outdoors and encourage them to use natural materials like leaves, sticks, and stones to create unique art pieces or structures.

13.Mini Theatre Productions:

Assign roles, build simple sets, and let the children perform plays or skits based on their favorite stories or original scripts.

14.Scavenger Hunt:

Organize a scavenger hunt with clues that require kids to use their imagination to solve puzzles and find hidden items around the house or garden.

15.Comic Strip Creation:

Supply blank comic strips for children to draw and narrate their adventures or stories in sequential panels.

16.Memory Map Drawing:

Encourage children to draw maps of imaginary places they have visited along with landmarks, secret paths, and treasures found during their journey.

17.DIY Playdough Sculptures:

Making playdough at home is easy, and kids can use it to create models of animals, buildings, or objects related to their imaginative stories.

18.Musical Stories:

Invite children to compose songs about their fictional characters or scenarios and perform them for family and friends using basic instruments like drums and shakers they can make themselves.

With these 18 exciting imagery activities for kids, you’ll not only spark their imagination but also foster creativity, critical thinking, empathy, and storytelling skills that will benefit them throughout life’s journey.

Teaching Kids to Interpret Art

Introduction

Art is a powerful medium that transcends language, culture, and time. It has the ability to evoke emotions, provoke thought, and communicate complex ideas through a single image or object. Teaching kids to interpret art can help them develop important skills such as critical thinking, creativity, and empathy. This article will explore various strategies that parents and educators can implement to introduce children to the world of art interpretation.

Why Art Interpretation Matters

Learning how to interpret art is more than just being able to tell what an artist was trying to say or understand the meaning behind an artwork. It enhances a child’s cognitive abilities through observation, analysis, and drawing conclusions based on what they see. By engaging with art from an early age, children can develop creative self-expression and become more open-minded individuals who appreciate diverse perspectives.

Strategies for Teaching Art Interpretation

1. Start early: Introduce your child or students to art when they are toddlers or in preschool. Use picture books featuring famous artworks, or visit local galleries with child-friendly exhibitions. Encourage curiosity by asking open-ended questions about what they see in the art pieces and their thoughts on the subject matter.

2. Create opportunities for discussion: Open dialogue about art helps children learn from each other’s observations and perspectives. Encourage group discussions about artworks at home or in class by asking questions such as “What do you see?” “What is happening in this picture?” “How does this artwork make you feel?” and “What do you think the artist was trying to say?”

3. Explore different mediums: Expose your child or students to various forms of art like paintings, sculptures, photographs, digital art, street art, and installations. This will help them realize that there are endless possibilities within the realm of artistic expression.

4. Make connections to personal experiences: Help kids relate artwork to their own lives by drawing parallels between the emotions, stories, or messages expressed in the art and personal experiences or events they have witnessed. This will foster a deeper understanding of the artwork and a personal connection to its meaning.

5. Encourage creativity: Let your child or students create their own art to help them express their thoughts and feelings. Discuss their creations and ask questions about their choices, techniques, and inspirations. This encourages critical thinking as they evaluate their own work.

6. Learn about the historical context: Understanding the time period in which a piece of art was created can provide insights into its meaning. Teach your child or students about the history of the artist, the cultural context, and major events during that time to help them gain a broader perspective on the artwork.

7. Be patient: Art interpretation is a skill that develops over time with practice and experience. Allow children to make mistakes, learn from them, and grow in their appreciation for the arts gradually.

Conclusion

Teaching kids to interpret art can be a rewarding journey for both parents and educators. It allows children to develop important cognitive skills while fostering an appreciation for diverse cultures, ideas, and perspectives. By incorporating these strategies into your teaching methods, you can help ignite a lifelong love of art in the lives of young learners.

Learning at Home! Ideas for Virtual Learning

In today’s digital age, learning at home has never been more accessible or engaging. Virtual learning offers numerous benefits and opportunities for students of all ages. Here are some creative ideas and resources to help make the most out of virtual learning experiences.

1. Online Courses and Tutorials

The Internet is filled with countless courses and tutorials to learn new skills or subjects. Websites such as Khan Academy, Coursera, and Udemy offer a wide range of topics, from coding to history to photography. Many of these platforms also provide resources for educators and parents to create personalized learning plans tailored to individual students’ needs.

2. Virtual Field Trips

Exploring the world has never been easier, thanks to virtual field trips that allow learners to experience culture, history, science, and art without leaving home. Many museums, zoos, and art galleries offer virtual tours on their websites, providing a fun and interactive way to learn about different topics.

3. Educational Apps and Games

Many educational apps and games can help reinforce learning while keeping students entertained. There are countless apps designed for various age groups and subjects – from early learning apps like ABCmouse to puzzle games that improve critical thinking skills like BrainPOP.

4. Interactive Live Videos

Platforms like YouTube Live, Zoom, or Google Meet can connect students with educators or other professionals for live interactive lessons or workshops. For example, National Geographic hosts regular live events with explorers or scientists which provide the opportunity to ask questions in real-time.

5. Audiobooks and Podcasts

Audiobooks and educational podcasts can be an enjoyable way for students to gain new knowledge while performing other activities or during downtime. Platforms like Audible, Scribd, or Apple Podcasts offer a vast collection of audiobooks and podcasts catering to various interests and ages.

6. Project-Based Learning

Encourage students to work on hands-on projects that require research, experimentation, and creativity. This approach can foster problem-solving skills and keep them engaged over an extended period. Projects can range from creating a blog to building DIY science experiments at home.

7. Online Study Groups and Discussions

Taking advantage of online discussion forums or creating study groups on platforms such as Google Classroom, Slack, or Microsoft Teams can help students share resources, collaborate on assignments, and discuss topics that may be challenging for them to grasp independently.

8. Personalized Learning Plan

Work with your child or student to develop a personalized learning plan that combines various virtual learning methods based on their preferences and goals. This plan can include setting specific goals, scheduling regular check-ins to track progress, and incorporating a mix of learning resources to promote a well-rounded educational experience.

In conclusion, virtual learning offers a wealth of possibilities for students to explore their interests and enhance their knowledge. By exploring these ideas and finding the right balance of resources that work for each individual learner, you can create an effective and enjoyable learning experience at home.

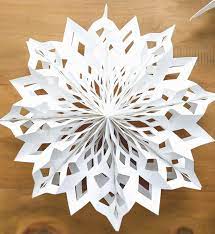
Winter Activity: Creating 3-D Snowflakes

Introduction

Winter is a magical time filled with snow, hot cocoa, and cozy nights by the fire. One of the best ways to embrace this festive season is by engaging in unique and fun activities. This article will guide you through the process of creating 3-D snowflakes, an exciting winter activity for people of all ages! These charming decorations can be used to adorn your home or given away as thoughtful gifts.

Materials Needed:

– White printer paper or construction paper

– Scissors

– Ruler

– Pencil

– Transparent tape

– String (optional, for hanging)

Step-by-step Instructions:

1. Start by crafting a perfect square from your paper. To do this, fold one corner of the paper diagonally until it aligns with the opposite edge. Then, using scissors, cut off the excess paper to form a square.

2. Next, fold your square diagonally again, forming a smaller triangle.

3. Fold the resulting triangle in half again to form an even smaller triangle.

4. Using a pencil and ruler, draw three equally spaced lines parallel to the longest side of your small triangle, stopping about half an inch from the edge.

5. Carefully cut along these lines without cutting through the edge that you left unmarked.

6. Unfold your triangle completely to reveal your initial square shape with a series of cuts in it.

7. Start by curling innermost cut portions towards each other in a loop before securing them with transparent tape.

8. Next, turn your paper over and repeat step 7 for the second set of cut portions.

9. Continue this process by alternating sides for each subsequent set of cuts until you reach the outermost pair, always using transparent tape to secure the loops in place.

10. Repeat steps 1-9 for five more squares so that you have six sections in total. Feel free to make these squares smaller or larger based on your preference for the final snowflake size.

11. To assemble your 3-D snowflake, use transparent tape to join the points of three sections together, forming a half-circle.

12. Repeat step 11 for the remaining three sections.

13. Now, connect the two half-circles together by taping their loose ends, completing your 3-D snowflake.

14. Optional: If you’d like to hang your 3-D snowflake, attach a string to one of its points using transparent tape.

Conclusion:

Creating 3-D snowflakes is a delightful winter activity that adds charm and holiday spirit to your home. Moreover, it’s an enjoyable and creative way to spend time with family and friends during this frosty season. So grab some paper, scissors, and let your imagination run wild as you craft beautiful 3-D snowflakes!

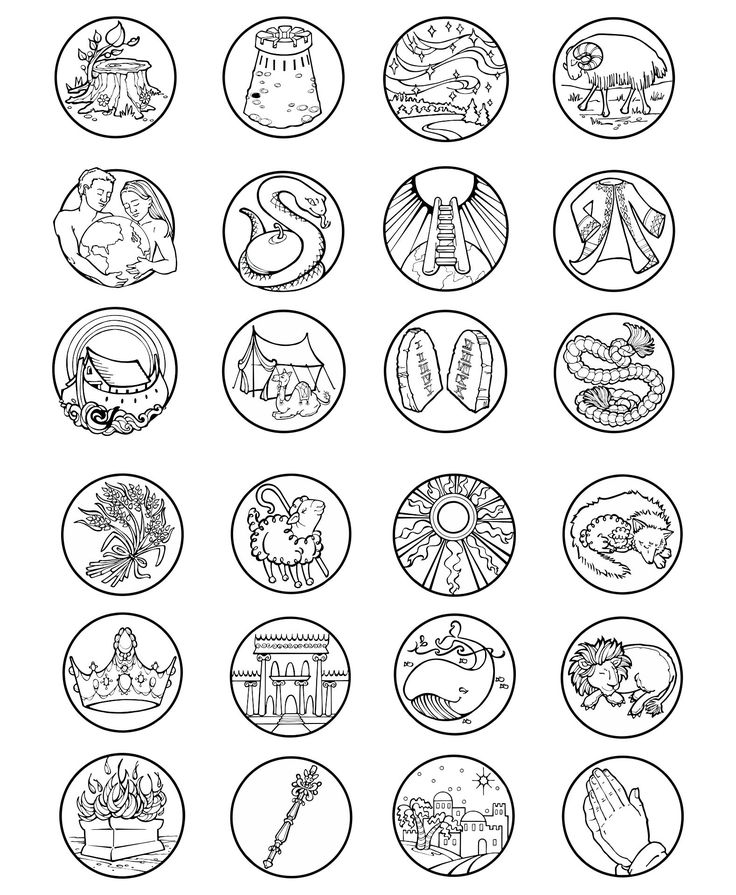
21 Jesse Tree Activities For The Advent Season

Introduction:

The Jesse Tree is a cherished Advent tradition that helps families and individuals reflect on the story of Jesus and prepare for the celebration of Christmas. By participating in various Jesse Tree activities, you can deepen your understanding of the biblical characters, events, and prophecies leading up to Christ’s birth. Here are 21 engaging Jesse Tree activities that you can incorporate into your Advent season this year.

1.Create a DIY Jesse Tree: Craft a simple Jesse tree using a small artificial tree or by drawing a tree silhouette on a large poster board. Add symbolic ornaments representing each day’s biblical story or character.

2.Daily Scripture Readings: Read a Bible passage each day that relates to the chosen Jesse Tree ornament theme, such as creation, Noah’s Ark, or Abraham’s journey.

3.Ornament Exchange: Organize an ornament exchange with friends or family members where each person creates a unique ornament for the Jesse Tree based on an assigned theme or biblical narrative.

4.Coloring Pages: Print and color Jesse Tree symbols and Scripture passages, then use them as ornaments for your tree.

5.Ornament Crafting Night: Host a crafting night with friends or family to create all the ornaments needed for your Jesse Tree.

6.Prayer Journaling: Write a daily prayer inspired by each day’s biblical story or character in a journal designed specifically for Advent reflections.

7.Family Devotions: Gather as a family each evening to read the corresponding Scripture passage, hang the ornament on the tree, and share personal reflections or prayers about the daily theme.

8.Puppet Shows: Use Bible character puppets (or create your own) to help tell and teach children about each day’s Jesse Tree story.

9.Write Poems: Compose short poems inspired by each day’s theme and recite them collectively during your daily Jessie Tree devotionals.

10.Songwriting Session: Write an original song for each day based on its Jesse Tree theme and sing it while hanging the ornament.

11.Scripture Art: Create beautiful artwork featuring keywords or phrases from each day’s Scripture passage, then display them next to your Jesse Tree.

12.Photo Scavenger Hunt: Snap a photo of something related to the daily theme (e.g., a rainbow for Noah’s Ark) and share it with your family before hanging the ornament.

13.Nativity Scene Integration: Pair your Jesse Tree readings with a Nativity scene, adding relevant figures to match each day’s theme.

14.Christmas Countdown Chain: Create a paper chain with 25 links. On each link, write the Jesse Tree daily theme and remove one link as you countdown to Christmas.

15.Decorate a Community Tree: Collaborate with your church or community center to create a large Jesse Tree filled with ornaments crafted by members of the community.

16.Bible Character Dress-Up Day: Dress up as the day’s Bible character (e.g., Abraham, Isaac, or Joseph) to make the stories come alive for kids.

17.Video Devotionals: Record daily video devotionals about each theme to share with friends or family on social media.

18.Guided Meditations: Use guided meditations focused on each day’s story to help you connect more deeply with the spiritual themes of Advent.

19.Memory Verse Challenge: Assign one memory verse per week related to the daily themes and challenge your family members to recite them from memory.

20.Stained Glass Craft: Create stained glass window art using tissue paper, construction paper, and clear contact paper for each biblical character represented in your Jesse Tree activities.

21.Adopt-a-Tree Project: Decorate a tree in your neighborhood park or community space as a Jesse Tree and encourage neighbors to decorate.

Get Crafty with Ice Cream Sticks: 20 Fun Activities For Students

Whether you call them ice cream sticks, popsicle sticks, or craft sticks, their versatility makes them a favorite for countless DIY projects. In this article, we have gathered 20 fun activities that students can undertake using ice cream sticks. From simple crafts to mind-challenging projects, there’s something for everyone.

1.Simple Math Manipulatives: Encourage students to learn math concepts such as addition, subtraction, multiplication and division using ice cream sticks. They can be painted with different colors and numbered, making learning more exciting.

2.Popsicle Stick Picture Frames: Create cute picture frames by gluing together ice cream sticks in a square or rectangular shape and decorating them with paint, glitter or other craft materials.

3.Ice Cream Stick Puzzle: Draw a large image on a set of connected popsicle sticks and then separate them to create an engaging puzzle.

4.Popsicle Stick Bookmarks: Decorate popsicle sticks with washi tape, ribbons, or markers to create personalized bookmarks.

5.Fairy Garden Structures: Erect tiny structures like fences, houses and bridges in a fairy garden using ice cream sticks.

6.Homemade Harmonicas: Create a functioning harmonica by sandwiching straws between two sets of ice cream sticks tied together with rubber bands.

7.Ice Cream Stick Airplanes: Craft cool airplanes by attaching two popsicle sticks together in the shape of an “X” with another stick running down the middle as the body of the plane.

8.Catapults: Introduce basic physics concepts by constructing miniature catapults using popsicle sticks, rubber bands and bottle caps.

9.Marble Maze: Create a mesmerizing maze in a shoebox using ice cream sticks glued together as the walls and adding obstacles for the marble to maneuver around.

10.Friendship Bracelets: Weave strings or yarn through groups of ice cream sticks, creating colorful and creative friendship bracelets.

11.Popsicle Stick Door Hangers: Decorate popsicle sticks with acrylic paint or stickers and attach them together to create customizable door hangers.

12.Shadow Puppets: Cut out animal or character shapes and glue them onto the popsicle sticks to create fun shadow puppets.

13.Ice Cream Stick Wind Chimes: Drill holes through the top of decorated ice cream sticks and string them together to create a beautiful, melodic wind chime.

14.3D Snowflakes: Building hexagon-shaped 3D snowflakes with popsicle sticks is a perfect way to welcome the winter season!

15.Mini Easel Display: Create small easels for displaying artwork or photos by gluing three ice cream sticks together in an “A” shape.

16.Popsicle Stick Bridges: Test the principles of engineering by building bridges using only ice cream sticks and glue.

17.Tic Tac Toe Game: Paint ice cream stick halves with x’s and o’s and use a grid made from additional sticks for a portable tic tac toe game.

18.Build a Bird Feeder: Assemble a bird feeder by gluing the edges of ice cream sticks into a shallow box shape and adding string for hanging.

19.Ice Cream Stick Pen Holder: Create an organizing tool by gluing popsicle sticks vertically around an empty tin can, making an attractive pen holder for your study desk.

20.Popsicle Stick Christmas Ornaments: With a bit of creativity and festive decorations, transform plain ice cream sticks into unique Christmas tree ornaments.

These fun activities using ice cream sticks offer endless opportunities for students to learn in engaging and hands-on ways, all while nurturing their creativity and critical thinking skills

20 Letter “W” Activities to Make Your Preschoolers Say “WOW”!

Introduction:

Get ready to WOW your preschoolers with these fun and educational activities that focus on the letter ‘W’. These engaging and hands-on activities will help your little ones learn about this wonderful letter while making lasting memories.

1.Watercolor Painting: Introduce watercolor painting, and let preschoolers create beautiful artworks using the colors that start with the letter ‘W’- white, wine, and wheat.

2.Wacky Word Wall: Create a word wall filled with ‘W’ words like watermelon, whale, and wagon. Encourage students to practice reading each word throughout the week.

3.Whisk Whipping Cream: Allow children to whip heavy cream into whipped cream using a whisk, teaching them about the letter ‘W’ as well as a simple kitchen skill.

4.Worm Exploration: Let the kids explore real or toy worms while discussing facts about worms, their role in nature, and of course – how their name starts with ‘W!’

5.Windy Weather Day: Talk about windy weather and perform simple experiments to show how wind works – like blowing ping pong balls across a table using straws or watching leaves blow in the wind.

6.Wheel Painting: Dip different sized wheels from toy cars or trucks in paint and have preschoolers make tracks on paper, showcasing unique patterns they can make with wheels.

7.Write With Water: Give children paintbrushes and water to practice writing the letter ‘W’ outside on pavement or cement – it’s mess-free writing practice!

8.Whistle While You Work: Teach children how to whistle (or try) as they enjoy practicing this delightful ‘W’ skill.

9.Walking W Challenge: Organize a relay race where students walk using different styles – waddling like ducks or wiggling like worms.

10.Weighted Water Play: Fill containers with varying levels of water, then let preschoolers test and compare the different weights using their hands or simple scales.

11.Wristwatch Craft: Help children create their own whimsical watches using paper plates and construction paper.

12.Wonderful Waffles: Teach children how to make waffles (with your assistance) and enjoy a special W-themed treat together.

13.Letter W Scavenger Hunt: Organize a fun scavenger hunt where preschoolers look for items that begin with the letter ‘W.’

14.Walrus Craft: Construct cute walrus faces from paper plates, adding whiskers made from pipe cleaners and googly eyes for a finishing touch.

15.”W” Bingo: Play a game of bingo using ‘W’ words, making the activity both fun and educational.

16.Wallpaper Collage: Create beautiful collages using leftover pieces of wallpaper, focusing on patterns containing ‘Ws’ or related words.

17.Woodworking Project: Assist preschoolers in creating simple woodworking projects like wooden picture frames or ornaments, emphasizing the ‘W’ connection throughout.

18.”Who Am I?” Game: Have children guess different animals or characters whose names start with ‘W’ based on clues given by the teacher.

19.Whittling with Soap: Introduce basic whittling concepts by allowing preschoolers to carve shapes or letters out of soft soap bars using plastic knives.

20.Winding Down with Storytime: End each day with a story featuring the letter ‘W,’ such as “The Very Busy Spider” by Eric Carle or “Whistle for Willie” by Ezra Jack Keats.

With these 20 letter “W” activities, your preschoolers are sure to have a ton of fun while learning about this fantastic letter!

30 Random Acts of Kindness Ideas for Kids

Introduction:

It is important to teach children the value of kindness from a young age. Instilling this virtue in them will go a long way in ensuring they grow up to become compassionate and empathetic adults. Here are 30 fun and easy random acts of kindness ideas that kids can practice to make the world a better place.

1.Write a thank-you note to your teacher or coach, expressing gratitude for their hard work and dedication.

2.Donate used toys, books, and clothes to a local charity or shelter.

3.Compliment a friend or classmate on something they do well.

4.Offer to help carry groceries for an elderly neighbor.

5.Create handmade cards for hospitalized children or nursing home residents.

6.Pick up litter at your local park or beach as a family activity.

7.Show appreciation for the bus driver by saying “thank you” when getting off the bus.

8.Bake cookies or prepare a meal for your local fire station or police department.

9.Plant flowers in your neighborhood, with permission from the property owner or city council.

10.Donate time at an animal shelter as a family, walking dogs or playing with cats.

11.Share your lunch with someone who forgot theirs at school.

12.Create care packages for homeless shelters with socks, toothbrushes, and snacks.

13.Schedule play dates with children who may not have many friends outside of school.

14.Give genuine compliments to people regularly – it can brighten their day.

15.Hold the door open for someone entering or exiting a building behind you.

16.Leave encouraging notes in library books before returning them.

17.Pass along used books to friends who may enjoy them, rather than selling them.

18.Volunteer as a family at a community soup kitchen or food bank.

19.Support local businesses by purchasing gifts from small shops instead of online retailers.

20.Help a parent or younger sibling with a chore without being asked.

21.Ask to visit an elderly relative or neighbor who might feel lonely, and spend time listening to their stories.

22.Be an advocate against bullying by standing up for someone being teased or harassed.

23.Enlist family and friends to create a neighborhood cleanup team.

24.Set up a lemonade stand and donate the proceeds to a local charity of your choice.

25.Provide cold bottles of water to delivery drivers, landscapers, or others working outside in the heat.

26.Encourage classmates to recycle by setting up recycling bins in your school or community center.

27.Design a kindness-themed mural at your school with permission from the administration.

28.Collect boxes of crayons, markers, and pencils for local schools in need.

29.Write positive messages on small stones and place them around your community for others to find.

30.Offer to take your neighbor’s trash and recycling bins out on collection day.

Conclusion:

These random acts of kindness ideas for kids are simple, yet significant ways for young minds to learn the importance of empathy and generosity. By practicing these acts regularly, children can build strong character traits that will stay with them as they grow into compassionate adults who positively contribute to society.

Teacher HELPLINE: Fun Family Crafts for Second Graders to Enjoy

Introduction:

Are you a teacher searching for fun and engaging family crafts to share with your second graders? Look no further! We have compiled a list of exciting craft ideas that students and their families can enjoy together. These activities not only foster creativity but also help strengthen the bond between children and their parents. Let’s dive into our top five recommendations!

1. Colorful Handprint Tree

Materials Needed:

– Large sheet of white paper or canvas

– Non-toxic paint (multiple colors)

– Paint brushes

– Water to clean the brushes

Instructions:

Have the families work together to create a beautiful handprint tree. Each family member will dip their hands in different colored paint and make handprints on the paper or canvas to form the shape of a tree. Parents can help their second graders by guiding them in creating branches and leaves with their handprints. This charming keepsake is sure to be cherished over the years.

2. Recycled Bottle Cap Mosaic

Materials Needed:

– Old bottle caps (plastic or metal)

– A piece of cardboard or wood as a base

– Craft glue

– Acrylic paint (optional)

Instructions:

Families can create dazzling mosaics using recycled bottle caps. Allow children to arrange the bottle caps on the base material, creating their desired design or pattern. Parents can then glue the caps down, ensuring they are securely attached. Optionally, families may choose to paint the bottle caps various colors beforehand for an extra touch of creativity.

3. Family Photo Collage

Materials Needed:

– Various family photos

– Scissors

– Glue or double-sided tape

– Large piece of construction paper, poster board, or cardstock

Instructions:

Encourage second graders and their families to collaborate on a unique photo collage that tells their story. Enable children to carefully cut out their favorite family photos and place them on the selected paper. Parents can help guide the process, ensuring that everything is spaced evenly and the final product is visually appealing.

4. Nature-Inspired Painted Rocks

Materials Needed:

– Smooth rocks or stones

– Non-toxic acrylic paint

– Paint brushes

– Protective sealant (optional)

Instructions:

Have families embark on a nature walk to collect smooth rocks and stones. Once collected, the children can paint these rocks with colorful designs, patterns, or even inspirational words. Parents may want to apply a protective sealant once the paint has dried to preserve the artwork.

5. Family Recipe Scrapbook

Materials Needed:

– Blank scrapbook or binder

– Printouts of cherished family recipes

– Markers, pens, or pencils

– Decorative stickers and embellishments

Instructions:

Invite each family to create a special family recipe scrapbook filled with their favorite meals and treats. Children can write or paste copies of the recipes into the scrapbook and work with family members to add drawings or creative decorations around each entry. This one-of-a-kind craft will surely become a treasured heirloom.

Conclusion:

These fun family crafts provide wonderful opportunities for second graders and their families to bond while fostering creativity. Teachers and parents can feel proud knowing they are engaging children in activities that promote imagination, collaboration, and priceless memories.