Pedagogue Blog

Robotic Orb Coding Challenge Task Cards

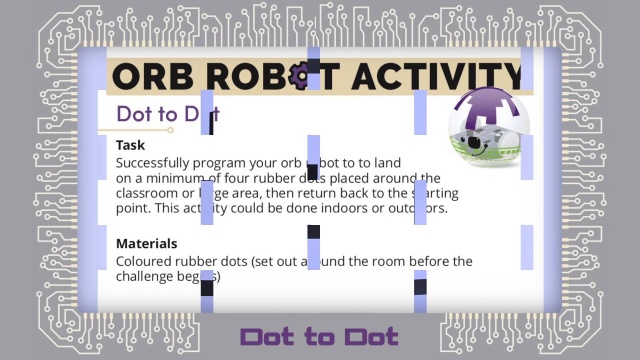
The Robotic Orb Coding Challenge Task Cards are an innovative and interactive tool designed to introduce students and enthusiasts to the world of coding and robotics. Through a series of engaging challenges, these task cards help learners understand the core concepts of programming and problem-solving in a tangible and hands-on way.

The Robotic Orb in question is typically a spherical device that can be programmed to navigate obstacles, follow patterns, or change colors based on user input. The task cards guide users through progressively complex coding scenarios, encouraging them to think critically and systematically while having fun with robotics.

Each task card comes with a clearly stated objective, step-by-step instructions, and expected outcomes. They cover a range of topics from basic movement commands to advanced sensor integration. Users may start with simple tasks such as programming the Robotic Orb to move in a straight line before advancing to more challenging endeavors like creating algorithms for light-based sensor navigation.

One of the key benefits of the Robotic Orb Coding Challenge Task Cards is their adaptability to various skill levels. For beginners, these cards can demystify the principles of coding through hands-on interaction. Intermediate users can refine their skills by experimenting with more complex instructions and tasks. Advanced coders can use the cards as a launchpad for developing intricate programs that push the boundaries of what their Robotic Orbs can do.

Educators find these task cards immensely useful for classroom settings as they offer a structured approach to teaching coding. Students are not only learning computational thinking but also gaining skills in teamwork, communication, and persistence as they work through each challenge.

As educational tools continue to evolve with technology, Robotic Orb Coding Challenge Task Cards stand out for their ability to merge learning with play. By giving learners physical feedback through the robotic orb’s actions, they make abstract coding concepts concrete and approachable, paving the way for the next generation of innovators in science, technology, engineering, and mathematics (STEM) fields.

15 Classroom Storage Ideas for the Busy Teacher

Managing a classroom can be as challenging as it is rewarding, particularly when it comes to keeping everything organized. For busy teachers looking for ways to tidy up the learning environment, here are 15 classroom storage ideas that can help create an orderly and efficient space:

1. Mobile Storage Carts: Utilize carts with wheels and drawers to easily move supplies where they are needed.

2. Hanging File Folders: Create a system for student paperwork, assignments, and handouts in a dedicated filing area.

3. Clear Storage Bins: Transparent bins help you quickly see what’s inside without having to rummage through them.

4. Book Bins: Assign each student a bin for their books and belongings to keep their desks clutter-free.

5. Classroom Library Corner: Use bookshelves with labeled baskets to categorize books by genre or reading level.

6. Stackable Crates: Perfect for storing larger items or holding student project materials together in one place.

7. Desk Organizers: Provide students with individual organizers for pens, pencils, and other small supplies.

8. Wall-Mounted Pockets: Utilize vertical space for storing items like homework or permission slips that need to be easily accessible.

9. Magazine Holders: Repurpose these as storage for textbooks, notebooks, or even clipboards.

10. Over-the-Door Shoe Holders: The clear pockets on shoe organizers make for perfect compartments for art supplies or calculators.

11. Rolling Library Ladder with Shelves: Make the most of high spaces with a ladder system that provides access to higher shelves.

12. Color-Coded Materials System: Use different colored bins or stickers to quickly identify subjects or classes.

13. Classroom Supply Caddy: Centralize common shared materials like scissors and glue in a caddy that can be passed around.

14. Utility Hooks: Install hooks inside cupboard doors to hang aprons, headphones, or tote bags out of sight.

15. Expandable Wall Racks: Ideal for organizing charts, maps, or even displaying student work without taking up desk space.

Implementing just a few of these storage solutions can greatly improve the functionality of a classroom, keeping the focus on teaching and learning rather than on managing clutter and chaos. With everything in its place, teachers can save precious time and maintain a calm, inviting educational environment for their students.

20+ Call and Response Ideas for the Classroom from Music, Movies and More

Call and response is a dynamic and interactive way to engage students in the classroom. Here are over 20 call-and-response ideas from music, movies, and more that teachers can use to grab attention, transition between activities, or simply add a bit of fun to the school day.

1. Classic Music Echo: Teacher sings “Twinkle, twinkle,” students respond with “little star.”

2. Pop Lyric Recall: Teacher says “We will, we will,” students reply with a spirited “Rock you!”

3. Disney Magic: Teacher exclaims “Hakuna,” students complete it with “Matata.”

4. Wizardry Call: Teacher proclaims “Expecto,” with students finishing with “Patronum!”

5. Superhero Signal: Teacher declares “To infinity,” students enthusiastically add “and beyond!”

6. Movie Quote Interaction: Teacher announces “Life is like a box of,” students chime in with “chocolates.”

7. Jungle Book Banter: Teacher calls out “The bare,” and the class responds with “necessities.”

8. Mystery Machine (Scooby-Doo Reference): Teacher says “Scooby-Dooby,” and the class shouts back “Doo!”

9. Famous Film Line: Teacher states “May the force,” students follow up with an energetic “be with you!”

10. Pirate Speak: Teacher hollers “Yo ho yo ho,” pupils retort with a boisterous “a pirate’s life for me!”

11. Royal Announcement (Inspired by The Lion King): Teacher proclaims “Long live the king,” students respond with respect, “Long live the king.”

12. Wizard Chant (Harry Potter inspired): Teacher chants, “I solemnly swear that I am up to no,” kids finish with gusto, “good!”

13. Adventurous Yell (Tarzan style): Teacher cries out “Ahh-ahh-ahh-ahh,” and the class responds copying the Tarzan yell.

14. Historical Figure Fun: Teacher says “Four score and seven years ago,” class finishes with “our fathers brought forth on this continent…”

15. Ocean Adventure Call (Finding Nemo inspiration): Teacher says “Just keep,” students reply swimmingly with “swimming.”

16. Secret Agent Code (James Bond theme): Teacher states “Bond. James Bond,” pupils echo dramatically.

17. Fairy Tale Phrase: Teacher enunciates “Mirror mirror on the wall,” class chimes back with “who’s the fairest of them all?”

18. Mythical Greet (Lord of The Rings reference): Teacher offers “One ring to rule them all,” students respond in kind.

19. Classic Literature Link (Alice in Wonderland inspired): Teacher speaks whimsically, “Why, sometimes I’ve believed as many as six impossible things before,” children finish by declaring cheerfully, “breakfast!”

20. Astronaut Check-in (NASA callout): Teachers says, “Houston, we have a,” class launches in unison with a resounding “problem.”

21. Caped Crusader Callout: Teacher starts off with a dramatic whisper of “I’m Batman,” and the kids reply covertly.

22. Wild West Whoop: Teacher calls out like an old western cowboy, shouting “Yee-haw!” Students gleefully kick back their response.

These call-and-response ideas can create a classroom environment that is responsive, engaged, and always ready to learn in an entertaining way!

Informative Writing | Teaching Tips and Unit Plans

Informative writing is a fundamental element of education, serving as the backbone for students to convey knowledge and ideas in a clear and structured manner. It is crucial in developing critical thinking and communication skills. As educators, it is essential to equip students with the skills necessary to excel in informative writing through effective teaching strategies and well-crafted unit plans.

Teaching Tips for Informative Writing:

Start with Understanding Purpose:

Educators should first ensure that students understand the purpose of informative writing – to educate the reader without reflecting personal opinion. Teachers can present examples of informative texts like news articles, encyclopedic entries, or how-to guides.

Focus on Structure and Clarity:

Teach students the standard structure of an informative essay: an introduction with a thesis statement, body paragraphs with supporting evidence, and a conclusion that summarizes key points. Stress the importance of clarity and conciseness in conveying information.

Develop Research Skills:

Informative writing requires reliable information. Teach students to research from credible sources, how to take notes effectively, and the importance of cross-referencing information to ensure accuracy.

Enhance Vocabulary:

Encourage students to expand their vocabulary; a rich vocabulary aids in more precise and engaging writing. Incorporate activities that introduce new words and their usage within informative contexts.

Practice Paraphrasing:

Students should learn to paraphrase research findings. This skill prevents plagiarism and allows them to process and communicate information in their own words.

Utilize Graphic Organizers:

Graphic organizers can help students plan their writing by organizing their thoughts, outlining main ideas, supporting details, and data before they begin drafting their essays.

Incorporating Technology:

Use technological tools for research, collaborative writing, or presenting information in different formats such as slideshows, blogs, or digital posters.

Peer Review Sessions:

Incorporate peer review sessions where students read each other’s work and give constructive feedback focussing on the content’s informativeness.

Unit Plans for Informative Writing:

Week 1: Introduction to Informative Writing

– Objective: Students will understand what informative writing is.

– Activities: Explore various informative texts and discuss characteristics. Practice identifying thesis statements and main points.

Week 2: Research Skills

– Objective: Students will learn to gather information from credible sources.

– Activities: Library session on research databases, practice note-taking methods, start preliminary research on chosen topics.

Week 3: Writing Process – Organizing Information

– Objective: Students will outline their essays using graphic organizers.

– Activities: Brainstorming sessions; teach how to organize facts into introduction, body, and conclusion; construct thesis statements.

Week 4: Drafting

– Objective: Students will write the first draft of their informative essay.

– Activities: Provide class time for drafting. One-on-one consultations with teacher for guidance.

Week 5: Revising & Editing

– Objective: Student will refine drafts for clarity and correctness.

– Activities: Peer reviews focused on content; teacher reviews focused on grammar, style, punctuation.

Week 6: Finalizing & Presenting

– Objective: Students will complete final draft and present their work.

– Activities: Preparation of final draft; students present their essays or create a visual representation of their topic for class discussion.

By integrating these teaching tips and unit plans into the curriculum, educators can help students master the art of informative writing – a skill that transcends academic purposes and prepares them for real-world communication challenges.

15 IKEA Hacks for the Classroom

IKEA’s affordable furniture and home products have a reputation for being both functional and modular, making them perfect for inventive hacks – especially in the classroom where budget and space are often in mind. Here are 15 ingenious ways to repurpose IKEA items to enhance learning environments, increase storage, and add a touch of creativity to any educational space.

1. Book Bins from TROFAST Storage Boxes

Transform TROFAST storage boxes into individual book bins for students. They’re just the right size for little hands and can easily be moved around the classroom.

2. RASKOG Cart as a Mobile Supply Station

Use a RASKOG utility cart to create a portable supply station. Fill it with art supplies, science experiment tools, or reading resources that can be wheeled to any group of students at a moment’s notice.

3. Magnetic Whiteboard from SPONTAN Magazine Rack

Flip a SPONTAN magazine rack on its side to make a magnetic whiteboard. Add magnets to hold visual aids or student work during presentations.

4. FINTORP Rail for Hanging Storage

Install FINTORP rails around the classroom to hang buckets filled with pens, pencils, or other small items, keeping desks clutter-free.

5. KALLAX Shelving Unit Room Divider

Arrange KALLAX shelving units back-to-back to divide your classroom into different learning areas, while also providing accessible storage.

6. BEKVAM Spice Rack for Bookshelves

Mount BEKVAM spice racks on the wall to create easy-to-reach bookshelves, perfect for displaying current reads or organizing subjects.

7. SKADIS Pegboard for Personalized Learning Stations

Customize SKADIS pegboards with hooks and containers to create individualized learning stations that can keep materials organized by subject or student.

8. STUVA Bench as Seating and Storage Combo

Turn STUVA storage benches into seating options that double as hidden compartments for books and larger classroom materials.

9. MOSSLANDA Picture Ledge for Displaying Student Work

Use MOSSLANDA picture ledges to showcase student artwork or feature star assignments without needing pins or tape that damage walls.

10. LACK Side Table as Student Workstations

Stack two LACK side tables on top of each other for an affordable and perfectly-sized student workstation with additional shelf space underneath.

11. GRUNDTAL Towel Holder as Paper Towel Dispenser

Attach GRUNDTAL towel holders under shelves or cabinets as an alternative way to dispense paper towels – neat and accessible!

12. VARIERA Box Organizers for Desk Drawers

Insert VARIERA box organizers inside desk drawers to sort classroom supplies like scissors, staplers, markers, making it easier for students and teachers to find what they need quickly.

13. FLISAT Table with TROFAST Bins for Sensory Play

Flip over a FLISAT children’s table and add TROFAST bins underneath each opening to hold tactile materials like sand, beans, or water for sensory play areas.

14. PLUGGIS Waste Sorting Bin as In/Out Mailboxes

Repurpose PLUGGIS waste sorting bins into in/out mailboxes for assignments or important papers that need to go back and forth between home and school.

15. BILLY Bookcase Transformation into Lockers

Convert BILLY bookcases into personal lockers by adding doors and assigning one shelf per student to store their belongings throughout the day.

These IKEA hacks not only save money but nurture an imaginative mindset among students when they see everyday items used in unconventional ways inside their classrooms.

21 Inspirational Quotes for Teachers to Lift You Up When You’re Down

Teaching can be one of the most rewarding and challenging professions. It requires dedication, patience, and a whole lot of heart. To offer encouragement and a mental boost to educators everywhere, here are 21 inspirational quotes designed to uplift teachers when they’re feeling down:

1. “The art of teaching is the art of assisting discovery.” – Mark Van Doren

2. “A good teacher can inspire hope, ignite the imagination, and instill a love of learning.” – Brad Henry

3. “Teaching is the greatest act of optimism.” – Colleen Wilcox

4. “Education is not the filling of a pail, but the lighting of a fire.” – William Butler Yeats

5. “Those who know, do. Those that understand, teach.” – Aristotle

6. “One child, one teacher, one book, one pen can change the world.” – Malala Yousafzai

7. “Teachers affect eternity; no one can tell where their influence stops.” – Henry Brooks Adams

8. “The best teachers are those who show you where to look but don’t tell you what to see.” – Alexandra K. Trenfor

9. “Teaching might even be the greatest of the arts since the medium is the human mind and spirit.” – John Steinbeck

10. “A teacher affects eternity; he can never tell where his influence stops.” – Henry Adams

11. “What we learn with pleasure we never forget.” – Alfred Mercier

12. “The task of the modern educator is not to cut down jungles but to irrigate deserts.” – C.S. Lewis

13. “Not all superheroes have capes; some have teaching degrees.” – Unknown

14. “It’s not about being the best teacher in the world; it’s about being the best teacher for your students each day.” – Unknown

15. “I am not a teacher but an awakener.” – Robert Frost

16. “A master can tell you what he expects of you. A teacher, though, awakens your own expectations.” – Patricia Neal

17. “Better than a thousand days of diligent study is one day with a great teacher.” – Japanese Proverb

18. “Good teaching is more a giving of right questions than a giving of right answers.” – Josef Albers

19. “If you have to put someone on a pedestal, put teachers. They are society’s heroes.” – Guy Kawasaki

20. “Teach the children so it will not be necessary to teach the adults.” – Abraham Lincoln

21. “The dream begins with a teacher who believes in you, who tugs and pushes and leads you to the next plateau, sometimes poking you with a sharp stick called truth.” – Dan Rather

May these quotes serve as a reminder to teachers that their work is deeply appreciated and monumentally important for shaping minds and changing lives for generations to come.

The Chalkboard

The chalkboard, a slate of dark stone or manufactured material, once stood as the centerpiece of classrooms around the world. It was more than just an educational tool; it was a symbol of learning, an emblem of the collective school experience that transcended cultures and generations.

The origins of the chalkboard trace back to the early 19th century when Scottish schoolmaster James Pillans, seeking a way to offer large-scale visual lessons to his geography students, first hung a large piece of slate on his classroom wall. As this practice spread, chalkboards began to foster a new, interactive teaching method. They allowed educators not only to present information but also to engage students in real-time through written questions and answers, a precursor to today’s interactive learning methods.

Powered by natural chalk—calcite or gypsum scraped into sticks—their dusty texts and figures could be quickly written and erased, allowing for dynamic and adaptable lesson plans. This transformable nature underscored the ephemerality of knowledge, emphasizing that education was a process rather than a collection of fixed facts.

Throughout the years, the chalkboard became iconic for its sensory experiences—like the screech of chalk against a board or the cloud of dust it left in its wake—which are etched in many former pupils’ memories. It was not uncommon for students to be tasked with ‘clapping out’ erasers, sending clouds of dust into the air but also offering them a brief respite from rigorous lessons.

But perhaps nothing is more emblematic of the chalkboard than its egalitarianism. Each student had access, regardless of status or skill level; everyone could write their piece on its slate. That democratic nature mirrored the wider pedagogical shifts occurring during its era—an era that glorified public education and knowledge for all.

However, as technology advanced, the once-ubiquitous chalkboards found themselves being replaced by their cleaner, brighter successor: whiteboards with non-permanent markers. Later, digital smartboards entered classrooms, coupling the functions of their predecessors with technological interactivity that addressed new educational needs.

Even though modern classrooms may no longer rely on chalkboards as they once did, these objects still hold nostalgic value. Antiques on schoolhouse walls or reimagined as hipster café menus and craft beer lists—they remind us of our shared pasts.

The story of the chalkboard is more than just an account of an educational tool; it’s about adaptability and nostalgia. It reminds us that while our methods may change and develop over time, the essence of teaching—the impartation and consideration of knowledge—remains constant amidst evolving pedagogies. As we move forward into digital frontiers within education spaces around globe today we carry with us echoes tradition embodied within every dusty stroke upon these quaint yet remarkably significant boards.

Blush Blooms Digital Teacher Planner

The Blush Blooms Digital Teacher Planner is an innovative tool designed for educators who are eager to organize their activities and curriculum in the evolving digital landscape. With more teachers shifting towards digital resources, this planner offers a seamless integration into their daily workflow, accommodating the dynamics of modern classrooms.

Crafted with an aesthetically pleasing design featuring blush tones and floral motifs, it’s not just functional but also a delight to use. The planner comes in a user-friendly format compatible with popular note-taking apps such as GoodNotes, Notability, and OneNote, allowing for easy navigation and customization.

The comprehensive layout includes all the essential elements a teacher requires: monthly calendars, weekly layouts, lesson planning pages, student tracking sheets, grade books, and sections for meeting notes. Each page is hyperlinked, providing quick access to different sections of the planner without unnecessary scrolling.

One of the standout features of the Blush Blooms Digital Teacher Planner is the ability to annotate directly onto the digital pages using a stylus or Apple Pencil. This makes it feel almost like writing on paper but with the benefits of digital technology such as copying, pasting, and undoing. Moreover, teachers can insert additional pages where needed or duplicate existing ones to ensure that they never run out of space.

In addition to these features, the digital planner supports cloud storage integration which means that teachers can access their plans from any device at any time. Whether they’re at home or on the go, their planner is readily available. This also facilitates easy sharing among colleagues or with students when needed.

The Blush Blooms Digital Teacher Planner is more than just an organizational tool; it’s a statement about embracing technology while sustaining efficiency and style in teaching practices. It offers peace of mind with its intuitive interface ensuring that educators stay on top of their schedule and foster a productive educational environment.

Pop Up Christmas Card Template – Santa Stuck in Chimney

With the holiday season around the corner, creating your own Christmas cards can be a fun DIY project that adds a personal touch to your greetings. A pop-up Christmas card featuring Santa stuck in the chimney is not only amusing but will surely bring a smile to anyone who receives it. Here’s how you can create this delightful piece of holiday cheer.

Materials Needed:

– Red cardstock (for the card base)

– White, black, and red paper (for Santa)

– Gray or brown paper (for the chimney)

– Scissors

– Glue

– Ruler

– Pencil

– Optional: cotton or white pompoms (for the snow effect)

Instructions:

1. Create the Card Base:

Take a piece of red cardstock and cut it into a rectangle that measures 10 inches by 7 inches. Fold it in half to form a 5-inch by 7-inch card.

2. Construct the Pop-Up Mechanism:

Cut two strips of paper about 1 inch wide and 4 inches long. Fold these strips into an ‘M’ shape with equal widths, which will act as springs for your pop-up.

3. Make the Chimney:

Cut out a chimney shape from the gray or brown paper with dimensions that fit within the open card and attach it to one of the ‘M’ shaped springs using glue. Then adhere the base of the spring to the lower portion of the open card’s center, so it pops up when opened.

4. Create Santa’s Legs:

Using white and black paper, cut two sets of legs to look like Santa’s boots and pants. Remember to make them proportional so they look like they’re dangling down from the top edge of the chimney.

5. Attach Santa’s Legs:

Glue Santa’s legs onto the top of your chimney pop-up, ensuring that when the card is closed, his legs are hidden inside.

6. Add Decorative Details:

Use cut-outs or drawing to add bricks or textures to your chimney. If you have pompoms or cotton, you can glue them around the chimney base for a snowy effect.

7. Final Touches:

Write your message on the bottom part of the card or anywhere else you see fit.

Your pop-up Christmas card with Santa stuck in the chimney is now ready to spread joy and laughter during this festive season!

Infinity Cube Origami Instructions

Origami, the traditional Japanese art of paper folding, can be used to create a multitude of fascinating structures. An Infinity Cube is one such intricate and mesmerizing design that you can create with small, simple folds of paper. In this article, we will walk you through the step-by-step instructions on how to make your very own Infinity Cube out of paper.

Materials Needed:

– 8 square sheets of origami paper (preferably of two different colors for an attractive contrast)

– Optional: Glue or double-sided tape for additional stability

Instructions:

Step 1: Prepare the Paper

Start with a square piece of origami paper. If you’re using dual-colored paper, begin with the color you want on the outside facing down.

Step 2: Fold Diagonally

Fold the paper in half diagonally to form a triangle. Then unfold it and repeat with the opposite corners, creating a cross crease pattern on the paper.

Step 3: Fold Edges to Center

Turn the paper so that it’s like a diamond and fold each corner into the center where the creases from steps 2 intersect.

Step 4: Forming Double Squares

With all corners folded in, you now have a smaller square. Take each corner again and fold towards the center line as close as possible without overlapping to form what looks like a double square.

Step 5: Creating Rectangular Flaps

Fold the newly created edges towards the centerline once more to create thin rectangular flaps.

Step 6: Unfold to Step 3

Carefully unfold your last three folds (from steps 4 and 5) back to what you had at the end of step 3.

Step 7: Fold Corners

Keep your model’s flaps open flat. Now fold each corner of these flaps towards its outermost crease line creating little triangle shaped folds — which will eventually become pocket flaps.

Step 8: Assembling the Cube Units

Refold along the creases made in step 5, but this time tuck these little triangles underneath which forms locking pockets. You should now have a rigid unit with two pockets on one side. Repeat these steps to create all eight units.

Step 9: Constructing The Infinity Cube

You will now put together your units without using glue first. Take two units and slide one’s flap into another unit’s pocket. Continue adding units one by one ensuring that each new unit has one flap in a free pocket from one block, and its free pocket ready for another block’s flap.

Step 10 (Optional): Secure With Adhesive

If you find your Infinity Cube isn’t sturdy enough or keeps falling apart – carefully apply glue or sticky tape to each joining flap before inserting them into pockets for extra stability.

Congratulations! You have just completed your very own Origami Infinity Cube. With its conjoined squares and intriguing folding mechanism, this cube can be transformed in multiple ways for endless tactile fun. Display it on your desk or give it as a gift – it’s sure to intrigue and impress with its hypnotic motion and clever design.

English Teaching Resources

English language education has never been more vital in the global landscape than it is today. With the rise of international communication, the necessity for comprehensive English teaching resources becomes increasingly evident. These resources are crucial for educators, enabling them to provide high-quality instruction and engaging learning experiences.

A wealth of English teaching resources is available to cater to the various aspects of language learning, spanning from grammar and vocabulary to speaking and listening skills. Let’s dive into some categories of resources that can help educators enrich their teaching practices:

Textbooks and Workbooks: Undoubtedly, these are foundational tools in any English language curriculum. They offer structured content and exercises that align with educational standards.

Literature: Introducing learners to a variety of English literature, from classic novels to modern short stories, not only improves reading comprehension but also instills a love for the language.

Online Platforms: Websites like BBC Learning English, British Council, and Duolingo provide interactive lessons and exercises suitable for different proficiency levels.

Mobile Apps: Language learning applications such as Rosetta Stone, Babbel, and Memrise make learning on-the-go easier and cater to the needs of digital-savvy students.

Games and Quizzes: Engaging activities such as crosswords, word search puzzles, and trivia games make learning fun while reinforcing language concepts.

Audio-Visual Materials: Listening practice through podcasts or watching films and TV shows in English can greatly improve comprehension and pronunciation skills.

Flashcards: These are perfect for visual learners to memorize vocabulary words, idiomatic expressions, and grammatical structures.

Discussion Forums: Online communities like Reddit’s r/TEFL or Dave’s ESL Cafe allow teachers to share ideas, resources, and advice with each other.

Lesson Plan Databases: Websites such as TEFL.net offer ready-made lesson plans that can save time for busy teachers.

Assessment Tools: Various online platforms offer tools for creating quizzes and tests that can track student progress effectively.

Teachers looking for effective English teaching resources have a vast array at their disposal. By combining traditional methods with modern technology and creative strategies, they can create diverse learning environments that cater to all students’ needs. The key is always to adapt these resources in ways that are most conducive to the learners’ engagement and educational growth. Teaching English is not just about imparting knowledge but also about inspiring learners to explore the boundless opportunities that come with mastering this global lingua franca.

The Power of Questioning in the Classroom

Questioning is an essential tool in the pedagogical toolkit of educators. Beyond the impartation of knowledge, it is the thoughtful questioning that can ignite curiosity, unearth understanding, and promote critical thinking in learners. The strategic use of questions in the classroom has transformative power – impacting not just academic learning but also shaping students into lifelong learners and critical thinkers.

At its most fundamental level, questioning serves to stimulate students’ minds. When teachers ask questions, they are effectively prompting students to form connections between presented material and prior knowledge. Questions can act as a bridge linking unfamiliar concepts to familiar ones, making learning more accessible and more meaningful.

Moreover, the depth and breadth of questions span a spectrum – from simple recall of facts with ‘what’, ‘who’, ‘when’, ‘where’ queries to the more sophisticated ‘why’ and ‘how’ that demand explanation and reasoning. Higher-order questions especially have been noted to facilitate deeper understanding and retention of material because they require students to analyze, evaluate, and create based on their knowledge base.

Creating a culture of inquiry is crucial for cultivating critical thinking skills. When teachers consistently incorporate questions that challenge assumptions and encourage different perspectives, students learn not to take information at face value but rather become skilled at deconstructing arguments and forming their own well-founded conclusions.

Questioning also furthers students’ communication skills. In order to answer effectively, students must organize their thoughts, choose their words with care, and articulate their responses clearly. This process of forming digestible responses not only aids understanding but also equip students with the skills needed for nuanced discourse.

Furthermore, effective questioning often leads students to ask their own questions – a hallmark of engagement and intellectual curiosity. When a classroom environment supports student-generated questioning, it emboldens learners to take charge of their own education journey, seeking answers and pathways that interest them deeply.

Assessment is another area where questioning plays a pivotal role. Beyond providing educators with insight into student comprehension, well-crafted questions in assessments demand application of knowledge rather than mere recall—thus better measuring true understanding.

Incorporating questioning strategies requires skillful planning on part of educators. Varying question types according to content goals, employing wait time for student responses thoughtfully, and fostering an environment that respects diverse contributions are all elements that must be balanced adeptly for questioning to reach its full potential.

However, despite its clear benefits, questioning must be applied sensibly. An overemphasis on questioning can overwhelm students or create an atmosphere of excessive scrutiny. Teachers must ensure their approach is supportive rather than confrontational – nurturing a safe space for all learners to express their thoughts freely.

In conclusion, skillful questioning has the power to transform classrooms—energizing lessons with active participation and sparking intellectual fervor among students. As both a teaching strategy and an assessment tool, it helps educators steer students not just toward academic success but fosters an environment conducive to sustained personal growth and discovery beyond school walls.

Latest Posts