Art Education

Origami Transforming Ninja Star (Using Sticky Notes)

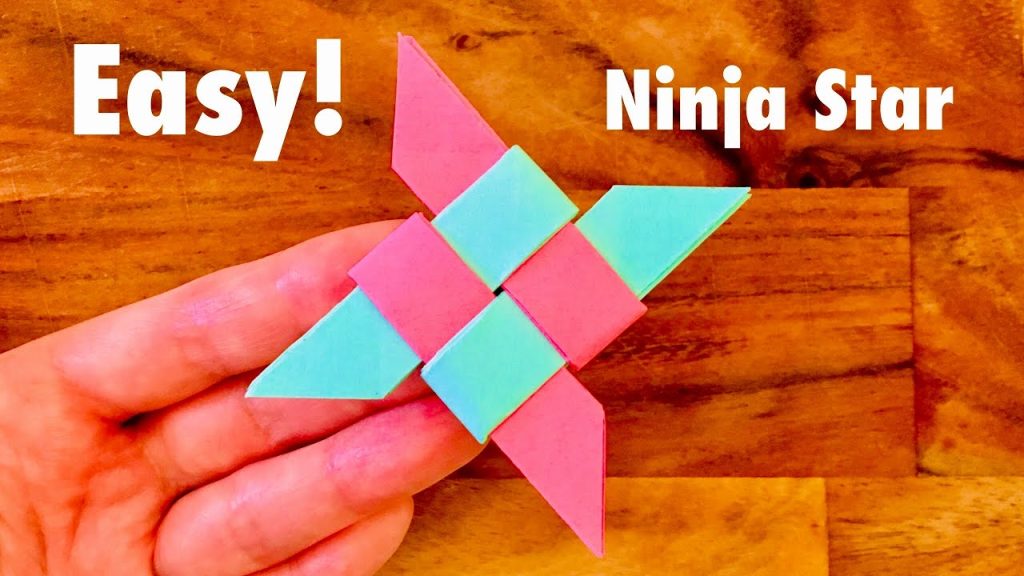
Origami, the ancient art of paper folding, has a wide range of fascinating models to offer, from simple boats and hats to the incredibly complex dragons and other intricate figures. Among these countless creations, there is one that particularly stands out for its combination of simplicity, action, and adaptability: the Origami Transforming Ninja Star. This eight-pointed star not only boasts a cool design but also transforms with a captivating motion, flipping back and forth between two different forms.

What makes this origami model unique is that it can be made using something as commonplace as sticky notes – those little paper squares typically used for quick reminders can take on a new life in the hands of an origami enthusiast. The transformation is not just visual; it’s almost magical. With a bit of dexterity, one shape shifts into another, surprising those who often see sticky notes as mere stationary items.

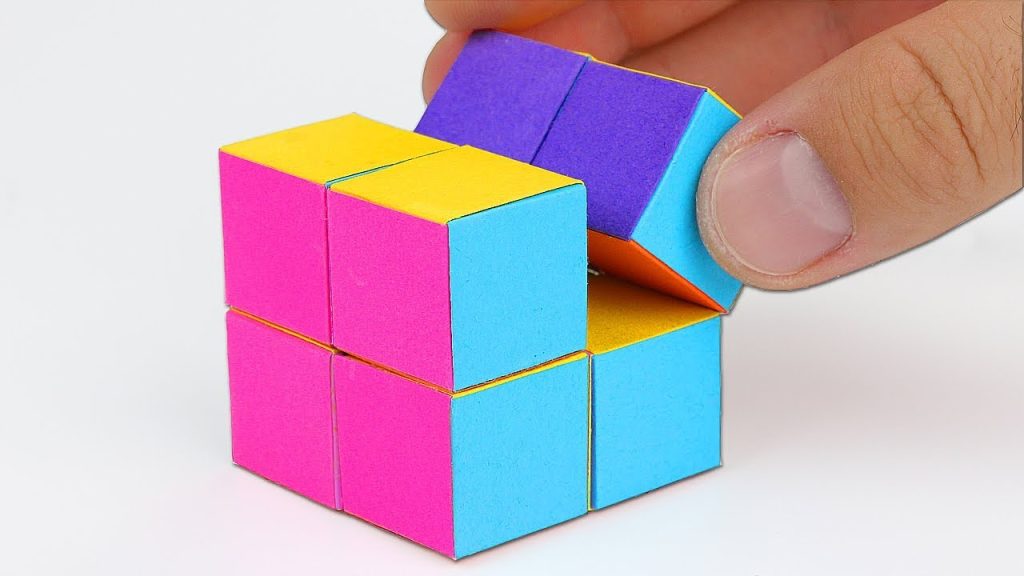
Creating your Transforming Ninja Star is straightforward and doesn’t require any cutting or gluing if you’re using sticky notes. Each sticky note forms an identical module, and these modules are interlocked to create the transforming star design. Most satisfying is the fact that each part of the star is made in exactly the same way – once you have mastered the fold for one module, you can easily make the rest.

Once constructed, it’s all about precision and symmetry to give your star a smooth transformation capability. It flips inside out with a flick of the wrist, changing shapes in a quick motion much to the delight of origami lovers and novices alike.

For many crafters, sticky notes are now not just for jotting down phone messages or reminders for groceries. Through this unique application of origami techniques, they also become moving art pieces or playful toys that symbolize innovation and transformation – both literally in their form-changing abilities and metaphorically as they repurpose a common office item into something extraordinary.

Not only does making an Origami Transforming Ninja Star develop motor skills and encourage creativity, but it’s also an excellent activity for teaching kids about geometry and symmetry. So next time you see a pile of sticky notes sitting idly by your desk, remember that they hold more potential than meets the eye – all it takes is a little fold here and there to transform them into something truly remarkable.

Infinity Cube Origami Instructions

Origami, the traditional Japanese art of paper folding, can be used to create a multitude of fascinating structures. An Infinity Cube is one such intricate and mesmerizing design that you can create with small, simple folds of paper. In this article, we will walk you through the step-by-step instructions on how to make your very own Infinity Cube out of paper.

Materials Needed:

– 8 square sheets of origami paper (preferably of two different colors for an attractive contrast)

– Optional: Glue or double-sided tape for additional stability

Instructions:

Step 1: Prepare the Paper

Start with a square piece of origami paper. If you’re using dual-colored paper, begin with the color you want on the outside facing down.

Step 2: Fold Diagonally

Fold the paper in half diagonally to form a triangle. Then unfold it and repeat with the opposite corners, creating a cross crease pattern on the paper.

Step 3: Fold Edges to Center

Turn the paper so that it’s like a diamond and fold each corner into the center where the creases from steps 2 intersect.

Step 4: Forming Double Squares

With all corners folded in, you now have a smaller square. Take each corner again and fold towards the center line as close as possible without overlapping to form what looks like a double square.

Step 5: Creating Rectangular Flaps

Fold the newly created edges towards the centerline once more to create thin rectangular flaps.

Step 6: Unfold to Step 3

Carefully unfold your last three folds (from steps 4 and 5) back to what you had at the end of step 3.

Step 7: Fold Corners

Keep your model’s flaps open flat. Now fold each corner of these flaps towards its outermost crease line creating little triangle shaped folds — which will eventually become pocket flaps.

Step 8: Assembling the Cube Units

Refold along the creases made in step 5, but this time tuck these little triangles underneath which forms locking pockets. You should now have a rigid unit with two pockets on one side. Repeat these steps to create all eight units.

Step 9: Constructing The Infinity Cube

You will now put together your units without using glue first. Take two units and slide one’s flap into another unit’s pocket. Continue adding units one by one ensuring that each new unit has one flap in a free pocket from one block, and its free pocket ready for another block’s flap.

Step 10 (Optional): Secure With Adhesive

If you find your Infinity Cube isn’t sturdy enough or keeps falling apart – carefully apply glue or sticky tape to each joining flap before inserting them into pockets for extra stability.

Congratulations! You have just completed your very own Origami Infinity Cube. With its conjoined squares and intriguing folding mechanism, this cube can be transformed in multiple ways for endless tactile fun. Display it on your desk or give it as a gift – it’s sure to intrigue and impress with its hypnotic motion and clever design.

10 Ways to Use Playdough in the Classroom

Playdough is not just a fun and colorful toy for young children—it’s also a versatile tool that can enhance learning in the classroom. With its moldable properties and sensory appeal, it can be incorporated into various educational activities. Here are ten creative ways to use playdough in the classroom:

1. Enhance Fine Motor Skills: Have students practice rolling, squishing, and sculpting playdough to develop their hand muscles and coordination.

2. Practice Letter and Number Formation: Students can form letters and numbers with playdough, making it an interactive way to learn the alphabet and number shapes.

3. Scientific Experiments: Create models of different landforms or cell structures in science class, enabling students to have a 3D representation of what they’re learning about.

4. Math Manipulatives: Use playdough as counters or to visually demonstrate mathematical concepts like fractions, geometric shapes, or algebraic equations.

5. Storytelling Props: Allow students to create characters and settings out of playdough for storytelling sessions, fostering creativity and narrative skills.

6. Patterning and Sequencing: Have children make patterns with colored playdough balls or shapes to teach sequences, patterns, and categorization.

7. Thematic Units: Whether you’re studying the ocean or outer space, use playdough for creating thematic models that engage students in topical units.

8. Art Therapy Sessions: Playdough can be used as a calming activity that allows students to express their emotions through sculpture.

9. World Cultures & Geography: Have students construct famous landmarks or geographical features from different countries with playdough during social studies lessons.

10. Learning Through Play: Encourage free play with playdough as a reward or during indoor recess; it stimulates creativity and social interaction among peers.

Incorporating playdough into classroom activities not only brings an element of excitement but can also make abstract concepts more tangible for young learners. These ideas can help you get started on integrating this versatile material into your teaching strategy.

Crepe Paper Artwork

The art world is constantly evolving as artists and hobbyists alike discover new mediums through which to express their creativity. Among the varied and vibrant options for artistic expression, crepe paper artwork stands out for its accessibility, versatility, and the sheer delight it brings to creators and viewers alike.

Crepe paper, with its distinctive crinkled texture and wide spectrum of hues, offers a unique palette for crafting stunning pieces of art. What began as a material primarily used for party decorations has transcended its humble origins to become a favorite among crafters seeking a malleable yet robust medium.

Why Crepe Paper Appeals to Artists

One of the primary reasons crepe paper is so appealing to artists is its pliability. The high degree of elasticity allows it to be stretched and shaped into an almost infinite variety of forms. When manipulated with skill, crepe paper can be transformed into intricate flowers that rival the beauty of their natural counterparts, whimsical sculptures that defy expectation, or layered works that play with light and shadow in mesmerizing ways.

Contemporary Crepe Paper Artistry

Today’s crepe paper artists are pushing the boundaries of what can be achieved with this material. From lifelike botanicals that capture the delicate veins of a petal to colossal installations that cascade from ceilings like waterfalls of color, the scope of what can be accomplished is ever-expanding. These contemporary artists often share their techniques through workshops and social media, inspiring an ever-growing community of crepe paper enthusiasts.

The Techniques Behind the Art

At its core, creating artwork with crepe paper involves cutting, shaping, and gluing. However, within these basic steps lies a world of complexity. Techniques such as fringing, pleating, and cupping add texture and dimension to the creations. Skilled artists wield tiny scissors with surgical precision while others may incorporate wire structures or complementary materials such as beads or fabric to enhance their work.

Sustainability and Craftsmanship

Another appealing aspect is sustainability. As an art form that principally uses paper—a renewable resource—crepe paper artwork resonates in an era where environmentally conscious practices are increasingly important. Moreover, the emphasis on craftsmanship in crepe paper art reconnects us with the joy of creating something tangible in a digital-dominated world.

Crepe Paper Art in Education and Therapy

Beyond its aesthetic virtues, working with crepe paper has educational and therapeutic applications. In schools, projects involving crepe paper promote fine motor skills, planning, and creative problem-solving. Therapeutically, crafting with crepe paper can offer a form of relaxation and stress relief, helping individuals focus their attention on the tactile experience of shaping and coloring.

In conclusion, crepe paper artwork may have once been relegated to the realm of simple craft projects. Today though, it is recognized as a serious form of artistic expression—one that invites people to explore their creativity while enjoying a sensory-rich process. As more discover the delights of working with this versatile medium, we can look forward to a future where crepe paper’s potential continues to unfold in ever more imaginative directions.

How to Make Slime for Kids (Easiest Recipe Ever, Tested By Teachers!)

Slime has become one of the most popular crafts for kids, providing hours of tactile play, and it can be made using simple household ingredients. This article shares the easiest slime recipe ever, tested and approved by teachers for both its simplicity and fun factor.

 Ingredients:

– 1/2 cup of white school glue

– 1/2 cup of water

– Food coloring (optional)

– 1/2 teaspoon baking soda

– 1 1/2 tablespoon contact lens solution (with boric acid as an ingredient)

 Instructions:

1. Prepare the Area: Before you start, cover your work area with newspaper or a plastic tablecloth. Have all ingredients within reach, and ensure that hands are clean to avoid dirt mixing into your slime.

2. Mix the Base: Pour 1/2 cup of white school glue into a bowl. Add in the 1/2 cup of water and mix thoroughly until well-combined. If you want colored slime, add a few drops of food coloring to achieve your desired hue and blend it into the glue mixture evenly.

3. Add Baking Soda: Sprinkle in the 1/2 teaspoon of baking soda and stir it into the mixture until everything is smooth.

4. Contact Lens Solution Magic: While stirring continuously, slowly add in the contact lens solution (about 1 1/2 tablespoons). You’ll notice that the slime begins to form almost instantly as it mixes with the baking soda and glue concoction. Keep stirring until the mixture pulls away from the side of the bowl and starts sticking together in a blob.

5. Kneading: Once your mixture has transformed into a cohesive slimy mass, take it out of the bowl and begin kneading with your hands for about 5 minutes. If it’s too sticky, you can add contact lens solution one teaspoon at a time until you reach the perfect consistency.

6. Enjoy Your Slime: Now you have slime that’s ready to be stretched, pulled, twisted, and squished! Always store your slime in an airtight container when not in use to keep it from drying out.

7. Caution: Ensure that children are supervised when making and playing with slime as it contains ingredients that should not be consumed or put near eyes.

This easy-to-follow slime recipe guarantees mess-free excitement for kids while stirring their imagination. Its teacher-tested assurance also means that this activity can be seamlessly incorporated into classroom settings for a fun, educational experience.

Side Portrait Collages

A side portrait collage combines the profile views of different individuals into a single artistic composition. Unlike a straightforward photograph, a collage allows for the layering and juxtaposition of various elements that can tell a story or convey a theme through the interplay of images.

Art enthusiasts and photographers create side portrait collages to explore identity, relationships, culture, and the passage of time. By selecting side profiles, artists can focus on silhouettes and facial features without the direct engagement that comes from eye contact in front-facing portraits. This can evoke a sense of introspection or mystery, allowing viewers to project their interpretations onto the artwork.

Side portrait collages often employ mixed media, incorporating not just photographs but also textures, drawings, and sometimes digital elements. The process begins with selecting profile images that align in size and angle to create visual harmony. Artists then carefully cut out these profiles and arrange them onto a chosen backdrop which could be anything from plain canvas to an intricate landscape.

The arrangement is critical—it dictates the narrative flow and emotional impact. While some collages might group subjects together to suggest intimacy or solidarity, others space them apart to express isolation or diversity. By manipulating proximity and overlap, the artist manipulates how we perceive relationships among the subjects.

Furthermore, these collages can highlight generational stories when they feature profiles from family members across different ages. They become visual legacies that encapsulate lineage within their layered contours.

In the digital age, software has empowered creators to push boundaries further. Digital tools allow easy manipulation of images—artists can experiment with color schemes, blend modes, and filters to create feelings or atmospheres that would be challenging to achieve with physical materials alone.

To produce an impactful side portrait collage is not just about crafting an aesthetically pleasing piece; it’s also about imparting meaning and emotion through thoughtful composition. The result is art that not only attracts the eye but also engages the mind, sparking curiosity about each subject’s story and their collective tales within the frame.

Teaching Kindness One Rock at a Time

In a world where every news cycle seems to carry stories of division and strife, a simple, yet profound movement is making waves by promoting acts of kindness. This movement has no grandiose platform; instead, it operates on a small gesture – painting and sharing rocks.

Teaching kindness through painted rocks is a beautiful activity that combines creativity, community, and compassion. It started humbly with individuals painting rocks with vibrant colors and positive messages and then leaving them for others to find in public spaces like parks, trails, or even just on the sidewalk. Whoever stumbles upon these delightful stones would undoubtedly feel a burst of surprise and joy. The underlying motive? To inspire smiles and inject small doses of positivity into the routine life.

The idea might seem trivial at first glance, but its impact is profound. When people engage in painting these rocks, they meditate on positive affirmations or encouraging words they want to share with others. This process not only nurtures their creative spirits but also builds within them an intention of kindness. As they leave these rocks in various spots around their communities, they actively participate in creating a more welcoming environment.

But the beauty of this movement doesn’t stop at creation; it invites interaction. Those who find these rocks are encouraged to post pictures on social media using specific hashtags or join community groups dedicated to rock painting. Some choose to keep the rocks as tokens of goodwill while others re-hide them to continue spreading joy. In this way, a network of kindness expands rapidly.

Engaging children in this project has remarkable educational value as well. By involving kids in painting and hiding these rocks, we imbue in them an understanding of community service, artistic expression, and simple human kindness. It’s an excellent opportunity for parents and educators to discuss with children the importance of being kind and how small actions can have big impacts.

Moreover, it’s a hobby that encourages outdoor activity; families or school groups can organize outings specifically with the purpose of placing or hunting for these kindness rocks. Such activities not only provide exercise but also foster team-building and problem-solving skills when participants work together to find suitable locations for their rocks or decode hints on finding others.

As the painted rock movement grows, so does its testament to the power of collective goodwill – that even something as small as a painted stone can carry a ripple effect of kindness throughout communities worldwide. Here is proof that teaching kindness doesn’t require monumental effort; sometimes all it takes is one rock at a time.

IKEA Spinning Wheel Fun in the Classroom (Printable Templates)

In the realm of education, instructors are incessantly seeking novel approaches to captivate and engage their students. One ingenious tool that is revolutionizing classroom dynamics is IKEA’s Spinning Wheel. This versatile gadget, not just a marker of Scandinavian furniture excellence, has now proven its worth as an interactive and educational device.

The IKEA Spinning Wheel, essentially a game of chance, offers educators an array of opportunities to infuse fun into their classrooms. With its customizable slots, teachers can tailor the wheel to include questions relevant to the lesson at hand, assign group tasks, or even determine topics for discussion. It serves as a visual and tactile stimulus that exudes an aura of excitement every time it’s spun.

Why is it Effective?

– Active Participation: The spinning wheel prompts all students to participate, ensuring an active learning environment.

– Flexibility: The adjustable slots on the spinning wheel make it usable for any subject – from language arts to mathematics.

– Instant Engagement: The novelty and game-like aspect capture students’ attention immediately.

– Fair Play: Every student gets an equal chance thereby promoting fairness in class activities.

How to Implement the Spinning Wheel in the Classroom:

– Ice Breaker Activities: Begin the day with a spin. It could decide what fun fact students share about themselves.

– Question Roulette: Reinforce learning by transforming quizzes into a game where correct answers allow spins for classroom privileges or points.

– Topic Selector: Effortlessly choose topics for essays or projects with a fun spin.

– Task Delegator: Assign classroom responsibilities or group roles using the spinning wheel.

Free Printable Templates

No IKEA nearby? No problem! We offer free printable templates so any teacher can construct their DIY spinning wheel. Here are templates you can download, print, and put into action today:

1. Basic Spinner: A simple template perfect for general use in any activity.

2. Subject-Specific Spinners: Maths equations on one wedge, grammar questions on another; tailor this template to any lesson plan.

3. Reward Wheel: Fill in with treats or privileges that work as incentives for student participation.

Using these templates is straightforward:

– Print out your preferred template.

– Laminate (optional) for added durability.

– Affix a spinner arrow using a brad or similar item which allows movement.

– Customize the sections based on your pedagogical requirements.

The Future of Fun Learning

IKEA’s Spinning Wheel represents just a fragment of the potential tools that can be incorporated into classroom environments to elevate engagement levels and make learning a joyous experience. The implementation of such interactive devices heralds a new age where education seamlessly blends with entertainment, crafting experiences that are not only informative but genuinely enjoyable.

With free printable templates at your disposal, witness your lessons transform and student participation soar – all thanks to this simple yet brilliant educational tool from IKEA.

Year of the Ox Craft Activities for Kids New Year 2023

As we usher in the Lunar New Year, it’s a great opportunity for kids to engage in creative crafts that celebrate the Year of the Ox. The ox symbolizes strength, determination, and honesty in Chinese culture—an excellent theme to encourage in young minds. Here are some fun and educational craft activities for kids to enjoy and learn more about this important cultural celebration.

1. Ox-Themed Paper Lanterns:

Kids can create their own New Year paper lanterns adorned with images of an ox. You’ll need red and gold paper, scissors, glue, and some string. Cut the paper into strips and form a cylinder shape, then cut out ox silhouettes from gold paper to glue onto the lantern. Attach a string to hang them up, bringing a festive look to your home.

2. Ox Finger Puppets:

Encourage storytelling with DIY finger puppets made of felt or paper. Craft kits are available or you can design your own with materials at hand. Have your children act out stories or create new ones featuring an ox character to explore Lunar New Year traditions.

3. Ox Masks:

Masks are a staple in many festivals, and creating an ox mask is both simple and fun. Use sturdy paper plates as a base, cut out eye holes, and let kids decorate them with paint, markers, or colored paper to resemble an ox face. Add elastic bands to secure the masks for imaginative play.

4. Traditional Ox Paintings:

Provide children with brushes, ink or paint, and paper to create traditional Chinese paintings featuring the ox. This activity introduces kids to different art techniques and the symbolic significance of animals in Chinese culture.

5. Lucky Red Envelopes (Hongbao):

Making red envelopes is a craft that also teaches kids about sharing blessings and good wishes for the new year. Fold red paper into envelopes and decorate them with gold paint or markers by drawing symbols like oxen or Chinese characters for luck.

6. Clay Ox Figurines:

Sculpting can be both therapeutic and exciting for children as they bring their own versions of oxen to life with clay or playdough. Once painted and dry, these figurines make charming decorations or gifts for loved ones.

Incorporating these craft activities into your family’s New Year celebrations not only entertains your children but also immerses them in cultural education and appreciation—valuable lessons that go well beyond the festivities.

How to Make an Exploding Gift Box for Mother’s Day With Your Students

Making an exploding gift box is a fun and creative way to celebrate Mother’s Day, particularly if you are a teacher looking for a crafty project to engage your students with. Below is a step-by-step guide on how you can make this exciting gift with your students.

Materials Needed:

– 1 large sheet of cardstock (12″x12″ for the base)

– 3 sheets of cardstock in varying sizes (10″x10″, 8″x8″, and 6″x6″ for the layers)

– Additional colorful paper or cardstock for decorating

– Glue stick or double-sided tape

– Scissors

– Ruler

– Photos, stickers, embellishments, and any other personal touches

Steps:

1. Start by preparing the base of the box. Take the largest piece of cardstock, and using the ruler, mark out a grid of nine equal squares (4″x4″ each if you are using 12″x12″ paper).

2. Cut along one line on each corner square, up to the first intersecting line to create flaps. These flaps will become the sides of your box.

3. Fold the flaps upwards to form the box sides, and secure them with glue or tape.

4. Next, take the next largest piece of cardstock (10″x10″) and repeat steps 1 and 2, creating more flaps from this slightly smaller sheet.

5. Before forming this layer into a box, encourage students to decorate each panel with messages, drawings, or photographs dedicated to their mothers.

6. Carefully glue this layer inside the previous one so that it sits within the base when all sides are folded up.

7. Repeat step 5 with each of the remaining smaller pieces of cardstock, ensuring that each inner layer is well-decorated before securing it inside the prior layer.

8. Add an element of surprise! Students can attach pop-up shapes or small handmade gifts to some panels, which will ‘explode’ out when the box is opened.

9. To finish, place a final gift or note in the centermost part of the box.

10. Optionally create a lid for your box by using a slightly larger piece than your base dimensions; do not forget to decorate it as well!

11. Once all layers are complete and dry, fold in the sides from largest to smallest so that they nestle within one another.

An exploding gift box opens up in layers, displaying all of its vibrant and thoughtful content at once – much like a blooming flower – making it an ideal interactive present crafted with love and creativity by your students for Mother’s Day!