Art Education

Creative Cityscape Art Activity for Kids: A Mixed Media Idea for the Classroom

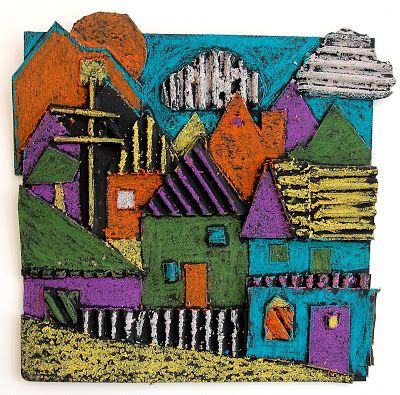
Cultivating creativity in children is crucial for their cognitive development, and what better way to do so than through art? Incorporating a Creative Cityscape Art Activity into the classroom not only fosters imagination but also integrates various learning aspects such as understanding shapes, colors, and perspectives. This mixed-media project is ideal for children of all ages and can be adapted to suit different skill levels.

Materials Needed:

– Construction paper in various colors

– Old magazines or newspapers

– Scissors

– Glue sticks

– Markers or crayons

– Optional: Paints, paintbrushes, glitter, or other decorative items

Instructions:

Step 1: Background Creation

Begin by having the kids choose their background construction paper. This will serve as the sky for their cityscape. Using blue might suggest daytime, while blacks or purples can represent a night sky.

Step 2: Creating Buildings

Using construction paper in different colors, guide the children to cut out various geometric shapes that resemble buildings. Rectangles can be skyscrapers while triangles can serve as rooftops. Encourage them to create buildings of differing heights and widths to add depth to their cityscape.

Step 3: Textured Details with Newspaper or Magazines

To add texture and pattern to their buildings, let the kids cut out pieces from old magazines or newspapers and glue them onto their paper buildings. They can look for patterns that mimic windows, doors, or brickwork.

Step 4: Assembling the Cityscape

Once they have a collection of buildings and textured details ready, it’s time to assemble the cityscape on their background paper. Encourage layering of buildings to create a more realistic perspective.

Step 5: Decorative Touches

Now the fun part – decoration! Kids can use markers or crayons to draw windows, doors or even people in the buildings. If you have opted for paints, they can dab light colors to represent lights in windows or dark colors for shaded areas.

Step 6: Final Flair

For an extra layer of creativity, provide optional decorative items like glitter for stars in the night sky or small stickers that could be cars or trees. Allow them space and freedom to express themselves creatively.

This activity doesn’t only lead to the creation of beautiful artwork; it promotes fine motor skills through cutting and gluing; knowledge about shapes and spatial relationships; color recognition; artistic decision-making; and possibly teamwork if you decide to make it a group project. Displaying the finished cityscapes in the classroom will give students a sense of pride and accomplishment in their creative capacities.

10 Ways to Use Pom Poms in the Classroom

Pom poms are not just for cheerleading and crafts; they can be used as versatile teaching tools in the classroom. Their bright colors, soft texture, and versatility make them an excellent resource for educators. Here are ten creative ways to use pom poms in your classroom:

1. Counting and Math Skills:

Pom poms can be a tactile way for students to learn counting, addition, subtraction, and even multiplication. Teachers can assign different point values to different colored pom poms for math games.

2. Color Sorting:

Develop early childhood skills by having students sort pom poms by color. This can help them learn to identify and categorize different colors.

3. Fine Motor Skills Practice:

Using tweezers or tongs to pick up pom poms and move them into containers is a great exercise for improving fine motor skills among young learners.

4. Creative Writing Prompts:

Get creative with language arts by using pom poms to represent plot elements – characters, setting, problem – which students can organize before writing a story.

5. Textured Art Projects:

Pom poms can be glued onto paper or other mediums to create textured art projects that students will love to touch and feel.

6. Sensory Bins:

Create sensory bins with pom poms of various sizes and textures. These bins are not only fun but also stimulate sight, touch, and can even be used for smell if they are scented!

7. Physics Experiments:

Showcase scientific principles with pom poms by creating simple experiments that demonstrate motion, forces, and energy transfer.

8. Reward System:

Use pom poms as a physical token reward system for positive behavior or accomplished tasks in the classroom.

9. Team-Building Exercises:

Divide students into teams and have them compete in relay races or other challenges where they must transport pom poms without using their hands – fostering teamwork and communication skills.

10. Music and Rhythm Games:

Incorporate pom poms into music class by using them as props for rhythm games or as makeshift shakers, adding an element of fun while learning about tempo and beat.

By integrating these fluffy spheres into learning activities across various subjects, teachers can offer a multisensory experience that is both educational and engaging for students of all ages.

Paper-Towel Roses | Flower Craft for Kids

Engaging children in creative activities not only sparks their imagination but can also develop their motor skills and appreciation for art. One interesting project that combines artistry with everyday household items is making paper-towel roses. This craft is simple, enjoyable, and results in beautiful flowers that won’t wilt! Ideal for a rainy day, a themed party activity, or just whenever your kids are feeling crafty, this guide will walk you through how to create your very own bouquet of paper-towel roses.

 Materials Needed

– Paper towels

– Food coloring or washable paint

– Water

– Scissors

– Green pipe cleaners (for stems)

– A small vase or cup for the final display (optional)

 Step-by-Step Instructions

1. Prepare the Colors: If you’re using food coloring, mix it with a little bit of water in separate bowls for each color you plan to use. For paint, dilute it with water until it’s a watery consistency.

2. Color the Paper Towels: Have the kids dip the paper towels into the colors they prefer. They can fully submerge them for a solid-colored rose or just dip edges to create a multicolored effect.

3. Dry the Paper Towels: Lay out the colored paper towels to dry. To speed up this process, you might want to use a hair dryer set on low heat.

4. Cut Petal Shapes: Once dry, fold the colored paper towels several times so you can cut multiple petal shapes with one snip. They don’t have to be perfect; irregular shapes make for more realistic roses.

5. Make the Stem: Take a green pipe cleaner and fold it in half to increase its strength and provide a better base for attaching the petals.

6. Assemble the Rose: Wrap the first petal tightly around one end of the folded pipe cleaner, then continue adding petals around it, securing them by twisting bits of the petal bottoms around the pipe cleaner stem.

7. Finishing Touches: Fluff out the petals until you’re happy with how full your rose looks.

8. Display Your Creation: Once you’re done assembling your rose, you can place it in a small vase or cup or create more roses to form a colorful bouquet.

 Safety Tips

– Be sure that small children are supervised when using scissors.

– Non-toxic materials like food coloring and washable paint are recommended so that they’re safe for all ages.

– To prevent stains, cover your work area with old newspapers or plastic tablecloths.

 Learning Opportunities

While creating these paper-towel roses, parents can discuss how real flowers grow and thrive, pointing out similarities with their craft such as the petals and stems. It’s also an ideal moment to talk about colors and how mixing them can result in new shades – perfect for young ones learning about primary and secondary colors!

To sum up, crafting paper-towel roses is not only an accessible art project for children but also an educational opportunity suitable for various age groups. It’s an excellent way to encourage creativity and can be modified in numerous ways: add sparkle with glitter glue, create patterns before dyeing your paper towels, or even use these adorable creations as thoughtful homemade gifts. Let your imagination bloom alongside your splendid paper-towel roses!

16 Inventive Desk Name Plate Ideas for Teachers

Here are 16 inventive desk name plate ideas for teachers that combine functionality with a creative flare:

1. Pencil Design Name Plate: Craft a name plate in the shape of a pencil with the teacher’s name playfully written as if drawn by the pencil itself.

2. Chalkboard Theme: Use a mini chalkboard where names can be written and changed. This adds a classic touch to the teacher’s desk and allows for flexibility.

3. Book Stack Name Plate: Design a name plate that looks like a stack of books, with the teacher’s name on the spine of the top “book.”

4. Apple with a Twist: An apple-shaped name plate with the teacher’s name is traditional; add modernity by using metallic or acrylic materials.

5. Tech-Inspired Acrylic Block: A clear acrylic block with a digital font can appeal to teachers who love technology.

6. Subject Iconography: Use symbols related to their teaching subject, like math equations or historical icons, as a background for their name.

7. Growth Chart Ruler: Turn into a themed name plate—a ruler indicating growth, alongside the teacher’s name.

8. 3D Printed Novelty: Create a custom 3D printed name plate with fun elements or characters relevant to the class subject matter.

9. Interactive Whiteboard Miniature: A small whiteboard that serves as both a functional tool and a personalized name display.

10. Periodic Table Element Style: Science teachers will appreciate their name stylized like an element from the periodic table.

11. Plant Holder Integration: Incorporate a small plant holder into the design for teachers who love greenery; their name could wrap around the pot.

12. Crayon Color Splash: Mimic crayons spelling out the teacher’s name or have it mounted on crayon-like designs for an art-inspired theme.

13. Scrabble Tiles Layout: Spell out names using oversized Scrabble tiles for an engaging and educational aesthetic.

14. Inspirational Quote Background: Have an inspirational quote in fine print behind the teacher’s name to motivate both them and the students.

15. Historical Desk Plaque Replicas: Choose replicas from history—like Presidential desk plates—for social studies teachers.

16. Foldable Book Stand Replica: Crafted to appear like a classic book stand, this can show both the teacher’s name and hold instructional material simultaneously.

Each of these ideas can help reflect a teacher’s unique style and make their desk more personal and inviting for students!

Easy Origami Animals Worksheet and Step-By-Step Instructions for Kids

Introducing kids to the art of origami is a wonderful way to spark their creativity and enhance their motor skills. Origami, the traditional Japanese art of paper folding, can be both fun and educational. Among the numerous designs available, easy origami animals are particularly popular with children. To get started, here’s a basic worksheet and step-by-step instructions for creating simple origami animals that children will love.

Origami Dog

_What You Need:_

– 1 square piece of origami paper (15cm x 15cm recommended)

_Instructions:_

1. Lay the paper flat and color side down.

2. Fold the paper in half diagonally to form a triangle.

3. Fold the left and right corners up to meet at the top corner, forming a diamond shape.

4. Fold the bottom corner up slightly to make the dog’s chin.

5. Turn over your figure; you now have your basic dog shape.

6. To add detail, fold the top of the diamond back on each side to create ears.

7. Draw eyes and a nose with a marker to give your dog character.

Origami Cat

_What You Need:_

– 1 square piece of origami paper (15cm x 15cm)

_Instructions:_

1. Place your paper color side down.

2. Fold it in half diagonally both ways and unfold to get an X crease.

3. Turn it over and fold it in half from top to bottom then from left to right.

4. Collapse along creases into a triangle base with open ends at the bottom.

5. Fold upper layers’ outer edges towards the middle crease line, forming a kite shape.

6. For cat ears, fold top layers’ outer corners upwards.

7. Fold up bottom point between ears partially under each layer to form the head.

8. Flip figure over and draw eyes, whiskers, and mouth.

Origami Fish

_What You Need:_

– 1 square piece of origami paper (15cm x 15cm)

_Instructions:_

1. Begin with paper color side down.

2. Fold paper in half diagonally (triangle).

3. Fold left/right corners of triangle up again towards the opposite corners — they will overlap slightly at top creating fish’s body.

4. Fold down one corner for tail fin, adjusting angle as desired.

5. Open folded pieces slightly; form tail fin more distinctly by bending them outward.

6. Flip over your fish; you can draw an eye or paste a small circle of black paper for detail.

By following these simple instructions, children can make a delightful collection of origami animals without too much difficulty. Encourage kids to explore colors and patterns within their origami designs which can result in personalized creations they can be proud of!

Classroom Activities for World Theatre Day!

On March 27th, the curtains rise to celebrate World Theatre Day, a time to recognize and promote the importance of theatre in all its forms across the globe. This day offers a unique opportunity for schools and educational institutions to introduce students to the magical world of performing arts through various classroom activities that inspire creativity, enhance communication skills, and foster a greater appreciation for cultural diversity.

Drama Workshops

A drama workshop is a fantastic way to plunge students into the world of theatre. Encourage them to participate in improvisation exercises, script readings, or mime practices. This not only sparks their imaginations but also improves their ability to express emotions and ideas without the barrier of scripted lines.

Playwriting Sessions

Invite students to pen their own short plays or scenes. This activity can be done individually or in groups, allowing for peer collaboration. Discuss plot development, character creation, and dialogue. Once their masterpieces are complete, they can perform the plays in front of the class or for a school assembly.

Set and Costume Design

Theatre is not just about acting; it’s also about the visual elements that bring a story to life. Organizing an art project focused on set and costume design teaches students about the importance of visual storytelling. They can draw or craft mini set models or create costume designs for different characters from famous plays.

Theatre Games

Incorporate theatre games into your lesson plans. Games such as “Freeze Frame” where students must create tableaux vivants (living pictures) depicting different scenes, or “Emotion Party” where each participant enters a scene displaying a distinct emotion, teach about body language and expression in a fun and interactive way.

Historical Theatre Chronology

Develop a timeline of theatre history that covers major periods like Greek tragedy, Commedia dell’arte, Shakespearean drama, and modern theatre movements. Assign each student a period to research and present on how societal changes influenced theatrical forms.

Guest Speakers

Invite local actors, directors, or playwrights to speak with students about their experiences in the field of theatre and discuss various career paths one might pursue within the industry. Hearing firsthand accounts can be truly inspirational for potential future artists.

Shadow Puppetry

Exploring different cultural perspectives in theatre can be done through an activity like shadow puppetry – an art form popular in regions such as Indonesia and China. Students can craft their own shadow puppets and perform short narratives using a backlit screen.

International Play Reading

For older students particularly interested in literature and drama theory, organize reading sessions that feature plays from around the world. This will expose them to diverse storytelling techniques and themes, broadening their understanding of global theatrical traditions.

By engaging in these dynamic classroom activities on World Theatre Day, educators have the power to instill a lifelong love for the arts while contributing to children’s holistic growth. Through theatre education, we prepare students not only to become future patrons of the arts but also empathetic global citizens able to think critically and creatively about the world around them.

Monster Corner Bookmark Craft Activity

Are you looking to inject a little creativity into your reading routine or find a way to encourage young learners to read more? Look no further than the fun and easy Monster Corner Bookmark craft activity! Not only is it a delightful project that bookworms of all ages can create and customize, but it also provides a quirky companion for your next reading adventure.

To get started with this simple craft, you’ll need the following materials:

– Colorful paper or cardstock

– Scissors

– Glue

– Markers or colored pencils

– Googly eyes (optional, but highly recommended)

Creating Your Monster Corner Bookmark:

1. Begin by selecting your cardstock or paper. Vibrant colors often work the best to give your monster that extra pop!

2. Cut your base piece into a square. A good starting size is a 6×6 inch square, which will work for standard-sized books.

3. Fold the square diagonally to form a triangle.

4. With the right angle of the triangle pointing towards you, fold the right corner up to meet the top point.

5. Repeat this fold with the left corner, so both corners now meet at the top point.

6. Unfold these last two folds; you should see two smaller triangles.

7. Fold one of these small triangles towards you and put some glue on it.

8. Refold those larger triangles back up so that they overlap and stick down onto the glue—this creates a pocket which is where you will slide over the corner of your page.

9. Now for the exciting part – making your monster unique! Use markers or colored pencils to draw on sharp teeth, scales, spots, or stripes onto your bookmark.

10. Attach googly eyes (one, two, three… the more, the merrier!) on your bookmark to bring it to life.

11. Optional: If you have them available, use pom-poms, glitter glue, or stickers for added texture and sparkle!

12. Let everything dry completely before placing your new monstrous friend onto a page corner in your book.

The beauty of this craft activity is its simplicity and adaptability; it can be tailored precisely to individual tastes or themes from books that children are currently enjoying! Not only does creating a Monster Corner Bookmark promote manual dexterity and encourage artistic expression; when using these bookmarks as placeholders in stories and novels, they serve as whimsical motivators for children (and adults alike) to pick up their books more often. So next time you’re in search of an engaging craft project that combines literacy with artistry—conjure up some monster mayhem with these delightful DIY corner book trackers!

Art Ideas for Kids: Outdoor Line Drawing

Are you looking for fresh, creative art ideas that will get your kids outside and into the sunshine? Outdoor line drawing is a simple and exciting activity that allows children to explore their artistic side while enjoying the great outdoors. Let’s dive into some engaging line drawing activities that are perfect for kids of all ages.

 1. Sidewalk Chalk Galore

The classic go-to for outdoor drawing, sidewalk chalk is an excellent medium for kids to draw large, colorful lines on pavement or concrete. Challenge them to create a giant collaborative mural or a hopscotch grid that doubles as an interactive game. Encourage them to use different line weights and styles—from dashed to zigzag—to add variety to their creations.

 2. Nature’s Canvas

Invite the kids to gather sticks, leaves, or other natural objects to use as drawing tools. Dip these items in watercolors or washable paints and let them make their mark on a roll of paper unfurled across the yard. It’s an environmentally-friendly approach to drawing lines and shapes while encouraging children to experiment with the textures provided by Mother Nature.

 3. Water Art Wonders

Fill squirt bottles with water tinted with food coloring and have the kids use these to ‘draw’ on sidewalks, fences, or any safe outdoor surface. As the water dries up, they’ll be fascinated by the evaporating lines—it’s ephemeral art at its most playful!

 4. String It Along

Lay out long pieces of string or yarn soaked in paint across a sheet of paper laid out on the grass. Kids can arrange the strings in patterns and press them down before carefully lifting them away to reveal interesting linear designs.

 5. Shadow Tracking

On a sunny day, provide kids with large sheets of paper and markers or crayons. Have them trace each other’s shadows throughout the day at different times to see how shadows change shape and position, creating a series of ‘shadow drawings’ that document their playful outdoor explorations.

By incorporating these inventive outdoor line drawing ideas into your child’s playtime routine, you’ll not only foster their artistic growth but also enhance their appreciation for nature and outdoor play. So grab some art supplies, step outside, and let those little imaginations soar with every line they draw beneath the sun-soaked sky!

Romero Britto Inspired Art Activities

Romero Britto’s vibrant, bold, and colorful art style is not only visually stimulating but also a fantastic inspiration for a range of art activities that can be enjoyed by people of all ages. By blending influences from pop art, cubism, and graffiti, Britto’s art lends itself perfectly to educational settings, art classes, or even a fun day of crafting at home.

 Paper Mosaic Masterpieces

One of the simplest ways to draw inspiration from Romero Britto is through creating paper mosaics. This activity requires nothing more than construction paper in various colors, scissors, glue, and a base sheet to glue pieces onto. Young artists can begin by sketching out simple designs like hearts, stars or even their own version of one of Britto’s iconic images. Once the layout is set, they cut small pieces of colored paper and meticulously glue them onto their outlines. This colorful pastiche pays homage to Britto’s love for bright colors and his unique take on cubism.

 Pop Art Portraits

Britto’s portraits are famous for their distinctive patterns and usage of color blocks. Using thick black markers or paints to outline segments on a portrait and then filling them in with different solid colors can mirror this style. Participants can start with self-portraits or pick a popular figure as the subject. The key here is not to focus too much on realism but rather on creating a simplified version with over-exaggerated features that allow for a more dramatic separation of colors.

 Sculpting with Modelling Clay

Romero Britto has a range of sculptures that carry his signature style beyond two dimensions. Similar creations can be crafted using modelling clay. Encouraging creators to design animals, figures, or any object that inspires them will give room to explore shape and form. After modeling the clay into the desired shape, they can paint their sculptures with patterns and colors reminiscent of Britto’s work.

 Canvas Pop Art Creations

For those ready to embrace their inner artist more fully, canvases await. Using acrylic paints allows for the replication of Britto’s bright visual energy as well as his use of bold black outlines. This activity requires little more than an array of colorful paints, brushes varying in size for different details, a canvas, and the eagerness to create something joyful. Emphasis should be placed on fun patterns like stripes or polka dots and vibrant color combinations.

 Upcycled Art Innovation

Romero Britto believes in the positive influence of art; hence an activity focusing on positivity would be fitting. Using recycled materials—such as old CD cases, bottles caps, bits of fabric—to create art teaches sustainable practices while staying true to Romero Britto’s resourceful spirit. Moving between two-dimensional and three-dimensional planes helps individuals think outside the traditional canvas and appreciate every surface as an opportunity for creation.

Teaching students or engaging individuals in these activities not only celebrates Romero Britto’s work but also emphasizes attributes he values: creativity, positivity, and the belief that everyone is an artist at heart.

Step-by-Step Origami Videos for Kids (Animal Rings)

Introducing the charming and creative world of origami to children can be a delightful experience, especially with the rise of interactive step-by-step origami videos. These videos have made learning the art of paper folding much more accessible and fun for kids. One project that is particularly popular among young crafters is making origami animal rings.

Origami has long been revered for its benefits in enhancing concentration, fine motor skills, and spatial visualization. Animal rings, due to their playful nature and quick results, serve as an excellent starting point for kids to dive into this ancient craft.

The videos that guide children through creating origami animal rings typically start by illustrating the type of paper suitable for the task. Selecting colorful and reasonably sturdy paper can make the process more enjoyable and the final product more vibrant. Squares of paper with about 6 inches on each side are usually perfect for small fingers to handle.

Next, these tutorial videos will demonstrate basic folds — such as the valley fold, mountain fold, petal fold, and outside reverse fold — that lay the foundation for more complex creations. Understanding these fundamental principles is crucial as they are repeated in nearly every origami figure children will make in their journey.

With each fold meticulously presented on screen, narrators often use child-friendly language accompanied by visual cues to help young viewers follow along without difficulty. Additional tips are provided along the way to ensure even those new to origami can succeed without frustration.

As children progress through the video, they’ll see how a flat piece of paper magically transforms into a three-dimensional ring topped with an animal design. Some popular choices are cats, dogs, foxes, and birds due to their easily recognizable features that bring immediate joy once completed.

The culmination of the instructional video is always a proud moment — children now have a wearable piece of art! What stands out about these origami lessons is not just the end product but also the process itself. It encourages patience, attention to detail, and following instructions while allowing for creativity and personal touches in decorating their animal rings.

Parents appreciate these tutorials because they provide an engaging activity that doesn’t require screen time or expensive materials — just paper and imagination. Moreover, wearing their creations offers kids a sense of accomplishment and inspiration to explore more complex projects.

In conclusion, step-by-step origami videos are an invaluable resource for parents and educators looking to introduce kids to a fun creative outlet. As children follow along creating their animal rings, they’re not just folding paper; they’re developing skills and a love for an art form that has been passed down through generations. As such videos continue to gain popularity online, it’s clear that this age-old craft has found a new lease on life in the digital world — much to the benefit of enthusiastic young minds everywhere.