Art Education

15 Father’s Day Gifts Ideas to Make With Students This Year

Father’s Day is a special occasion to celebrate and honor fathers, father figures, and paternal bonds. It’s an excellent opportunity for teachers and educators to engage their students in creative projects that can also double as heartfelt gifts. Here are 15 Father’s Day gift ideas that students can make this year:

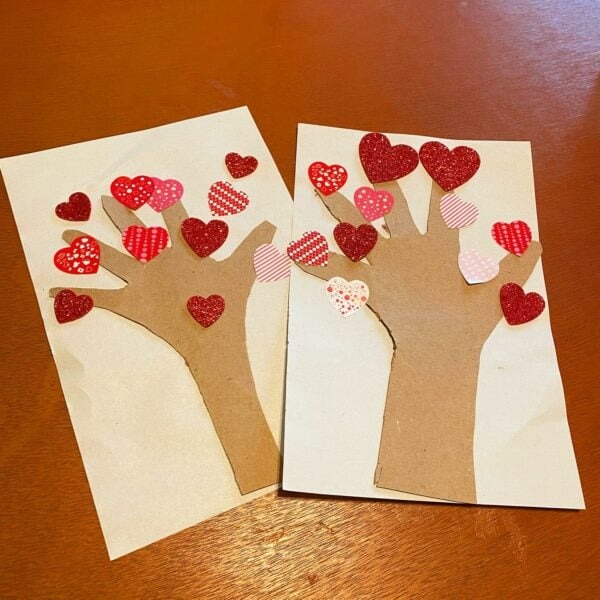
1. Handprint Art – Children can use paint to create a colorful handprint on a canvas or cardstock. Frame it for an added touch.

2. Personalized Bookmarks – Using cardstock, students can create bookmarks decorated with drawings or messages expressing their love.

3. Customized Keychains – With some beads and string, or even shrink plastic, kids can make personalized keychains for dads.

4. Decorated Picture Frames – Have your students decorate wooden or cardboard frames and then insert a favorite photo.

5. Homemade Ties – For the younger crowd, paper ties decorated with markers or crayons are cute and simple to make.

6. Recorded Video Messages – Students can record heartfelt messages or perform short skits to share with their dads digitally.

7. Coupon Books – Kids can design homemade coupons redeemable for chores, hugs, or special one-on-one time.

8. Handmade Cards – A classic choice; students can use crafting supplies to make unique Father’s Day cards.

9. Baked Goods – Teach your class a simple cookie recipe they can bake at school or at home with supervision.

10. Desk Organizers – Using repurposed materials like cans or small boxes, students can create handy desk organizers for dad’s office space.

11. Potted Plants – Small potted herbs or succulents that kids have helped grow are both meaningful and practical gifts.

12. Sports Team Coasters – For sports fan dads, students can craft coasters in the colors or logos of their dad’s favorite team.

13. DIY BBQ Rubs/Sauces – Under guidance, students can mix spices to create a custom BBQ rub or sauce for grill-loving fathers.

14. Paperweights – Simple rocks painted by the kids or clay molded into shapes can serve as charming paperweights.

15. Duct Tape Wallets – Older students might enjoy crafting wallets made from colorful duct tape for a functional yet homemade gift.

These activities not only give students an opportunity to express their creativity but also teach them the value of giving thoughtful, handmade gifts to the special people in their lives.

Drawing Teaching Resources

Drawing is an art form that allows individuals to express their creativity and sharpen their observation skills. As with any skill, learning to draw requires practice and guidance. Fortunately, there is a vast array of drawing teaching resources available for both beginners and advanced artists. In this article, we will explore various resources that can help anyone improve their drawing abilities.

Books:

Many aspiring artists begin their journey with drawing books. These books offer step-by-step instructions for drawing different subjects such as humans, animals, landscapes, and more. Some popular titles include “Drawing on the Right Side of the Brain” by Betty Edwards, which helps readers develop their perceptual skills, and “Keys to Drawing” by Bert Dodson, which provides exercises on proportion and perspective.

Online Courses and Tutorials:

The internet is a treasure trove of drawing tutorials. Platforms like Skillshare, Udemy, and even YouTube host a multitude of courses taught by professional artists. These courses often cover basics like line control, shading techniques, and composition but can also delve into specific styles or mediums like digital art or watercolor painting.

Art Supplies:

Quality art supplies can significantly enhance the learning experience. While beginners might start with a simple pencil and paper, there’s a variety of pencils (graphite, charcoal), pens (ink, gel), markers (alcohol-based, water-based), and papers (sketch pads, watercolor paper) that cater to different styles and techniques.

Communities:

Joining an art community can be incredibly beneficial for feedback and motivation. Websites like DeviantArt or ArtStation allow artists to share their work and engage with others. Communities often host challenges or prompts that encourage regular practice.

Art Classes:

Local community centers or colleges often offer art classes where individuals can receive hands-on instruction from an experienced teacher in a collaborative environment.

Mobile Apps:

Apps such as Procreate for iPad users or Adobe Photoshop Sketch provide powerful tools for digital art creation. They are accompanied by numerous online tutorials specific to the app’s use.

By utilizing these resources collectively or independently, anyone interested in drawing can embark on a self-taught journey or supplement their traditional education in the arts. The key is consistent practice, experimenting with different mediums and styles, and actively seeking constructive criticism to improve one’s skill set over time.

Ultimate Blends Poster Pack

In the world of design, creativity knows no bounds. With the right tools and resources, any vision can be transformed into a stunning piece of art that captures minds and hearts alike. This is where the Ultimate Blends Poster Pack comes into play. This pack is not just another collection of images; it’s a treasure trove for designers, marketers, educators, and any individual looking to add a splash of creativity to their projects or walls.

The Ultimate Blends Poster Pack comes packed with a wide range of high-quality, ready-to-print posters that are perfect for various applications. Whether it’s decorating a classroom, spicing up a dorm room, or creating eye-catching visuals for marketing purposes, these posters are versatile and easy to use. Crafted by skilled artists and incorporating diverse styles from vintage to modern, abstract to realistic, there’s something in this pack for every aesthetic preference.

One of the standout features of the Ultimate Blinds Poster Pack is the diversity of themes covered. From inspirational quotes and educational infographics to breathtaking landscapes and pop culture icons, each poster is designed with attention to detail and an understanding of what captivates an audience. But what truly sets this pack apart is its dedication to quality. Each poster is expertly curated to ensure it meets high-resolution standards, ensuring that when you print them out, they’re crisp, clear, and bursting with color.

The convenience factor cannot be overstated. These posters come in various sizes and formats, making them compatible with standard printing methods—no need for costly custom prints or complicated resizing efforts. And with digital delivery, access to this incredible library of images is instant. Upon purchase, designers have the freedom to explore and utilize these creations immediately.

An additional perk includes rights that allow for commercial use without any additional licensing headaches—it’s all covered in the initial purchase. This means local businesses can use these posters in their advertising campaigns or decorate their premises without worrying about infringing on copyright laws.

In conclusion, whether you’re an amateur designer looking to practice your skills or a professional on the hunt for quick yet impactful visuals—look no further than the Ultimate Blends Poster Pack. It’s an investment in your creative repertoire that will pay dividends in saved time and enhanced visual communication.

15 Valentine’s Day Craft Ideas for the Classroom With an Educational Twist

Valentine’s Day is a perfect opportunity to blend creativity with learning in the classroom. These 15 craft ideas offer an educational twist, ensuring that students not only enjoy the festivities but also enrich their knowledge and skills.

1. Heart-Shaped Word Puzzles: Students can create heart-shaped puzzles with words and definitions they’ve been learning in class. This is a great way to reinforce vocabulary.

2. Love-Themed Science Experiments: Incorporate simple science experiments that explore concepts like density by creating love potion layers using various liquids in different shades of pink and red.

3. Math Pattern Hearts: Cut out a series of hearts and use them to teach patterns and sequencing. Older students can tackle more complex patterns or use the hearts for graphing exercises.

4. Historical Valentines: Students can craft Valentine’s cards inspired by historical figures, write messages as if they were that person, encouraging research skills and creativity.

5. Literary Love Quotes: Have students pick quotes from their favorite books or poems about love and friendship, then design a card around the quote, promoting reading comprehension and design skills.

6. Valentine’s Day Around the World Posters: Students can create posters depicting how Valentine’s Day is celebrated in different cultures, incorporating social studies into the crafting session.

7. Origami Heart Bookmarks: Teach students the art of origami by making heart bookmarks while integrating geometry concepts.

8. Friendship Bracelets with Beaded Patterns: Students can practice pattern-making and fine motor skills by designing friendship bracelets.

9. Heart-Shaped Secret Code Messages: Introduce basic cryptography by having students write secret admirer notes in a simple coded language they devise.

10. Symmetry Art: Use Valentine’s-themed imagery like hearts or Cupid’s arrow to teach symmetry through painting or drawing exercises.

11. Botanical Valentines: Combine science with art by pressing flowers for Valentine’s cards, discussing plant biology along the way.

12. Exploring Emotions Collage: Encourage emotional intelligence by having students create a collage of images and phrases that represent love and kindness from magazines or printed materials.

13. Geographical Heart Maps: Students make heart-shaped maps showing places they love or regions that celebrate Valentine’s Day, reinforcing geography knowledge.

14. Biographical Hearts: Each student picks a significant person in history and writes interesting facts inside a heart-shaped booklet, blending history with craftwork.

15. Chemical Reaction Cards: Make homemade pH indicator paper with cabbage juice, then paint on heart-shaped paper to see color change reactions as an engaging chemistry lesson.

Incorporating these crafts into your classroom celebration not only sparks creativity but also reinforces academic concepts across various subjects, making learning festive and fun!

An Easy No-Sew Teaching Apron

Teachers are often in need of a handy tool to keep their supplies accessible while keeping their hands free for demonstrations and assisting students. That’s where a teaching apron becomes a valuable asset. Not everyone has the time or sewing skills to create their own apron, but fear not, for there is a simple solution: the no-sew teaching apron.

Creating a no-sew teaching apron is straightforward and budget-friendly. Here’s how to make your own using simple materials like fabric glue, scissors, and a pre-made canvas apron.

Materials:

– Pre-made canvas apron

– Fabric glue

– Patches or fabric for pockets (optional)

– Scissors

– Decorative elements like ribbons, buttons, or iron-on patches (optional)

Instructions:

1. Begin by laying your pre-made canvas apron flat on your work surface. Ensure it’s clean and smooth out any wrinkles.

2. Decide where you would like to add additional pockets. These can be crafted from coordinating or contrasting fabric patches. If you have existing pockets, you can skip this step or add more for extra space.

3. Cut the fabric patches into your desired pocket shapes and sizes. Remember that you’ll need a small flap to fold under for a clean edge, which will also be where you apply the fabric glue.

4. Fold under the edges of your fabric patches to create a hemline for a polished look. Apply fabric glue along these edges.

5. Position your new pockets onto the apron wherever you find them most practical. Press firmly to adhere them to the base apron material, then allow them ample time to dry.

6. (Optional) Personalize your teaching apron with decorative elements like ribbons around the edges, buttons on pocket flaps, or iron-on patches that reflect subjects you teach or personal interests.

7. Allow any added decorations and pockets to dry completely before using the apron.

And there you have it: an easy-to-make, no-sew teaching apron that will keep all of your essential teaching tools right at hand! Whether it’s markers, stickers, notes, or anything else you require quick access to during classroom activities, your newly fashioned accessory will help you keep it all together—no sewing required!

Funky Easter Egg Craft Template

Easter is a time for family, fun, and, of course, egg decorating! While traditional methods of dying and painting eggs are timeless, sometimes it’s exciting to add a funky twist to tradition. If you’re looking to spritz up your Easter with some unique craftiness, this Funky Easter Egg Craft Template is just the ticket.

Materials:

– Hard-boiled eggs or foam egg substitutes

– Acrylic paints in various bright colors

– Small paintbrushes

– Fine-tip markers or pens

– Assortment of washi tape

– Stickers or adhesive gems

– Glitter glue

– Googly eyes

– Feathers, sequins, and any other funky craft supplies

Instructions:

1. Begin by choosing your base color for the egg. Apply acrylic paint smoothly over the entire surface. You may need to use a couple of coats to get a bright, even coverage. Let it dry completely.

2. Once the base coat is dry, it’s time to get funky! Use washi tape to create geometric patterns or stripes on the egg. Alternatively, draw freehand designs with markers or pens for that personal touch.

3. Add some texture by sticking on feathers, sequins, or adhesive gems. You can make patterns or simply apply them randomly for that funky look.

4. For a sparkly effect, carefully apply glitter glue in lines or dots across the egg surface. Let this dry thoroughly before handling further.

5. Attach googly eyes to give your egg character—a pair for a quirky personification or multiple eyes for an alien vibe.

6. Finish off by using fine-tip pens or markers to add any details such as facial features (if you’re making a character), outlines of washi tape patterns, or additional doodles that bring your funky design together.

7. Once everything is dry and set, place your eggs in a decorative basket or display them proudly on your Easter table.

Remember, there’s no right or wrong way to create Funky Easter Eggs—embrace the quirks and imperfections that make each one unique! So gather your supplies and let creativity lead the way this Easter season.

Fun Easter Bunny Craft Idea

Easter isn’t just about the egg hunts and candy; it’s also a perfect time for engaging in fun crafts with family. One delightful way to liven up the holiday is by creating your own Easter bunny decorations. This can be a festive activity for children of all ages, and it adds a personalized touch to your Easter decor. Bring out the markers, glue, and creativity—it’s time for a fun Easter bunny craft idea!

Materials Needed:

– White, pink, and black construction paper

– Cotton balls

– Scissors

– Glue

– Marker

Instructions:

1. Body: To start with the body of the Easter bunny, use the white construction paper to cut out an oval shape.

2. Head: Cut out a smaller oval shape from the same white paper for the head.

3. Ears: For the ears, cut two long ear shapes from the white paper and two smaller ear shapes from the pink paper to fit inside the white ears.

4. Feet: From the white paper, cut out two large oval shapes for the feet.

5. Facial features: With the black construction paper, cut out two small circles for eyes and a tiny triangle for the nose.

6. Assembly: Glue the head oval onto one end of the body oval.

7. Once you’ve got your body parts arranged, take those cotton balls and pull them apart slightly to give them some fluff. Glue them onto the center of your bunny’s body for a cute fuzzy texture!

8. Ears: Attach the pink parts onto the white ears using glue and fasten them on top of your bunny’s head.

9. Feet: Glue on the feet ovals at the bottom of your body oval.

10. For your bunny’s face, stick on the eye circles and nose triangle you cut out earlier using glue onto its head. With a marker, draw on whiskers and a mouth connecting to its cute little nose.

11. Tail: No bunny would be complete without its adorable tail! Take one last cotton ball and glue it on as its tail at back of its body oval.

12. If you’re feeling extra creative, feel free to add additional details like bow ties or vests cut out from colored paper, or even stickers to give your craft character!

Your Easter Bunny is now ready! This fun project not only allows kids to explore their creativity but also helps with fine motor skills as they cut, pinch, and stick together their festive creation. Display these bunnies around your home or use them as placeholders for Easter dinner—your guests are sure to be charmed!

Goal Setting Template (Iceberg)

Setting goals can often feel like attempting to unveil the unseen bulk of an iceberg that lies beneath the water’s surface. The Iceberg Model for goal setting represents this concept by highlighting that the visible part of the iceberg is the goal itself, whereas the much larger, unseen portion represents the necessary systems, habits, and beliefs required to achieve that goal.

In using an Iceberg Template to set your goals, you first identify the tip of your iceberg – this is your primary objective. It should be specific, measurable, attainable, relevant, and time-bound (SMART). This visible goal is what you will ultimately achieve.

Below the waterline lies the vast mass of the iceberg. In this area of the template, you will outline:

1. Systems – What are the processes or structures needed for supporting your goal? This section should detail the daily practices or broader systems that facilitate progress towards your aim.

2. Actions – Define the consistent actions that are required to reach your goal. These should be repeatable tasks that directly contribute to achieving your objective.

3. Resources – List any tools, people, or educational resources that will assist you in pursuit of your goal. These could be books, software tools, advisors, or courses that provide knowledge and support.

4. Beliefs – Identify empowering beliefs that will help you stay committed to your goal. Beliefs about yourself and what is possible are deep-rooted in our subconscious and can significantly influence behavior and outcome.

5. Obstacles – What potential challenges could impede your progress? This includes both external circumstances and internal mental barriers. Acknowledging them allows for proactive planning to overcome these hurdles.

6. Milestones – Establish smaller targets along the way to measure progress toward your larger goal. Celebrating these milestones can provide motivation and a sense of accomplishment throughout your journey.

Remember, just like an iceberg’s broad base supports its peak above water, a well-structured foundation beneath your main objective will bolster your success in achieving it. Using a Goal Setting Template like the Iceberg method provides a comprehensive view of both what is wanted and all that is necessary to make it happen.

Visual Art Elements Unit – Upper Years

The Visual Art Elements Unit for upper years is a comprehensive educational program designed to deepen students’ understanding of the fundamental components that form the basis of visual art. This unit focuses on seven elements: line, shape, form, color, value, texture, and space. By studying these elements, students gain essential tools for analyzing and creating artworks.

Line is the most basic element of visual art, described as a mark that connects two points. Lines can vary in width, direction, and length, and they often define the edges of forms and shapes in an artwork.

Shape refers to a two-dimensional, enclosed area. Shapes are flat and can be geometric (like squares and circles) or organic (such as those found in nature). Students learn to recognize and create both types of shapes.

Form builds upon shape by adding depth, making it three-dimensional. Forms can be viewed from various angles and typically include cubes, spheres, cylinders, and pyramids.

Color is perhaps one of the most expressive elements of art. The unit explores color theory comprehensively, including the color wheel to understand primary, secondary, tertiary colors, as well as concepts like hue, saturation, and brightness.

Value pertains to the lightness or darkness of a color. It defines how light falls on an object and can give the illusion of depth.

Texture relates to how things feel or how they look like they might feel if touched. In art class, students might work with various materials to understand surface quality.

Lastly, space refers to the area around or within components of a piece of art. Students learn about positive and negative space and how artists use perspective to create the illusion of depth in a two-dimensional work.

Throughout the Visual Art Elements Unit for upper years, students will engage in various hands-on projects that strengthen their skills in observing these elements in existing artwork while also incorporating them into their own artistic creations. This unit lays a vital foundation for any further study in art or design fields and enriches students’ visual literacy which can enhance their personal enjoyment and critique of art throughout their lives.

Halloween Crafts and Activities for Spooky Learning

Halloween is not just about dressing up and trick-or-treating; it’s also a perfect opportunity to engage children in learning through fun and thematic activities. Here are some Halloween crafts and activities that offer both spookiness and educational value, ensuring that this holiday is both exciting and instructive.

1. Pumpkin Math – Carve out a pumpkin with your kids, and as you remove the seeds, have them count the seeds in groups of 10 or practice simple arithmetic like addition and subtraction using the seeds.

2. Ghostly Writing – Encourage writing skills with a spooky twist. Have children write ghost stories using new vocabulary words or practice their penmanship with Halloween-themed sentences.

3. Spooky Slime Science – Making slime isn’t just fun; it’s a science lesson too! Discuss the chemical reactions that occur between the glue, water, and borax as children mix their concoctions.

4. Halloween Mask Making –Let kids design their own masks using paper plates or heavy-duty construction paper. This craft boosts creativity and can be linked to lessons about different cultural celebrations of Halloween around the world.

5. Monster Measurement – Cut out different monster body parts from paper, and ask your kids to measure them using standard units like inches or centimeters. This activity enhances understanding of measurement concepts.

6. Witch’s Brew Cooking Class – Create a recipe for a witch’s brew that involves measuring ingredients, following directions, and sequencing steps, all of which are fundamental math and reading skills.

7. Candy Graphing – After trick-or-treating, sort out candy by type or color and use them to create graphs showing the frequency of each kind—this introduces data interpretation in a fun way.

8. Bat Biology – Hang paper bats from the ceiling but make each bat a fact about real bat species. As kids read about each one, they’ll learn about these fascinating creatures’ biology and habitats.

9. Haunted House Blueprint – Have children draw a blueprint of their ideal haunted house, practicing spatial awareness and geometry as well as engaging artistic skills.

10. Mummy Wrap Relay – Plan a relay where teams wrap a member in toilet paper like a mummy—great for teaching teamwork while also sneaking in some gross motor skill development.

Incorporating educational elements into festive celebrations can make learning more dynamic and memorable for children. Halloween crafts provide an outstanding platform for blending academic skills with holiday-themed enjoyment, creating an environment where learning is an adventure filled with curiosity and enthusiasm.