Tech Advice

How to Use the Optical Out S/PDIF Port on Your PC

Introduction:

The S/PDIF (Sony/Philips Digital Interface) is a digital audio interconnect that allows for the transmission of digital audio signals from one device to another. Most modern computers and audio devices come equipped with this port, which provides a high-quality connection for various multimedia applications. In this article, we will discuss how to use the optical out S/PDIF port on your PC for optimal audio experience.

Step by Step Guide:

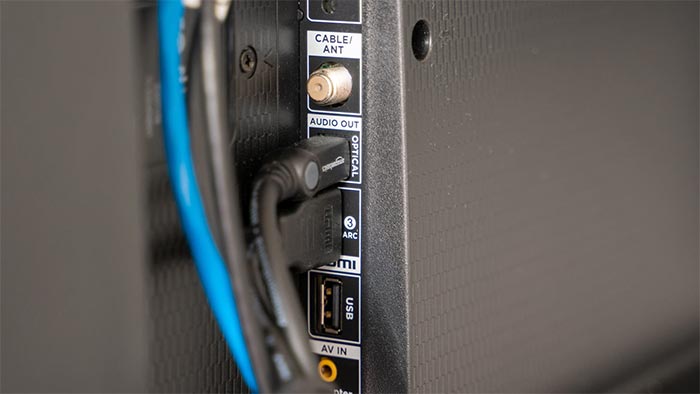
1. Locate the Optical Out S/PDIF port on your PC: First, find where the optical out S/PDIF port is on your computer. This port is usually located at the back of your computer’s tower or laptop and is marked with an illuminated square icon.

2. Acquire an appropriate cable: To connect your PC to an audio device such as speakers or a receiver, you’ll need a TOSLINK or optical cable. These cables are available in various lengths and can be purchased at electronics stores or online.

3. Connect the cable: Plug one end of the TOSLINK/optical cable into the Optical Out S/PDIF port on your PC, and plug the other end into the corresponding input on your audio device.

4. Switch to digital audio output: Go to your PC’s settings to ensure that digital audio output is selected as the default. On Windows, right-click on the speaker icon in the system tray, select ‘Sounds’, click on the ‘Playback’ tab, and choose ‘Digital Output’ or ‘S/PDIF’. On macOS, go to System Preferences > Sound > Output and select ‘Digital Out’ or ‘S/PDIF’.

5. Configure audio settings: Some sound systems will automatically configure themselves for S/PDIF input, while others may require manual setup through their menus or remote controls. Refer to your audio device’s documentation for specific instructions on how to configure settings, such as audio format (Dolby Digital, DTS, or PCM) and speaker configuration.

6. Test the connection: Once your audio settings are configured, play some audio content on
your PC to ensure that the digital audio signal is being transmitted to your connected device. You should now experience high-quality sound without distortion or interference.

Conclusion:

By making use of the optical out S/PDIF port on your PC, you can enhance your audio experience and fully enjoy multimedia applications. This digital interface ensures a reliable and superior connection between devices, offering better sound quality than traditional analog connections. Follow the steps outlined above to set up and utilize your computer’s Optical Out S/PDIF port effectively.

Home Generator Buying Guide – Power Up Your Life

Introduction

A home generator is a valuable investment that can provide a sense of safety and comfort during power outages. Whether you live in an area prone to severe weather conditions or occasional power interruptions, having a reliable home generator can make your life easier. This guide will help you navigate the key factors to consider when purchasing a home generator.

Understanding Home Generators

Home generators come in different sizes and capabilities designed to meet specific energy needs. Portable generators are small, easily movable units that can power essential household items such as a refrigerator, freezer, computer, or lighting during an outage. Standby generators are large stationary units installed on the property that can automatically turn on when there’s a power interruption, providing electricity for the entire home.

Fuel Type

Home generators usually run on gasoline, propane, diesel fuel, or natural gas. Consider the fuel type based on availability and accessibility in your area. Gasoline is readily available but may not be practical during a disaster or prolonged outage due to its short shelf life and storage constraints. Diesel fuel is stable and provides more energy per gallon but may not be suitable for residential areas due to noise and emissions concerns. Natural gas and propane are clean-burning fuels that can be connected to existing utility lines for efficient operation.

Power Output

Your generator’s power output should match your household’s energy needs during an outage. To determine this, calculate the total wattage of essential appliances you plan to run simultaneously. Portable generators typically offer between 3,000 to 9,000 watts while standby units provide up to 20,000 watts or more. Choose a generator with slightly more capacity than your calculations to ensure adequate performance.

Run Time

When comparing generators, pay attention to their run times at 50% capacity. A longer run time means fewer refueling intervals and more continuous power supply during outages. Portable generators tend to have a shorter run time as they are designed for occasional use, while standby generators have extended run times for long-lasting power.

Safety Features

Modern home generators come with several safety features that protect the unit and its users. Look for features such as automatic shut-down in case of overheating or low oil levels, a ground-fault circuit interrupter (GFCI) to prevent electrical accidents, and low-tone mufflers that reduce noise pollution.

Automatic Transfer Switch

A crucial component of the standby generator setup is the automatic transfer switch (ATS). It monitors your utility power supply and automatically transfers the load to the generator in the event of a power outage. Once utility power is restored, the ATS will switch back and shut down the generator. Choose an ATS with an appropriate amperage rating for your needs.

Conclusion

Whether you decide on a portable or standby generator, considering these factors will help you find the ideal home generator for your needs. Preparing for uncertain times with a reliable power source not only gives you peace of mind but also ensures that your family stays safe and comfortable even during unexpected outages.

Is the CapCut App Safe to Use?

In today’s digital era, numerous apps offer various functionalities, including editing videos, creating content, marketing strategies, and more. One such app that has captured significant attention recently is CapCut. Many users may wonder, “Is the CapCut app safe to use?” In this article, we will explore the security and privacy measures of the CapCut app to help answer this question.

CapCut, initially known as Viamaker, is a popular video editing app developed by Bytedance Ltd., the company behind TikTok. This app provides several video editing features such as cutting, trimming, adding music and effects, subtitling, speed modification, and much more. With its user-friendly interface and diverse tools packed into one powerful application, it has quickly gained popularity among content creators.

Safety Measures in CapCut:

1. Data Privacy: Since Bytedance Ltd., located in China, owns CapCut app as well as the TikTok app; many users may have concerns about data privacy. However, it is essential to know that just like other well-known applications available worldwide; CapCut follows standard data storage practices and encryption methods to protect users’ information. Additionally, Bytedance has taken measures to enhance data privacy and security by placing its servers outside China.

2. Permissions: When you install the CapCut app on your smartphone or tablet device, you must grant specific permissions for the app to function effectively. These permissions include access to your camera roll (to select videos), microphone (for recording voiceovers), and storage for exporting completed projects. It is essential to understand that these permissions are necessary for a seamless video-editing experience and do not pose a significant security risk.

3. Content Safety: The CapCut app lets all its users create content freely without imposing restrictions on certain topics or themes. However, it encourages the community of creators to produce engaging content while adhering to the app’s guidelines, ensuring that offensive, inappropriate, or harmful content doesn’t make its way onto the platform.

4. Updates: Bytedance frequently updates the CapCut app to enhance its features and address any potential security vulnerabilities. To keep your device safe, ensure that you always use the latest version of the app and download it from official and trusted sources like Google Play Store and Apple App Store.

In conclusion, the CapCut app has come a long way since its initial release and has garnered a global following. Like any other popular application, it takes necessary measures to ensure user privacy and data safety. However, users must exercise caution by monitoring the permissions granted to the app, keeping it updated, and downloading it from reliable sources. With these steps in mind, you can confidently enjoy using CapCut as a trustworthy video editing tool for your content creation journey.

How to Use Your Wal-Mart Discount Card on Walmart.com

Introduction:

Walmart is known for its competitive prices and convenience, making it one of the top choices for many shoppers. For Walmart associates and eligible family members who receive the Wal-Mart Discount Card, they can enjoy even greater savings when shopping at Walmart. This article will guide you through the process of using your discount card on Walmart.com.

Step 1: Register or log in to your account

To start, you need a Walmart.com account. If you already have one, simply log in using your email address and password. If you’re new to the site, follow these steps:

1. Go to Walmart.com.

2. Click “Account” at the top right corner of the page.

3. Click “Sign In” and then “Create Account.”

4. Fill out the required information (name, email address, and password), then click “Create Account.”

Step 2: Link your Wal-Mart Discount Card to your account

After you’ve logged in or created an account, it’s time to associate your discount card with your Walmart.com profile:

1. Hover over “Account” at the top right corner and click “Account” again.

2. Scroll down to “Manage Account” and click “Account Settings.”

3. On the left-hand side menu, click “Associate Discount.”

4. Enter your discount card number (located on the back of the card) and associate ID number (typically found on your paystub or company badge).

5. Click “Add Discount” to link your card with your profile.

Step 3: Shop and apply your discount at checkout

Now that you’ve linked your discount card, it’s time to start shopping! Whenever you shop on Walmart.com, be sure to log in before adding items to your cart.

When checking out:

1. Click “Cart” at the top right corner and review your selected items.

2. Click “Checkout” to proceed.

3. At the order summary page, you should see your Walmart associate discount applied automatically to eligible items.

4. Complete your purchase by entering your shipping information and payment method.

Tips and Restrictions:

– While Walmart associate discounts apply to most items, there are some exclusions (such as third-party sellers, gift cards, and prescriptions).

– The discount card may also be used in-store by presenting it at the time of purchase.

– If the discount is not applying at checkout, double-check that you’ve correctly entered both the discount card number and associate ID number.

Conclusion:

As a Walmart associate or eligible family member with a Wal-Mart Discount Card, you now know how to take advantage of additional savings when shopping on Walmart.com. Happy shopping!

How to Fix a Slow Download Speed in Battle.net for Windows

Introduction:

Battle.net, the popular gaming platform by Blizzard Entertainment, is home to some of the most beloved games like World of Warcraft, Diablo, StarCraft, and Overwatch. However, players may encounter slow download speeds while updating or downloading games on Windows PCs. This article will provide tips and tricks to help you resolve the issue and get back to enjoying your favorite games as soon as possible.

1. Check Your Internet Connection:

Start by testing your internet connection’s speed using websites like Speedtest.net or Fast.com. If your connection is slower than usual, try resetting your modem/router or contacting your internet service provider (ISP) for assistance.

2. Disable Other Bandwidth-Intensive Applications:

Close other programs such as streaming services or file-sharing clients that might consume a lot of bandwidth, which can impact Battle.net’s download speeds.

3. Change Battle.net’s Bandwidth Settings:

a) Launch Battle.net and click on the gear icon in the upper-right corner.

b) Choose “Settings” from the dropdown menu.

c) Scroll down to find “Network Bandwidth” settings.

d) Increase both “Latest updates” and “Future patch data” settings to a higher value.

e) Click “Done” to save your changes.

4. Clear Battle.net Cache Files:

Cache files can sometimes cause slow download speeds on Battle.net.

a) Press Windows Key + R to open Run.

b) Type “%ProgramData%” (without quotes) and hit Enter.

c) Locate the “Blizzard Entertainment” folder and delete it.

5. Run Battle.net as Administrator:

Running Battle.net as an administrator ensures it gets the necessary permissions for optimal performance.

a) Right-click on the Battle.net icon.

b) Choose “Run as administrator.”

6. Change the Download Server Region:

Slow download speeds might be due to high traffic on the servers closest to your location. Changing the download server might help.

a) Open Battle.net and click on the gear icon in the upper-right corner.

b) Choose “Settings” from the dropdown menu.

c) Under “Game Install/Update,” click on the Server Region dropdown menu.

d) Choose a different region from the list and click “Done.”

7. Disable Proxy Settings:

Windows proxy settings can interfere with Battle.net’s download speeds.

a) Press Windows Key + R to open Run.

b) Type “inetcpl.cpl” (without quotes) and hit Enter.

c) Navigate to the “Connections” tab and click on “LAN Settings.”

d) Uncheck “Use a proxy server for your LAN” and click “OK.”

Conclusion:

If slow download speeds persist in Battle.net for Windows even after trying these solutions, consider downloading games during off-peak hours or contact Blizzard’s customer support. It’s essential to maintain smooth downloads and quick updates so you can delve into your favorite gaming worlds without a hitch.

How to Set Up iCloud Email Access on Android

Introduction

There are various email services available, and iCloud email is one of the most sought-after options for Apple users. However, Android users may also want to set up iCloud email access on their devices. This article will walk you through the step-by-step process to set up your iCloud email on an Android device.

Step 1: Retrieve your iCloud Email Settings

Before you begin setting up your iCloud email on Android, you need to retrieve your iCloud email settings. To do this:

a. Visit icloud.com and sign in with your Apple ID.

b. Click on the ‘Mail’ icon.

c. On the bottom-left corner, click on the gear icon (Settings).

d. Select ‘Preferences’ from the dropdown menu, and then click on ‘Accounts.’

e. Take note of both incoming and outgoing mail server details as well as your iCloud email address.

Step 2: Set up an Email App on Android

You can use any preferred email app available on the Google Play Store or use the default Email app provided by your Android device. To set up an Email app:

a. Open your chosen Email app on your Android device.

b. Tap ‘Add Account’ or a similar option depending on the app you chose.

c. Select ‘Other’ or ‘IMAP’ as your account type.

Step 3: Enter Your iCloud Account Information

Now you can input your iCloud account information into the Email app:

a. Enter your full iCloud email address (e.g., [email protected]) and password.

b. Tap ‘Next,’ and choose ‘IMAP.’

Step 4: Configure Incoming Mail Server

Next, you need to configure the incoming mail server settings:

a. For the “Username,” input your full iCloud email address.

b. Enter your password.

c. Under “IMAP Server,” enter the incoming mail server details you retrieved (e.g., imap.mail.me.com).

d. Use ‘993’ for the port and select ‘SSL/TLS’ as the security type.

e. Tap ‘Next.’

Step 5: Configure Outgoing Mail Server

Lastly, configure your outgoing mail server settings:

a. For the “Username,” use your full iCloud email address.

b. Enter your password.

c. Under “SMTP Server,” enter the outgoing mail server details you retrieved (e.g., smtp.mail.me.com).

d. Use ‘587’ for the port and choose ‘STARTTLS’ as the security type.

e. Tap ‘Next.’

Step 6: Complete Account Setup

After configuring your mail server settings, complete the account setup:

a. Adjust your ‘Sync frequency,’ ‘Notifications,’ and other preferences as desired.

b. Tap ‘Next’ to finalize the process.

Congratulations! Your iCloud email should now be set up on your Android device, and you can access all your emails in one convenient location.

Conclusion

Setting up iCloud email access on an Android device might seem complicated, but following this step-by-step guide will make the process much simpler. By taking advantage of the built-in Email app or a third-party option from the Google Play Store, you can easily add your iCloud email to your Android device and manage all of your accounts together seamlessly.

Exploring Reddit Coins: How to Get and Use Them

Introduction:

Reddit, the popular online discussion platform, has its own virtual currency system known as “Reddit Coins.” This digital currency can be used to award fellow Redditors and show appreciation for their valuable contributions. In this article, we will dive into what Reddit Coins are, how to get them, and how to use them.

What are Reddit Coins?

Reddit Coins are a virtual currency designed to be used within the platform to purchase various awards for other users. They play a crucial role in fostering a positive community atmosphere by allowing members to show their appreciation for insightful comments, intriguing posts, or simply a good laugh.

Types of Awards:

There are three types of awards that can be gifted using Reddit Coins:

1. Silver Award: Costs 100 coins and adds a Silver badge to the awarded post or comment.

2. Gold Award: Costs 500 coins and grants the recipient one week of Reddit Premium membership, which includes an ad-free browsing experience and access to r/lounge, an exclusive community for premium members.

3. Platinum Award: Costs 1,800 coins and grants the recipient one month of Reddit Premium membership and 700 coins.
In addition to these three main awards, Reddit also offers Community Awards that vary across different subreddits.

How to Get Reddit Coins:

There are several ways you can obtain Reddit Coins:

1. Purchase: Users can buy coins directly from Reddit using real money. Various coin packages are available for purchase in different denominations, starting from $1.99 for 500 coins up to $99.99 for 40,000 coins.

2. Receive Awards: When another Redditor presents you with a Gold or Platinum Award, you will also receive a certain amount of coins (100 for Gold and 700 for Platinum).

3. Participate in Promotions: Occasionally, Reddit runs promotions where users can earn free coins by engaging in specific activities, such as joining Reddit Premium or participating in community events.

How to Use Reddit Coins:

Utilizing Reddit Coins is simple and can be done with a few steps:

1. Navigate to the post or comment you want to award.

2. Click on the “Give Award” or “Award” button (located below the post or next to the comment).

3. Choose your desired award from the list provided.

4. Confirm your selection by clicking on “Give Award” and confirm the transaction.

Conclusion:

Reddit Coins offer an exciting way for users to show appreciation to fellow community members, encourage quality content, and foster a positive atmosphere within the platform. By understanding how to get and use these virtual tokens, you can actively contribute to an environment where exceptional contributions are acknowledged and celebrated.

How to Fix Yellowed Bed Sheets: Restoring Your Linens to Pristine Condition

Introduction:

Nothing beats the feeling of snuggling into fresh and crisp bed linens. However, over time, even the finest sheets can start to yellow and lose their once-gleaming appearance. This can be caused by factors such as exposure to body oils, sweat, or simply aging. Thankfully, there are ways to restore your yellowed bed sheets to their pristine condition! In this article, we will explore some useful tips and tricks that will help you revive your valued linens.

1. Pre-treat the stains:

As a first step, identify and target specific yellowed areas on your sheets by closely examining them. Once spotted, pre-treat these stains with a mixture of hydrogen peroxide, baking soda, and dishwashing liquid. Apply this solution directly onto the affected areas and let it sit for at least an hour before washing.

2. Soak in vinegar:

A powerful yet gentle cleaning agent, white vinegar can effectively remove yellowed stains from your sheets. Mix one part vinegar with four parts lukewarm water in a large container or your bathtub. Place your sheets in this solution and let them soak for a few hours or overnight for best results.

3. Try oxygen bleach:

Oxygen bleach is a less harsh alternative to regular chlorine bleach and is ideal for restoring bright white linens. Mix a scoop of oxygen bleach with warm water following the manufacturer’s instructions and soak your sheets in it for about an hour before washing them as usual.

4. Wash with warm water:

After pre-treating, soaking in vinegar or oxygen bleach bath, wash your yellowed bed sheets in warm water using mild laundry detergent. Warm water is better at breaking down stains compared to cold water.

5. Opt for line drying outdoors:

Sunlight provides natural bleaching action that can help further brighten your linens’ appearance. Line dry your sheets out in the sun to benefit from its restorative properties and imbue your linens with the fresh scent of crisp outdoor air.

6. Repeat if necessary:

If you find that your sheets are still showing some signs of yellowing after one round of treatment, don’t worry! Simply repeat the process until you achieve the desired level of whiteness.

Conclusion:

With these tried-and-true techniques, you’ll soon have your once-yellowed bed sheets looking fresh, gleaming and inviting once more. Your linens will not only feel cleaner but will also provide a more comfortable sleeping environment for a good night’s rest. Happy laundering!

How to Get an Xbox Live Gold Subscription for Free

Introduction:

Xbox Live Gold subscription is sought after by many Xbox gaming enthusiasts. With perks like online multiplayer, free games every month, and exclusive discounts on games at the Microsoft Store, obtaining a free Xbox Live Gold subscription can be a game-changer. In this article, we will explore various ways to get that Xbox Live Gold subscription for free.

Method 1: Microsoft Rewards

Microsoft Rewards is a program offered by Microsoft which allows users to earn points by completing different tasks, such as searching with Bing, using Microsoft services, or shopping in the Microsoft Store. These points can be redeemed for various gift cards, including an Xbox Live Gold subscription. To start earning points:

1. Sign up for a Microsoft Rewards account if you haven’t already.

2. Complete daily tasks and challenges provided on the Microsoft Rewards homepage to earn points.

3. Participate in quizzes, polls, and special offers to accumulate additional points.

4. Redeem your accumulated points for an Xbox Live Gold subscription once you reach the required threshold.

Method 2: Utilize Free Trial Codes

Most new Xbox consoles come with a free trial code for Xbox Live Gold. If you’ve recently purchased an Xbox or received it as a gift, check for any trial codes included in the packaging or accessories. While this method might only grant you a week or month of free subscription, it’s still a great way to experience the benefits of having one without spending any money.

Method 3: Third-party Giveaways

Many websites and influencers from the gaming community organize contests or giveaways where they offer free Xbox Live Gold memberships as prizes. By following popular gaming websites or influencers on social media platforms like Twitter and joining their giveaways, you might have a chance at winning a subscription.

Keep in mind that not all giveaways are genuine; some might be scams aimed at stealing your personal information or promoting malware. Be cautious before sharing any sensitive information or downloading files from unknown sources.

Method 4: Sharing Subscriptions with Friends

Xbox Live Gold allows users to share their subscription with friends through the “Home Xbox” feature. By designating a friend’s console as your “Home Xbox,” you can grant them access to your subscription privileges, including Xbox Live Gold benefits. In return, arrange with your friend to do the same for you, effectively granting each other access to free Xbox Live Gold subscriptions.

Conclusion:

Securing an Xbox Live Gold subscription for free might require some effort and time. However, through Microsoft Rewards, free trial codes, third-party giveaways, or sharing subscriptions, it’s possible to unlock this premium service and elevate your Xbox gaming experience without spending a dime. Keep an eye on these methods and enjoy all the perks that an Xbox Live Gold subscription offers!

Ecobee Smart Thermostat Premium vs Ecobee Smart Thermostat Enhanced: A Comprehensive Comparison

Introduction

With the rapid growth of technology and increasing awareness for energy conservation, smart thermostats have become ubiquitous in modern households. Two popular choices in this domain are the Ecobee Smart Thermostat Premium and the Ecobee Smart Thermostat Enhanced. In this article, we will compare these two models to help you make an informed decision.

Design and Display

Both the Ecobee Premium and Enhanced devices boast sleek and aesthetically pleasing designs that easily blend with your home decor. The primary difference between them lies in their display screens. The Premium version has a 3.5-inch full-color LCD touchscreen, while the Enhanced model features a slightly bigger, 4-inch quad HD touchscreen with a higher resolution for easier navigation.

Energy Savings

The main purpose of smart thermostats is to optimize energy consumption and reduce costs. The Ecobee Premium and Enhanced models both excel at this, making use of advanced algorithms to learn your schedule and preferences. However, the Enhanced version’s additional sensors contribute to even more precise temperature control, ultimately leading to slightly higher energy savings than its counterpart.

Smart Home Integration

Both thermostats can be seamlessly integrated into your smart home ecosystem via popular platforms like Apple HomeKit, Google Assistant, Samsung SmartThings, Amazon Alexa, and IFTTT. That said, the Enhanced model comes with a built-in Alexa speaker that allows for direct voice control without needing additional hardware.

Installation and Compatibility

The process of installing both Ecobee models is very user-friendly, thanks to their comprehensive step-by-step installation guides. Each thermostat is compatible with most HVAC systems in North America, including conventional heating and cooling setups as well as heat pumps with auxiliary heat.

Price

In terms of pricing, the Enhanced model comes at a slightly higher cost compared to its Premium counterpart due to its upgraded features. Regardless, both smart thermostats offer significant energy savings in the long run, which will offset their initial price tags.

Conclusion

In summary, the choice between the Ecobee Smart Thermostat Premium and Enhanced ultimately depends on your specific needs and budget. If a higher-resolution screen, built-in Alexa speaker, and marginally superior energy savings are important to you and you don’t mind spending a little more upfront, then the Ecobee Smart Thermostat Enhanced might be the better option for you. On the other hand, if you’re looking for an affordable yet efficient solution to control your home’s temperature intelligently, the Ecobee Smart Thermostat Premium is a solid choice.