Art Education

Koala Mindful Colouring Sheet

In today’s high-speed, digital world, finding a moment of peace can often feel challenging. But as mindfulness practices have become increasingly popular for managing stress, one simple and enjoyable activity has emerged as a favorite among people of all ages: mindful coloring. At the forefront of this trend is the charming Koala Mindful Colouring Sheet which combines the therapeutic benefits of coloring with the adorability of one of Australia’s most beloved marsupials.

Mindful coloring has been embraced as a form of meditation, inviting individuals to focus on the present moment by bringing their attention to the intricate patterns and choices of color in their artwork. The act itself is inherently calming, requiring concentration that serves to quieten the mind and alleviate surrounding pressures. It’s a creative outlet that can decrease anxiety and increase self-awareness.

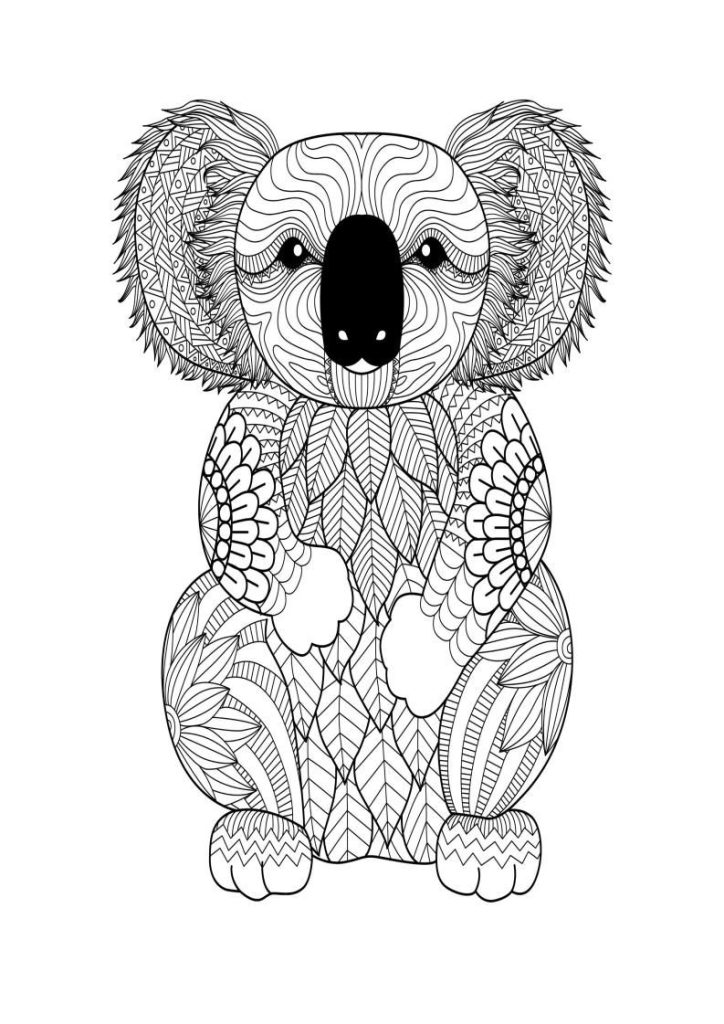
Amongst various subjects used for mindful coloring sheets, the koala holds a special place. These serene creatures, famous for their leisurely lifestyle and cuddly appearance, make perfect templates for coloring activities. The Koala Mindful Colouring Sheet typically features a detailed illustration of a koala nestled among eucalyptus branches—its natural habitat designed with florals, leaves, and sometimes abstract elements intended to engage the colorist’s imagination and sense of aesthetics.

What sets the Koala Mindful Colouring Sheet apart is not just its cute factor but also its versatility; it is suitable for both children learning to develop fine motor skills and adults seeking a mental escape from routine life. Educational settings have found it useful in teaching youngsters about wildlife conservation, Australian ecology, or simply as an engaging activity that also promotes tranquility.

The beauty of such sheets is that they are accessible to everyone. They require no artistic skills or expensive materials—just some colored pencils or markers and a willingness to let go and be drawn into the moment. Many find that after a session of mindful coloring, they feel refreshed, their mood lightened, and often with a delightful piece of personal art they can display.

Moreover, mindfulness experts suggest that applying colors to designs like those found on Koala Mindful Colouring Sheets can reflect our emotions—an outlet for expressing feelings non-verbally. In this regard, each sheet becomes more than just an image—it’s a storyteller of our internal state at the time we were coloring.

As we continue to search for ways to balance our lives amidst daily challenges, tools such as Koala Mindful Colouring Sheets stand out as simple yet profound options for enhancing mental wellness. Easy to incorporate into daily routines at any age or skill level, they offer respite and joy—the proof that sometimes the best therapies come in the simplest forms.

Creating an Inclusive Classroom through a Diversity Heart Art Activity

In a world that is vibrantly diverse and multicultural, educators are continuously seeking methods to promote inclusion and celebrate the unique differences within a classroom setting. An inclusive classroom is one where students of all backgrounds, abilities, and identities feel valued, supported, and engaged in the learning process. One hands-on approach for fostering such an environment is through engaging students in a Diversity Heart Art Activity.

The Diversity Heart Art Activity is more than just an arts and crafts project; it’s a powerful tool that encourages students to express their individual identities while recognizing and appreciating the diversity of their classmates. Here’s how to implement this activity:

Materials Needed:

– Construction paper in various skin-tone colors

– Additional colored paper or materials for decoration

– Scissors

– Glue sticks

– Markers or crayons

Instructions:

1. Begin with a discussion about what diversity means and why it’s important in our lives and our classrooms. Encourage students to share their thoughts on what makes them unique.

2. Distribute heart-shaped templates to each student. Have them trace the template onto construction paper that most closely matches their skin tone.

3. Invite students to personalize their hearts with things that represent their identity – this could include drawing, writing, or attaching items that reflect their culture, interests, languages, traditions, or any other aspect of their background.

4. Once completed, create a large display with all the hearts together to form a single, unified mural or heart-shaped collage. This visual representation will show how each unique piece contributes to the beauty of the whole group.

5. Hold a reflection session after the activity where students can share about their personal heart designs. Allow them to talk about what they’ve learned from others’ hearts as well.

6. Keep the heart display up in your classroom as a visual reminder of diversity and inclusion.

Outcomes:

The Diversity Heart Art Activity serves several educational purposes:

– It provides a platform for students to engage in self-exploration and self-expression.

– It fosters a sense of belonging by showing every student that they are a vital part of the classroom community.

– It builds empathy and respect as classmates learn about each other’s backgrounds.

– It opens up dialogue for deeper discussions on topics such as inclusivity, racial equality, cultural awareness, and anti-bullying.

Diversity activities like this not only support a positive classroom community but also prepare students for working and living in a diverse world. When diversity is embraced in educational settings from an early age, it cultivates an atmosphere where everyone can thrive both in school and beyond.

Free Printable Craft Templates and Activities

In the age of digital entertainment, finding activities that encourage creativity and hands-on engagement can be a challenge, especially for families with children. However, one often overlooked resource is free printable craft templates and activities, which are readily available online and can spur hours of imaginative play and artistic expression. These templates can be anything from coloring pages to complex 3D paper models, catering to a wide range of interests and skill levels.

The Beauty of Free Printable Crafts

Printables offer an array of benefits—they’re cost-effective, easily accessible, and come in diverse themes and difficulties. Parents and educators need only an internet connection, a printer, and common household items like scissors and glue to begin. Additionally, crafting helps develop fine motor skills, encourages problem-solving, enhances focus, and reduces screen time.

For children especially, these activities are not just a method of keeping occupied; they’re educational tools that can complement the curriculum taught in schools. From learning about animals through mask-making templates to exploring geometry with printable shape activities, the learning possibilities are vast.

Where to Find Them

Websites such as Pinterest, Teachers Pay Teachers, or even museum sites often have collections of printables that can cater to various interests. Often organized by theme, season or educational content these resources are frequently updated with fresh designs.

Moreover, many blogs dedicated to parenting and early childhood education regularly offer new printable craft ideas that align with global celebrations like Earth Day or cultural events such as the Lunar New Year.

Types of Printable Crafts

Coloring pages remain classic options but extend beyond simple designs; many feature educational aspects like letters of the alphabet or scenes from history. Cutout masks enable role-play scenarios which are significant in social learning for young children. 3D paper models range from simple box animals for younger kids to intricate architectural landmarks for older crafters. Seasonal decorations help families update their home decor while sharing quality time together. Folding origami teaches patience and precision as well as aspects of another culture’s traditional crafts.

How to Use Them

The key is to select age-appropriate crafts that match your child’s interests. Always supervise young children when working with scissors or other tools required for assembling the crafts.

Create a dedicated crafting space where projects won’t be disturbed between crafting sessions. Store printables you’ve downloaded in a binder or folder so they’re easy to find for future use. This also helps reduce waste since unused sheets can be saved for later.

Furthermore, parents can integrate these activities within larger learning themes at home—for instance setting up a “science week” where printable crafts such as animal masks are combined with related educational videos or backyard explorations.

Closing Thoughts

Free printable craft templates provide a treasure trove of educational and enjoyable resources for families looking to infuse creativity into their routine without breaking the bank. Whether it’s through solo projects or collaborative family efforts, printable crafts promote valuable skills development while ensuring everyone has fun in the process.

DIY Christmas Wreath Template

The holiday season is upon us, which means it’s time for decorations, cheer, and the spirit of giving. There’s nothing quite as welcoming as a beautiful Christmas wreath on your front door. But why buy one when you can add a personal touch to your holiday décor by making your own? This article will walk you through creating a DIY Christmas wreath that will be the envy of your neighborhood this festive season.

Materials You’ll Need:

– A wreath base (foam ring, straw wreath, or wire ring)

– Greenery (real or artificial)

– Floral wire

– Wire cutters

– Decorations (ribbons, ornaments, pinecones, berry sprigs, etc.)

– Hot glue gun and glue sticks

– Optional: lights

Step 1: Prepare Your Wreath Base

Start by choosing your wreath base. Foam rings are perfect for indoor decorations and easy to pin items into. Straw wreaths are a good natural option, and wire rings work well if you’re going to layer lots of greenery. Clear any old decorations if you’re reusing a base.

Step 2: Add Greenery

Begin by cutting your greenery into manageable pieces using wire cutters. If using a foam base, you can pin or hot glue the stems directly onto the ring. For straw or wire bases, wrap floral wire around the stems and attach them securely to the base. Work your way around the ring until it’s fully covered.

Step 3: Arrange Decorations

Now comes the fun part – decorating! Arrange your ribbons, ornaments, pinecones, berries, etc., on your wreath before fixing them in place to get an idea of the final look. Once satisfied with your arrangement, use hot glue or floral wire to attach each piece securely to the greenery.

Step 4: Consider Lighting

If you want to make your wreath sparkle at night, consider weaving in some small battery-operated LED lights around the greenery.

Step 5: Finishing Touches

Lastly, inspect your wreath for any bare spots that may need additional foliage or decorations and secure any loose elements with extra floral wire or hot glue.

And just like that, you’ve created a unique and personalized Christmas wreath! Hang it on your door to greet guests with holiday cheer or use it as an eye-catching centerpiece for your Christmas dinner. Not only did you craft something special for this Christmas season, but you also made something that can be adapted and embellished each year to come.

Icebreakers An Exploding Gift Box: The Ultimate Mother’s Day Craft Idea

Icebreakers are essential tools that facilitate interaction and help people get to know each other better, whether in work meetings, team-building sessions, or classroom settings. An innovative and crafty take on the concept of icebreakers is the creation of an “Exploding Gift Box”. This captivating craft not only serves as a delightful icebreaker but also doubles as a charming gift idea – perfect for occasions like Mother’s Day.

The core principle behind an Exploding Gift Box is excitement and surprise; upon removing the lid, the box ‘explodes’ to reveal a plethora of messages, photos, and decorations that spread outwards. This explosion of memories and sweet nothings makes it an ideal personalized gift.

Making an Exploding Gift Box requires some crafting materials: cardstock, patterned paper, scissors, glue, and decorations such as stickers, ribbons, and photographs. To start with, you will need to create your base box by cutting cardstock into successively smaller squares which will be folded into boxes without tops or bottoms. These boxes are then attached to each other on one side so they nest snugly inside one another.

Each layer or tier of the box can contain hidden messages, small mementos, or pictures relevant to shared experiences or showcasing affection for your mother. Such a gift becomes a series of discoveries – each layer presents its own set of surprises that tell a story or convey emotion.

The beauty of the Exploding Gift Box lies in its flexibility; it can be as simple or complex as you wish. For an extra touch on Mother’s Day, perhaps include handwritten notes expressing gratitude or recalling fond memories. Decorate with colors your mother loves and consider using elements that have special meaning between you two.

Besides serving as a unique gift for Mother’s Day, creating an Exploding Gift Box can be turned into a group activity where family members contribute their own creations to the layers. This turns crafting into an interactive experience and unveils collective feelings towards the celebrated person – in this case, Mom.

In conclusion, an Exploding Gift Box is not just a craft but an encapsulation of treasured moments and emotions. It’s an intimate portrayal of affection – teasingly mysterious until unraveled – which makes it stand out as the ultimate Mother’s Day craft idea with the sentimental power that surpasses any store-bought gift.

DIY Mailbox Template

With the digital world taking over most of our communication, there’s something charmingly nostalgic about receiving a physical letter in the mail. And what better way to enhance that experience than with a mailbox that reflects your personal style? Designing and constructing your DIY mailbox can be a fun weekend project that adds appeal to your front yard and marks your home with unique flair.

Before starting this project, it’s important to check local regulations regarding mailbox specifications—there are typically rules about size, location, and construction to ensure mail delivery is not impeded.

Materials:

– Durable wood (cedar or pine are good choices) or metal sheeting

– Nails or screws

– Hinges (for the mailbox door)

– A latch or magnetic catch (to keep the door closed)

– Weather-resistant paint or sealant

– House numbers

– Other decorative elements as desired

Tools:

– Saw (if working with wood)

– Drill

– Screwdriver

– Measuring tape

– Paintbrushes

Step-by-Step Guide:

1. Planning: Sketch out your design on paper, including dimensions. Consider the size of your mail deliveries, the space available near the curb, and any design themes you wish to incorporate.

2. Cutting Out Parts: Based on your sketch, cut out each part of the mailbox. This typically includes the box body, door, floor, and back panel. If using wood, sand down rough edges for a cleaner finish.

3. Assembly: Start assembling by connecting the sides to the floor and back panel. Make sure everything is square before securing it with nails or screws.

4. Door Installation: Attach hinges to your door then secure it to the body of the mailbox ensuring it opens and closes smoothly.

5. Paint and Seal: Apply weather-resistant paint to protect against rain, snow, and sun damage. Once dried, apply an additional layer of sealant for extra durability.

6. Add Decorative Elements: Personalize with house numbers, patterns, or other decorations. Secure any added elements firmly in place.

7. Installation: Mount your DIY mailbox on a post near your curb following local postal guidelines for height and distance from the street.

Voilà! You’ve completed building a bespoke mailbox that adds practical charm to your front yard right in time for what might just be your new favorite snail mail.

How to Make a Space-themed Invitation to Play (Sensory Play)

Looking for a way to blast off into fun and learning? Creating a space-themed invitation to play is an excellent method for engaging children in sensory play while stimulating their imagination and curiosity about the cosmos. Here’s how you can set up an interstellar sensory experience.

Materials Needed:

1. A large, shallow container or sensory bin

2. Black beans or rice (for the “space” base)

3. Glitter and star confetti

4. Small toy astronauts, rockets, and spaceships

5. Glow-in-the-dark planets and stars

6. Moon sand (you can make this with flour and baby oil) for crater making

7. Space-themed silicone molds (stars, planets)

8. Blue or black playdough for asteroid-making

9. Tools like scoops, tweezers, and tongs for fine motor skills practice

10. A backdrop of space, which could be a printed image or cloth

Instructions:

1. Setup: Begin by filling the container with your black beans or rice to create the dark expanse of space. This will be your play base.

2. Add Sparkle: Mix in some glitter and star confetti to give it that cosmic sparkle. This will make your sensory bin look more like the Milky Way!

3. Space Toys: Place the toy astronauts, rockets, spaceships into the bin judiciously scattered across the surface to encourage discovery.

4. Celestial Bodies: Introduce the glow-in-the-dark planets and stars into the space base, burying some slightly below the surface so that children can excavate them during their play.

5. Moon Sand Craters: In a corner of the bin or in a separate container inside the bin, include moon sand so kids can mold craters and landscapes.

6. Silicone Molds & Playdough: Provide space-themed silicone molds along with blue or black playdough so children can create their own asteroids.

7. Fine Motor Fun: Add tools like scoops, tweezers, and tongs for manipulating items within the bin which is beneficial for developing fine motor skills.

8. Backdrops & Storytelling: Setting up your space backdrop behind or around your bin adds an extra layer of atmosphere prompting storytelling and role-playing.

Conclusion:

Having set up your stage for intergalactic exploration through sensory play, invite children to engage with this playful learning experience fully — let them scoop, dig, mold, sort and imagine their exciting space adventures! This invitation to play not only excites them about space but also educates through tactile learning and problem-solving activities within this imaginative thematic context.

Remember that sensory bins not only tap into a child’s senses but also enhance cognitive development by stimulating creativity as they discover and explore new ‘worlds.’ So gear up your little astronauts for some stimulating extraterrestrial entertainment!

Jellyfish Craft Template for Kids

Crafting can be a wonderful way for children to unleash their creativity and learn about the amazing creatures that dwell in our oceans. This article will guide you through creating a simple jellyfish craft template that can be a fun project for kids of all ages.

Materials:

– Colored paper or cardstock

– Tissue paper (various colors)

– Ribbon or yarn

– Scissors

– Glue stick

– Googly eyes (optional)

– Hole punch (optional)

Instructions:

1. Begin by downloading and printing the jellyfish body template on colored paper or cardstock. If you do not have a printer, you can draw a dome-shaped jellyfish body freehand.

2. Cut out the jellyfish body using scissors. This is an excellent opportunity for kids to practice their cutting skills.

3. Take different colors of tissue paper and cut them into strips to create the jellyfish tentacles. These strips can be straight, wavy, or even spiraled for an extra effect.

4. Glue one end of each tissue paper strip to the underside of the jellyfish body. Layering different colors can create a vibrant tentacle effect.

5. Using a hole punch, create two holes near the top of the jellyfish body if you wish to hang your craft later. If not, you can skip this step.

6. Cut lengths of ribbon or yarn and thread them through the punched holes to make a hanger for the jellyfish.

7. Add googly eyes to give personality to your jellyfish (you may also cut out eye shapes from paper if googly eyes are not available). Glue these onto the front of the body.

8. Display your finished jellyfish craft by hanging it or attaching it to walls as part of an undersea-themed room decoration.

This simple craft is not only enjoyable but also educational, as it can stimulate conversations about marine life and ocean conservation—making learning fun and hands-on! Plus, by using materials commonly found around the house, it’s an eco-friendly way to get creative.

Now that you have your own homemade jellyfish, you’ve added a beautiful piece to your kids’ arts and crafts collection! Enjoy watching these gentle sea creatures ‘float’ around, bringing a touch of underwater magic into your home.

Christmas Explosion Box – Decorative Square Templates

The Christmas season brings with it the joy of sharing gifts and creating memorable moments with loved ones. Among the myriad ways to present a gift, the Christmas Explosion Box stands out as a delightful and interactive option. An Explosion Box opens up to reveal layered decorative squares, each uniquely embellished to surprise and enchant the recipient.

Creating a Christmas Explosion Box is not just about giving a present; it’s an experience. With decorative square templates, anyone can transform paper into a personal, heartfelt explosion box. Let’s explore how these templates can enhance your festive gifting.

 Why Choose a Christmas Explosion Box?

1. Personal Touch: Unlike conventional gift wrapping, an explosion box can be personalized to reflect specific interests or memories associated with the person receiving the gift.

2. Creative Freedom: With decorative templates, you have the freedom to mix and match designs, colors, and textures to create a unique presentation.

3. Interactive Experience: The act of the box “exploding” to reveal its contents adds an element of surprise and fun that elevates the gifting experience.

 Selecting Your Template

Decorative square templates come in various themes ranging from traditional Christmas motifs such as reindeer, snowflakes, and Santa Claus, to more modern designs that include geometric patterns and abstract art.

When selecting your template:

– Consider the preferences of your recipient.

– Choose a color scheme that resonates with the festive season—reds, greens, golds are classics.

– Look for templates that offer different sizes of squares so that they layer nicely when assembled.

 Customization Tips

Here are some ideas on how to customize your explosion box:

– Use photographs within some squares to make it more personal.

– Incorporate stickers or 3D elements like bows or mini ornaments.

– Write heartfelt messages or quotes on some panels for an emotional touch.

– Embed small trinkets within the layers as additional surprises.

 Assembling Your Explosion Box

Assembling an explosion box is straightforward:

1. Print out your selected square templates on high-quality paper or cardstock.

2. Carefully cut them following the guidelines provided.

3. Fold along the lines to create sharp edges that will allow your box to hold its shape perfectly.

4. Use glue or double-sided tape to secure each layer in place.

5. As you stack layers into the box, ensure they decrease in size progressively to create the “exploding” effect.

6. Finally, decorate each square based on your chosen theme before placing your main gift at the center.

The result is a multi-dimensional piece of art that encloses your gift in layers of love and creativity.

 In Conclusion

The Christmas Explosion Box is more than just packaging; it’s an imaginative way to convey affection during this special time of year. With decorative square templates readily available, even those who consider themselves less artistically inclined can craft a beautiful explosion box that is sure to bring joy and amazement when it’s time for unwrapping gifts under the Christmas tree.

19 Valentine’s Day Craft Ideas & Fun Activities for the Classroom With an Educational Twist

Valentine’s Day in the classroom can be more than just a celebration of love and friendship; it can also be an opportunity for educational enrichment through engaging craft ideas and fun activities. Here are 19 Valentine’s Day craft ideas and activities with an educational twist that teachers and educators can use to enrich their students’ learning experiences:

1. Valentine’s Math Puzzles: Combine art with math by having students design puzzles with mathematical problems that, when solved, create a Valentine’s pattern.

2. Love Letter Writing Skills: Encourage students to write love letters or kind notes to family members, focusing on proper letter format, grammar, and punctuation.

3. Heart-Shaped Word Problems: Create word problems that involve adding or subtracting items related to Valentine’s Day, such as candy hearts or roses.

4. Science of the Heart: Explore the human heart with age-appropriate anatomy lessons and crafts, like creating a heart model from clay or paper.

5. Cultural Studies: Have a discussion about how love and friendship are celebrated in different cultures around the world and craft Valentine cards inspired by these traditions.

6. Valentine’s Vocabulary: Build vocabulary with Valentine’s Day-inspired words and ask students to create poems or short stories using them.

7. Historical Valentines: Research the history of Valentine’s Day and its significance while creating historical timelines as a craft project.

8. Symmetry Art: Use hearts to teach symmetry by creating perfectly symmetrical heart art projects using paint or collage materials.

9. Fractioned Hearts: Teach fractions with paper hearts cut into halves, thirds, or quarters, allowing students to mix and match to create whole hearts.

10. Valentine’s Day Science Experiment: Conduct simple science experiments like dissolving conversation hearts in various liquids to teach about solubility.

11. Geography of Love: Locate countries on a map where certain Valentine’s traditions originated from and design cards inspired by these locations.

12. Storytelling Through Art: Have students depict scenes from classic love stories or fairy tales known for their romantic themes on their crafts.

13. Acts of Kindness Chart: Encourage empathy by checking off acts of kindness done towards classmates throughout the month leading up to Valentine’s Day.

14. Love Bug Habitats: Create an environmentally-focused project where students build ‘habitats’ for love bugs (ladybugs) using recycled materials.

15. Geometry of Love: Explore geometric shapes through creating various heart sizes using rulers and protractors.

16. Learning Emotions with Emoticons: Use valentine emoticons to discuss emotions in a social-emotional learning session and create related artwork or emoji cards.

17. Puzzle Piece Poems: Teach figurative language by having each student write one line of a poem on a puzzle piece; then combine them together to see the full picture of collective creativity.

18. Secret Admirer Multiplication Games: Make multiplication practice fun with a game where each correct answer gives a clue to who the ‘secret admirer’ might be.

19. Biography Valentines: Choose a historical figure who showed great love for people, places, issues, etc., and create a valentine that represents their accomplishments or contribution to society.

These ideas not only celebrate the holiday but also reinforce key concepts across various subjects, making Valentine’s Day both fun and instructive for your classroom!